Contents
- 1 🌿 Why Huckleberry Jelly?
- 2 Ingredients & Equipment
- 3 Preparing Fresh Huckleberry Juice
- 4 Cooking the Jelly
- 5 Testing for Proper Set
- 6 Canning & Storage
- 7 Serving Ideas & Pairings
- 8 Recipe Variations & Tips
- 9 Troubleshooting Guide
- 10 Nutrition & Storage Notes
- 11 Frequently Asked Questions (FAQs)
- 12 Final Tips for Stunning Huckleberry Jelly
- 13 In Summary
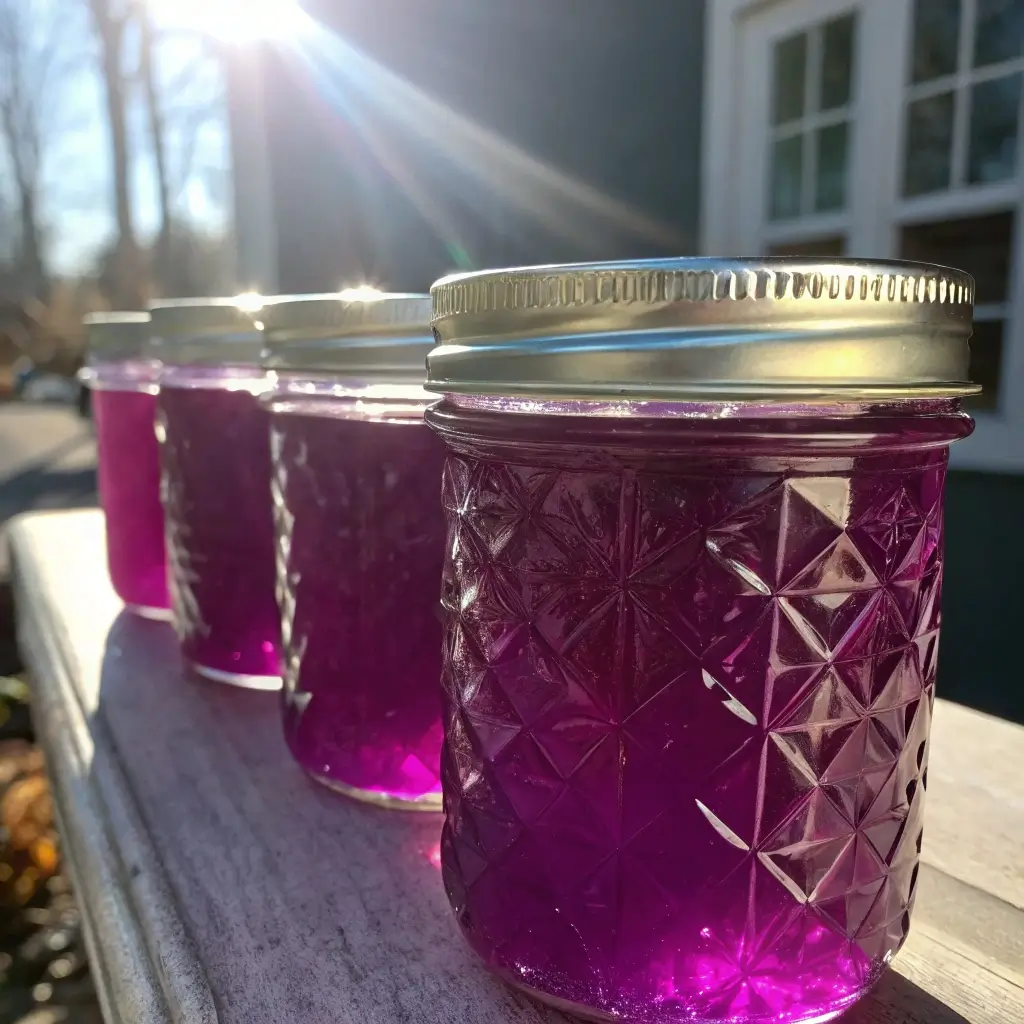
This huckleberry jelly recipe delivers a smooth, seedless spread with a bright jewel-like finish and a bold wild berry flavor. Perfect for people who love clear jellies with no bits, this recipe uses fresh huckleberry juice, sugar, and fruit pectin for a firm, spreadable texture. It’s great on PB&J, biscuits, or even over soft cheeses like brie. You’ll learn how to extract juice without losing flavor and how to test for proper set. Perfect for summer canning projects, homesteaders, or gifting jars during the holidays, this recipe guides you step by step—from choosing ripe huckleberries to finishing sealed jars that gleam like amethysts. With hints of wild mountain air and sun‑ripened sweetness, this homemade jelly is a showstopper on the breakfast table and a thoughtful handmade gift.
🌿 Why Huckleberry Jelly?
Huckleberries are nature’s little gems—wild, tangy, and bursting with color. Compared to cultivated berries, they have an intensely rich flavor and deeper color payoff. This recipe transforms fresh berries into a translucent, jewel-toned jelly that looks gorgeous on the shelf and tastes like summer captured in a jar. Additionally:
-
Pure wild flavor: No artificial colors or fillers—just deep purple brilliance.
-
Seedless clarity: Smooth texture ideal for jamming, topping, and gifting.
-
Versatility: Sweet enough for breakfast, refined enough for cheese boards.
Ingredients & Equipment
Ingredients (makes about 4–5 half‑pints)
| Ingredient | Amount |
|---|---|
| Fresh huckleberries | 4 cups (about 1 lb) |
| Granulated sugar | 4 cups |
| Water | 1 cup |
| Fruit pectin (powdered) | 1.75 oz (one pouch) |
| Fresh lemon juice | 2 Tbsp |
Equipment
-
Large heavy-bottomed saucepan or preserving kettle
-
Fine mesh strainer or jelly bag
-
Candy thermometer
-
Lids & rings for half‑pint jars
-
Canning pot or large stockpot with rack
-
Jar lifter, funnel, ladle, bubble remover (or plastic spatula)
Preparing Fresh Huckleberry Juice
Step 1 – Rinse & Sort Berries
Pick through your huckleberries to remove leaves, stems, and damaged fruit. Rinse gently under cold water in a colander. Shake off excess moisture.
Step 2 – Cook Berries
In a clean saucepan, combine berries with 1 cup of water. Bring to a gentle simmer over medium heat, stirring occasionally. Cook about 8–10 minutes, until berries are soft and liquid begins releasing.
Step 3 – Extract Juice (Seedless & Smooth)
-
Option A: Strainer method
Pour cooked berries into a fine mesh strainer set over a large bowl. Use the back of a spoon to press juice—avoid forcing pulp through. -
Option B: Jelly bag method
Line a strainer with two layers of cheesecloth or a jelly bag. Let juice drip slowly for 30–45 minutes (no squeezing).
Juice Yield Tip
From 4 cups of berries, expect 2½–3 cups of juice. If short, collect more juice from additional berries to reach 3 cups.
Cooking the Jelly
Step 4 – Combine Juice, Pectin & Lemon
Return 3 cups of huckleberry juice to a clean saucepan. Whisk in powdered pectin until fully dissolved to avoid clumping. Add 2 Tbsp of fresh lemon juice—this boosts flavor and helps set.
Step 5 – Add Sugar & Heat
Gradually stir in 4 cups of sugar, whisking constantly. Heat mixture over high heat until it reaches a full rolling boil (cannot be stirred down).
Step 6 – Boiling Time
Once a full boil is achieved, maintain for 1 minute. Stir constantly to prevent scorching. Remove from heat immediately.
Testing for Proper Set
Step 7 – Plate Test
Drop a small spoonful of jelly onto a chilled saucer. Return to freezer 1 minute. If the surface wrinkles when nudged, the set is ready. If still runny, return to boil for another minute and retest.
Step 8 – Thermometer Method
Alternatively, use a candy thermometer. Read temperature—220 °F (104 °C) means the jelly is typically set-ready at sea level. At higher altitude, add 2 °F for every 1,000 ft above.
Canning & Storage
Step 9 – Prepare Jars
While cooking, heat jars in simmering water (180 °F) to keep warm. Warm lids according to manufacturer instructions. Always use sterilized, non-cracked jars.
Step 10 – Fill & Remove Air Bubbles
Using a canning funnel, fill jars, leaving ¼″ headspace. Use a non-metallic bubble remover to slide around the inside to release trapped air.
Step 11 – Wipe, Seal, & Process
Wipe jar rims clean and center lids. Screw on rings finger-tight. Lower jars into boiling water bath (layers if needed), ensuring 1–2″ of water above lids. Process for 10 minutes at sea level; add 1 minute for every 1,000 ft altitude.
Step 12 – Cool & Label
Lift jars and cool on a towel undisturbed for 12–24 hours. Lids should “pop” flat—no give when pressed. Label with date and contents. Store in a cool dark place for up to 18 months.
Serving Ideas & Pairings
Breakfast Bliss
-
Spread over toast, English muffins, or croissants
-
Stir into plain yogurt or oatmeal
Sweet & Savory Combos
-
Dollop on Brie or Camembert
-
Glaze grilled chicken or pork (for non‑vegetarian eaters)
Decadent Desserts
-
Use as a layer in thumbprint cookies
-
Swirl into cheesecake batter before baking
-
Mix with whipped cream as a fruity filling
Recipe Variations & Tips
Mixed Berry Jelly
Add 1 cup blackberries or blueberries to huckleberries for layered flavor. Juice ratio remains the same.
Reduced Sugar Option
Use low/no-sugar pectin and reduce sugar by 25–30%; follow manufacturer’s instructions for setting.
Alcohol-Free Vanilla
Stir in 1 tsp high-quality vanilla extract after removing from heat for a warm vanilla note.
Spicy Jelly Twist
Infuse juice with a small piece of jalapeño or cinnamon stick during cooking. Remove before jelling.
Troubleshooting Guide
| Issue | Possible Cause | Fix |
|---|---|---|
| Jelly too runny | Underboiled | Boil 1–2 more minutes and retest |
| Jelly too firm/thick | Overcooked or too much pectin | Reduce boiling time or pectin next batch |
| Cloudy appearance | Fruit residue escaped mesh | Use finer strainer; avoid squeezing pulp into juice |
| Sugar crystals on top | Incomplete dissolution at boiling point | Keep at full boil longer, stir thoroughly |
| Lids do not seal | Jar rim dirty, insufficient heat processing | Ensure clean rims, correct bath time, hot jars/lids |
Nutrition & Storage Notes
-
Nutrition (per Tbsp): ~50 kcal, 13 g sugar (all natural), trace vitamins and minerals from berries
-
Storage: Unopened jars stay fresh 12–18 months. After opening, refrigerate and use within 1 month
-
Canning Safety: For high-acid preserves (fruits, jams, jellies), boiling water bath is safe. Don’t use pressure canning.
Frequently Asked Questions (FAQs)
How do I know my huckleberries are ripe?
Ripe huckleberries are deep purple to black, not red. They come easily off the stem with a slight tug and have a firm texture with sweet-tart flavor.
Can I use frozen huckleberries?
Yes! Thaw completely, then simmer to extract 3 cups of juice. You may need to strain less, since frozen berries burst during thawing.
Why is there pectin in this recipe?
Commercial powdered pectin helps ensure a consistent, firm set while preserving the berry’s vibrant clarity. Without it, the jelly may remain runny.
Is the jelly suitable for vegetarians?
Absolutely—this recipe contains no animal products or alcohol, making it vegan- and vegetarian-friendly.
Can I double or halve the recipe?
Yes. Maintain the juice-to-pectin-to-sugar ratio. Halving is straightforward; for doubling, ensure your saucepan is large with room to boil vigorously.
How can I prevent foam during boiling?
A skim of butter (¼ tsp) added when boiling begins helps reduce foam, though some naturally may form—skim gently with a spoon.
What’s the advantage of the “plate test” vs. thermometer?
The plate test accounts for sugar concentration and altitude. Thermometer readings can fluctuate with altitude: at 5,000 ft, jelly sets around 227 °F, not 220 °F.
My jars are foggy—safe to eat?
Fogging can result from minerals in water used for processing. The jelly should still be safe—rinse jars before serving. Alternatively, use distilled water for canning baths.
Final Tips for Stunning Huckleberry Jelly
-
Choose top-quality berries – fresher = clearer, brighter color
-
Strain carefully – clarity depends on fine straining
-
Boil at FULL rolling boil – for true set
-
Test before canning – plate test gives confidence
-
Cool undisturbed – avoids clouding and ensures proper seal
In Summary
This homemade huckleberry jelly is a celebration of wild-harvested goodness—rich, clear, jewel-toned, and bursting with flavor. With simple pantry ingredients, a few tools, and this step‑by‑step guide, you’ll produce stunning, seedless jelly perfect for any occasion. Whether on morning toast, elegant cheese boards, or thoughtfully shared as gifts, it brings a piece of wilderness magic to every table. Dive into summer canning, trust the process, and enjoy the sweet rewards!
Happy jarring and jelly‑making! 🍁
")


