Contents
- 1 Why This Roast Method Is Perfect for Beginners
- 2 Choosing the Right Beef Roast
- 3 Ingredients You’ll Need
- 4 Tools You’ll Need
- 5 Preparing Your Beginner-Friendly Oven Roast
- 6 Roasting the Meat Step-by-Step
- 7 Resting the Roast for Perfect Results
- 8 Carving and Serving Your Oven Roast
- 9 Perfect Side Dishes for Special Occasions
- 10 Flavor Variations for Creativity and Personal Taste
- 11 Making a Simple Pan Sauce (No Alcohol)
- 12 Storing Leftovers
- 13 Reheating Without Drying Out
- 14 Troubleshooting for Beginners
- 15 Frequently Asked Questions
- 16 Final Thoughts
A well-made oven roast is one of the most timeless dishes you can prepare for a special occasion. Whether you’re hosting a holiday dinner, celebrating a milestone, or simply gathering loved ones around the table, a beautifully cooked roast stands as a warm, comforting centerpiece that feels both elegant and inviting. But for many beginners, roasting can seem intimidating—large cuts of meat, long cooking times, temperature management, and the pressure of feeding a crowd all add up.
This guide is designed to remove that intimidation completely. It’s a beginner-friendly oven roast method that walks you through every step in plain, simple language. No complex culinary techniques. No elaborate preparation. No alcohol-based sauces. No specialized equipment required. Just a dependable, balanced, and flavorful technique that anyone can master, even if it’s their first time preparing a roast.
The goal is confidence. You’ll learn how to select the best cut of beef, season it simply but effectively, roast it evenly, test for doneness, rest the meat correctly, and slice it for maximum tenderness. You’ll also discover helpful tips, side dish ideas, flavor variations, and problem-solving advice so you can feel fully prepared.
Whether you’re hosting your first holiday dinner or planning a special meal for family and friends, this oven roast method ensures an impressive, satisfying result every time.
Let’s begin building your new go-to special occasion roast.
Why This Roast Method Is Perfect for Beginners
This recipe keeps everything straightforward without sacrificing flavor or presentation. Even if you’re not an experienced cook, you’ll end up with a juicy, tender roast that slices beautifully and pairs effortlessly with classic side dishes.
Main Benefits
Simple seasoning approach
The flavor relies on basic pantry staples—salt, pepper, garlic, herbs, and a bit of olive oil.
Consistent results
Using a moderate oven temperature ensures even cooking from edge to center.
No complicated preparation
No searing in a pan, no basting with liquids, and no advanced tools.
Perfect for special occasions
Despite its simplicity, the final presentation is elegant and impressive.
Beginner-proof temperature guidance
A meat thermometer removes the guesswork.
This recipe prioritizes ease without sacrificing the look or taste of a dish meant for celebrations.
Choosing the Right Beef Roast
Not all cuts cook the same way, and choosing the right roast can make all the difference. For beginners, the best choices are forgiving, cook evenly, and don’t require advanced techniques.
Best Cuts for This Recipe
Top Sirloin Roast
-
Excellent balance of tenderness and flavor
-
Affordable and beginner-friendly
-
Reliable cooking performance
Ribeye Roast (Boneless)
-
Rich, flavorful, and juicy
-
A premium option for big celebrations
-
Naturally tender
Chuck Roast (Oven-Roast Style)
-
Becomes extremely tender when roasted slowly
-
Great for comfort-style meals
-
Works well with this method if cooked slightly longer
Beef Tenderloin Roast
-
Very tender and cooks quickly
-
Ideal for elegant dinners
-
Mild flavor enhanced by simple seasonings
Bottom Round or Eye of Round
-
More budget-friendly
-
Benefits from gentle cooking and proper slicing
-
Great option when feeding many guests
Each roast works with the same method, though cooking times may vary slightly depending on shape and thickness.
Ingredients You’ll Need
This is a simple recipe designed to let the natural flavor of the beef shine.
Main Ingredients
-
1 beef roast (3–5 pounds)
-
2–3 tablespoons olive oil
-
1 tablespoon kosher salt
-
1 tablespoon ground black pepper
-
1 tablespoon garlic powder
-
1 teaspoon onion powder
-
1 teaspoon dried thyme
-
1 teaspoon dried rosemary
-
1 teaspoon paprika (optional for color)
Optional Additions
-
4 cloves fresh garlic, minced
-
1 teaspoon dried parsley
-
1 teaspoon smoked paprika for extra depth
These seasonings create a balanced, flavorful crust without overwhelming the natural richness of the meat.
Tools You’ll Need
You don’t need professional cooking tools to make a perfect roast.
-
Roasting pan or baking dish
-
Oven-safe rack (optional)
-
Aluminum foil
-
Sharp carving knife
-
Meat thermometer
-
Cutting board
-
Small mixing bowl
Even if you skip the rack, the roast will still turn out delicious.
Preparing Your Beginner-Friendly Oven Roast
The secret to making a perfect special-occasion roast is proper preparation—simple but essential steps that ensure even cooking and a beautiful crust.
Let the Roast Come to Room Temperature
Remove the roast from the refrigerator 1–2 hours before cooking.
This helps the meat cook evenly, avoiding a cold center and overcooked edges.
Pat the Roast Dry
Use paper towels to remove surface moisture.
Dry meat helps seasonings adhere and creates a better crust.
Prepare the Seasoning Mixture
In a small bowl, mix:
-
Olive oil
-
Salt
-
Pepper
-
Garlic powder
-
Onion powder
-
Rosemary
-
Thyme
-
Paprika
The result is a fragrant, flavorful paste that spreads easily over the roast.
Season the Meat Generously
Rub the mixture over every surface of the roast:
-
Top
-
Bottom
-
Sides
-
Edges
Spend a few seconds pressing the herbs into the meat so they stick.
Let the roast rest with its seasonings while the oven preheats.
Roasting the Meat Step-by-Step
This method is intentionally simple: one consistent temperature and just a few checks.
Preheat the Oven
Set your oven to 325°F (163°C).
This temperature is ideal for:
-
Gentle, even cooking
-
Preventing dryness
-
Allowing beginners more control
Set Up the Roast
Place the roast on:
-
A roasting rack
or -
Directly in a roasting pan
Fat-side-up is ideal if your roast has a natural fat cap.
As it cooks, the fat melts over the meat, helping keep it moist.
Insert the Thermometer
Place your thermometer in the thickest part of the roast, avoiding fat pockets or bone.
Cook Times (Approximate)
Plan on:
15–20 minutes per pound at 325°F.
But time is only a guide—temperature is the true measure of doneness.
Internal Temperature Guide
-
Rare: 120°F (very pink inside)
-
Medium-rare: 130°F (warm pink center; most recommended)
-
Medium: 140°F (slightly pink center)
-
Medium-well: 150°F (lightly colored center)
-
Well-done: 160°F (fully cooked, no pink)
Remove the roast when it’s 5–10 degrees below your target, as it will continue cooking while resting.
Resting the Roast for Perfect Results
Resting is a crucial step that beginners often skip—but it makes all the difference.
Why Rest the Roast?
Resting allows juices to redistribute, giving you:
-
Juicier slices
-
Even texture
-
Better flavor
How to Rest Properly
Remove the roast from the oven and:
-
Tent loosely with foil
-
Let rest for 20–25 minutes
Avoid wrapping too tightly, or the crust will become soft.
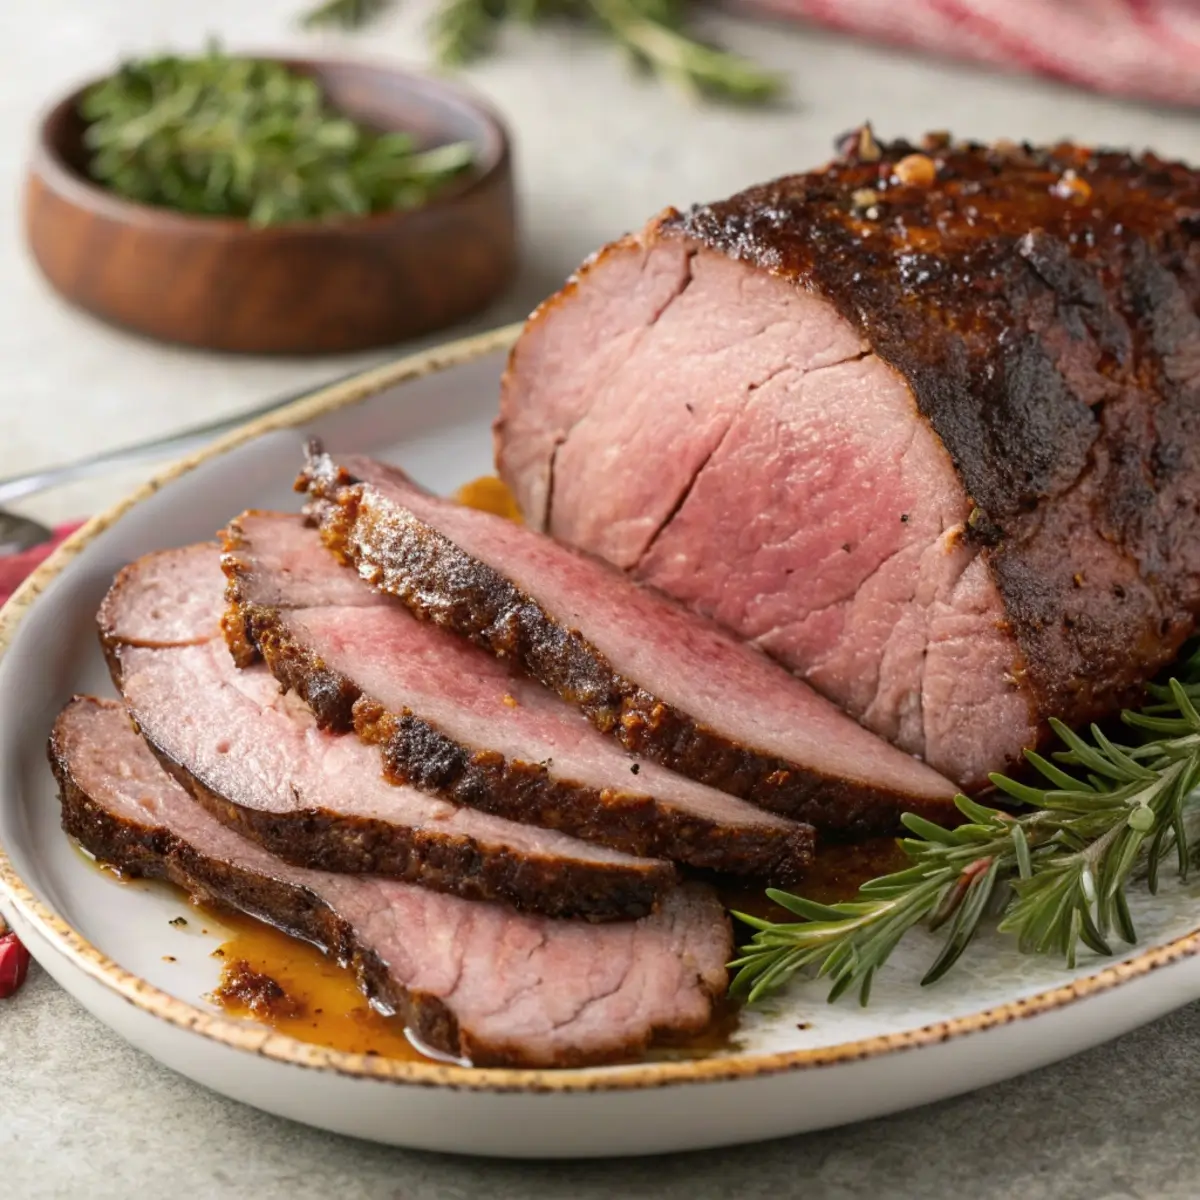
Carving and Serving Your Oven Roast
A properly carved roast is easier to serve and more enjoyable to eat.
How to Slice
-
Place the roast on a stable cutting board.
-
Use a long, sharp carving knife.
-
Slice against the grain (perpendicular to the lines in the meat).
-
Cut into even slices, thick or thin depending on your preference.
Presentation Tips
-
Arrange slices neatly on a platter.
-
Spoon a little warm cooking juice over the top.
-
Garnish with fresh herbs for a pop of color.
With simple seasoning and careful roasting, the slices will look elegant with very little effort.
Perfect Side Dishes for Special Occasions
Your roast becomes even more impressive when paired with sides that complement its flavors.
Classic Comfort Sides
-
Mashed potatoes
-
Creamy cauliflower puree
-
Roasted baby potatoes
-
Glazed carrots
-
Sautéed green beans
Light and Fresh Options
-
Mixed greens salad
-
Garlic-steamed broccoli
-
Citrus herb salad
-
Roasted asparagus
Warm Bread and Extras
-
Soft dinner rolls
-
Garlic butter baguette
-
Herb-seasoned rice
All of these pair beautifully with the simplicity of the roast.
Flavor Variations for Creativity and Personal Taste
Even though this recipe is beginner-friendly, you can customize it easily.
Herb-Lemon Roast
Add 1 tablespoon lemon zest to the seasoning paste.
Garlic Butter Roast
Use softened butter in place of half the olive oil.
Peppercorn Roast
Add 1 teaspoon cracked black pepper for a bolder bite.
Smoky Roast
Add ½ teaspoon smoked paprika and ¼ teaspoon cumin.
Slow-Roast Option
Cook at 250°F for a longer time to create an ultra-tender roast (best for lean cuts).
These variations maintain the simple nature of the recipe while allowing you to adapt it to different meals or seasons.
Making a Simple Pan Sauce (No Alcohol)
After removing the roast from the pan, you can create a quick, flavorful sauce using only broth and seasonings.
Steps
-
Place the roasting pan on the stove.
-
Add 1–2 cups beef broth.
-
Heat on medium, scraping up any browned bits.
-
Simmer for 5 minutes.
-
Season with salt and pepper.
This creates a rich, natural jus that keeps the no-alcohol requirement intact.
Storing Leftovers
A good roast can extend into several delicious meals.
Refrigeration
Store sliced leftover roast in airtight containers for 3–4 days.
Freezing
Wrap tightly and freeze for up to 2 months.
Thaw overnight in the refrigerator.
Reheating Without Drying Out
To keep your leftovers tender:
-
Reheat in the oven at 250°F for 10–15 minutes
-
Add a splash of broth to keep it moist
-
Avoid microwaving unless using short intervals
Troubleshooting for Beginners
Even simple recipes can come with challenges. Here’s how to fix the most common issues:
The roast is dry
-
It likely cooked too long.
-
Slice thin and serve with extra jus or broth.
The crust didn’t brown
-
The roast may have been too wet before seasoning.
-
Next time, pat dry more thoroughly.
The center is undercooked
-
Return to the oven at 300°F and check every 5 minutes.
The meat thermometer was inaccurate
-
Always insert it into the thickest part.
-
Avoid touching fat or touching the pan.
The seasoning seemed too mild
-
Increase salt or garlic slightly next time.
-
Different cuts absorb seasoning differently.
Frequently Asked Questions
Can I prepare the roast ahead of time?
Yes. Season it up to 24 hours before cooking and refrigerate uncovered for better crust formation.
Should I sear the roast first?
It’s optional. This beginner-friendly recipe skips the searing step without sacrificing flavor.
Can I add vegetables to the roasting pan?
Absolutely. Carrots, potatoes, onions, and celery all roast beautifully.
Do I need a roasting rack?
No. It helps with airflow but isn’t required.
What’s the best doneness for serving a crowd?
Medium or medium-rare are most popular for tenderness and flavor.
Can I use fresh herbs?
Yes. Use twice the amount of fresh herbs compared to dried.
How do I know when the roast is done?
Always rely on a meat thermometer rather than cooking time.
Can I use oil other than olive oil?
Yes. Avocado oil is a good alternative.
Is this recipe suitable for holidays?
Absolutely—its simplicity makes it ideal for stress-free hosting.
Final Thoughts
A beginner-friendly oven roast is one of the most dependable dishes you can prepare for holidays and special occasions. With simple ingredients, clear steps, consistent temperatures, and a strong emphasis on ease, this recipe helps even the most inexperienced cook create a tender, flavorful main dish that feels truly celebratory.
Whether you’re serving it at Christmas, family gatherings, milestone dinners, or quiet at-home celebrations, this roast delivers reliability, elegance, and comforting flavor. It’s the kind of dish that brings people together, anchors a memorable meal, and gives home cooks the confidence to host with ease.
")


