Contents
- 1 The Magic of Turning Discard Into Delicious
- 2 Gathering Your Ingredients (And Why They Matter)
- 3 Baking Tools You’ll Need
- 4 Step-By-Step: Mixing with Intention
- 5 Variations to Keep It Fresh
- 6 Storage and Reheating Wisdom
- 7 Common Banana Bread Blunders
- 8 Your Banana Bread Questions Answered
- 9 A Last Slice of Advice
The Magic of Turning Discard Into Delicious
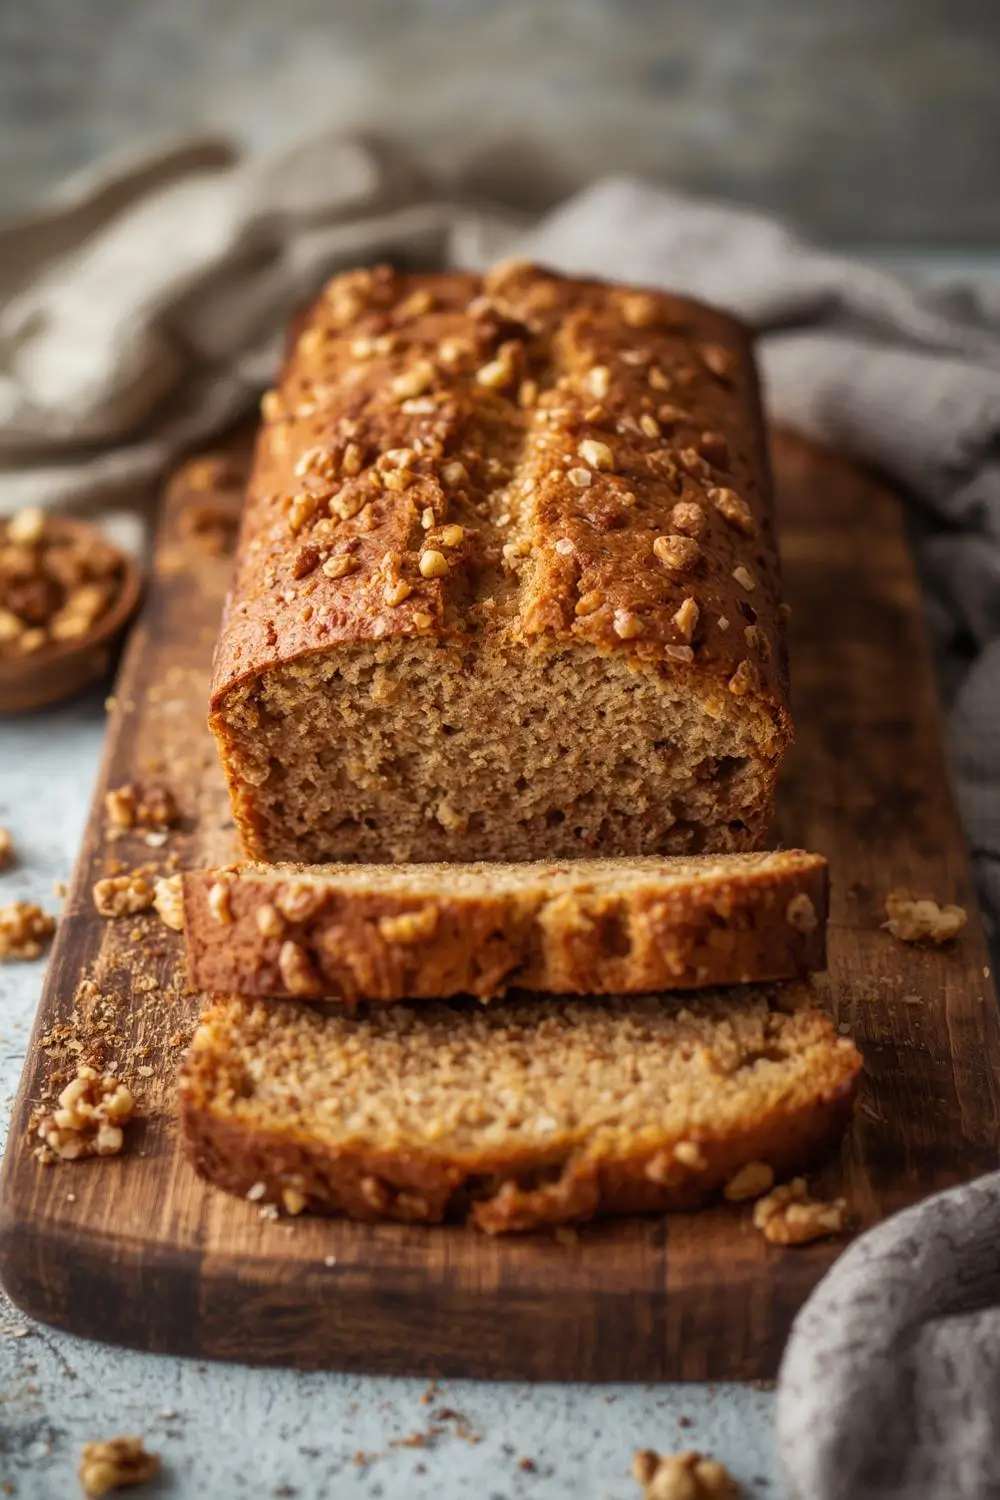
You know that moment when your bananas go from bright yellow to speckled brown almost overnight? And your sourdough starter container looks at you with those sad, discarded eyes? This recipe is your delicious solution. Let’s transform what might seem like kitchen cast-offs into the most wonderfully moist banana bread you’ve ever tasted – with a subtle tangy twist that’s downright addictive.
Having tested this recipe over two dozen times (my neighbors can confirm!), I can promise you this sourdough discard banana bread requires zero fancy equipment and delivers big flavors. The starter discard not only reduces waste but creates an exceptionally tender crumb while balancing the sweetness perfectly. We’re talking golden edges, a crackly top crust, and that heavenly aroma that makes your whole kitchen smell like a warm hug.
Why This Recipe Will Become Your New Favorite
- No mixer needed – Just two bowls and a sturdy spoon
- Uses common pantry staples – No obscure ingredients
- Moist for days – Thanks to sourdough’s magic
- Adjustable sweetness – Perfect control over sugar levels
- Insanely versatile – Nuts, chocolate, or keep it classic
Gathering Your Ingredients (And Why They Matter)
Let’s talk about each component before we start mixing. Understanding why we use these particular ingredients helps troubleshoot later:
The Wet Team
- Overripe bananas (1 1/3 cups mashed) – The blacker the better! Enzymes develop as bananas ripen, creating natural sweetness and moisture. True story: I once used bananas so ripe they were leaking – perfect!
- Sourdough discard (1/2 cup) – Use straight from the fridge or room temp. Hydration (100% vs. stiff starter) doesn’t significantly impact this recipe.
- Melted butter (1/2 cup) – Provides richness. For dairy-free, coconut oil works beautifully but expect subtle coconut notes.
- Light brown sugar (3/4 cup) – The molasses content adds depth. Pack it firmly like you’re building a sandcastle.
- Large eggs (2) – Bring to room temperature! Cold eggs re-solidify melted butter.
- Pure vanilla extract (2 tsp) – Skip imitation. The good stuff makes a noticeable difference.
The Dry Crew
- All-purpose flour (1 3/4 cups) – Don’t pack your measuring cup! Fluff flour first, spoon in, level off.
- Baking soda (1 tsp) – Our main leavening agent. Check expiration dates – old soda = flat bread.
- Ground cinnamon (1 tsp) – Warming spice that complements the sourdough tang.
- Fine sea salt (1/2 tsp) – Enhances all flavors. Reduce slightly if using salted butter.
Baking Tools You’ll Need
This is a gloriously low-tech recipe. You’ll require:
- 9×5 inch loaf pan (metal preferred over glass)
- Parchment paper (for easy removal)
- Two mixing bowls (one large, one medium)
- Potato masher or fork (for banana smashing)
- Rubber spatula
- Cooling rack
- Thin kitchen towel (for the “steam tent” trick)
Step-By-Step: Mixing with Intention
Follow these steps carefully for consistent results every time:
1. Prep Like a Pro
Position oven rack in the center and preheat to 350°F (175°C). Line your loaf pan with parchment paper, leaving a 2-inch overhang on both long sides – this creates handles for easy lifting later. Melt butter gently in microwave (use short bursts) or small saucepan. Let cool slightly while you prepare other ingredients.
2. Banana Transformation Station
Peel bananas into your large mixing bowl. Mash with vigor! You want minimal chunks – aim for baby food consistency. Add slightly cooled melted butter and stir vigorously for 1 minute. This emulsifies the fats.
3. The Sweet Additions
Add brown sugar to banana mixture. Stir 50 strokes – yes, count them! This dissolves sugar crystals. Crack in eggs one at a time, incorporating fully after each. Pour in vanilla and sourdough discard. Stir until you have a homogeneous, slightly lumpy batter.
4. Dry Team Assemble!
In your medium bowl, whisk flour, baking soda, cinnamon, and salt until thoroughly combined – about 45 seconds. Tiny brown flecks (spices) should be evenly distributed.
5. The Critical Merge
Dump dry ingredients into wet bowl. Use your spatula in a folding motion: scrape from bottom up, rotate bowl 90 degrees, repeat. Stop when just combined – streaks of flour are okay! Overmixing develops gluten, making bread tough.
For fold-ins: Now’s the time! Gently stir in 3/4 cup of walnuts, chocolate chips, or a mix.
6. Baking Magic Happens
Pour batter into prepared pan. Tap pan firmly on counter 5 times to release air bubbles. Bake 55-70 minutes. Why the wide range? Ovens lie! Start checking at 50 minutes:
- Cracked center should look dry
- Edges pull slightly from pan
- Toothpick shows a few moist crumbs (not wet batter)
7. The Steam Tent Secret
Remove loaf from oven. Immediately drape with clean kitchen towel. This traps escaping steam, keeping the crust soft. Cool in pan on wire rack 15 minutes before removing via parchment handles. Cool completely (2 hours!) before slicing – I know, it’s torture!
Variations to Keep It Fresh
Once you master the base recipe, try these twists:
Flavor Boosters
- Toasted coconut: Mix 1/2 cup into batter + sprinkle on top before baking
- Cinnamon sugar crust: Brush top with melted butter, sprinkle 1 tbsp sugar + 1 tsp cinnamon
- Espresso kick: Add 1 tsp instant espresso powder to dry ingredients
Mix-In Mania
- Chopped pecans + dried cranberries
- White chocolate chunks + macadamia nuts
- Semi-sweet chocolate chips + orange zest (1 tsp)
Dietary Twists
- Gluten-free: Use 1:1 GF flour + 1/4 tsp xanthan gum
- Vegan: Replace eggs with 1/2 cup applesauce + 2 tbsp ground flax
- Lower sugar: Reduce brown sugar to 1/2 cup + add 1 tbsp maple syrup
Storage and Reheating Wisdom
Proper storage maintains that magical texture:
Room Temperature
After cooling completely, wrap loaf tightly in beeswax wrap or foil. Keep on counter up to 3 days. Always slice as needed to preserve moisture.
Refrigerator Hack
Placed in airtight container, the bread lasts 1 week. The cold makes it denser – toast slices in dry skillet to revive.
Freezing Instructions
- Whole loaf: Double-wrap in plastic, then foil. Freeze up to 3 months. Thaw overnight in fridge.
- Single portions: Slice, place parchment between slices, freeze in bag. Toast frozen slices directly!
Reviving Leftovers
Day-old bread? Transform it:
- French toast dredge (dip in egg/milk mixture)
- Bread pudding base
- Grilled “banana bread” sandwiches with cream cheese
Common Banana Bread Blunders
Avoid these frequent mistakes:
Mistake 1: Under-ripe Bananas
Yellow bananas = starchy taste. Wait for brown spots! Speed-ripen: bake whole bananas (peel on!) at 300°F for 15-20 minutes until blackened.
Mistake 2: Cold Eggs
They seize up melted butter, creating greasy pockets. Solve: place eggs in warm water 15 minutes before baking.
Mistake 3: Overmixing
Leads to tunnel-like holes and dense bread. Mix until just combined – better to have a streak of flour than overdo it.
Mistake 4: Wrong Pan Size
Using 8×4 instead of 9×5 causes overflow. No proper pan? Bake in muffin tins (18-22 minutes) or divide into two small loaves.
Mistake 5: Skipping the Steam Tent
That towel creates a humid environment, preventing the crust from hardening too much. Don’t skip this step!
Your Banana Bread Questions Answered
Can I use active sourdough starter instead of discard?
Absolutely! The discard simply refers to unfed starter. Active starter behaves similarly in this recipe since we’re not relying on its rise.
My discard is very thick – does that matter?
Not significantly. Thicker discard might make the batter slightly denser – just ensure it’s well incorporated. If using stiff starter, add an extra tbsp milk if batter looks dry.
Can I use frozen bananas?
Yes! Thaw completely in fridge, drain excess liquid, then mash. Frozen bananas often yield sweeter bread due to cell breakdown during freezing.
Why did my bread sink in the middle?
Typically indicates underbaking or opening the oven door too early. Use an oven thermometer to verify temperature accuracy. Resist peeking for first 45 minutes!
Can I substitute other sugars?
Granulated white sugar works but expect a less moist result. Coconut sugar adds caramel notes but darkens the bread. Avoid liquid sweeteners like honey unless adjusting flour.
How do I know when bananas are ripe enough?
Beyond brown spots – the peel should feel thin, fruit should smell intensely sweet, and you should easily mash it with minimal pressure.
A Last Slice of Advice
This sourdough discard banana bread isn’t just another recipe – it’s your new secret weapon against food waste and sad, uneaten bananas. That jar of discard in your fridge? It’s not refuse; it’s golden potential waiting to transform into a moist, tangy-sweet loaf that makes ordinary days feel special.
Next time your starter looks lonely and those bananas get too spotty, remember this magic formula. Share a slice with neighbors (they’ll love you), pack it in lunchboxes, or enjoy it toasted with a smear of creamy butter on lazy weekend mornings. Happy baking – may your kitchen always smell of cinnamon and possibility!
")


