Imagine waking up on a lazy Sunday, the scent of warm cinnamon and buttery dough filling your kitchen, and finding perfectly golden, gooey cinnamon rolls waiting to be devoured. No frantic mixing, kneading, or rising at 6 AM. This is the magic of make-ahead cinnamon rolls. They’re the ultimate crowd-pleaser for brunch, offering the taste of freshly baked perfection without the early morning hustle. Whether you’re hosting family, friends, or just craving a special weekend treat, these rolls deliver pure, comforting joy. Let’s dive into creating this bakery-worthy delight together.
Why Make-Ahead Cinnamon Rolls Rock:
- Stress-Free Hosting: Bake them the night before, refrigerate, and pop them in the oven when guests arrive. Your morning is free for coffee and conversation.
- Perfect Texture: Baking them fresh ensures that irresistible, slightly crisp exterior gives way to a soft, pillowy, cinnamon-swirled center.
- Customizable: Swap fillings, adjust sweetness, or make them dairy-free with simple swaps.
- Make-Ahead Magic: The dough can be prepared, shaped, and even partially baked ahead, giving you maximum flexibility.
- Crowd-Pleasing: Everyone loves a warm, sweet roll with coffee or milk. It’s a guaranteed hit.
The Heart of the Recipe: Ingredients Explained
Creating these rolls starts with understanding each component. Don’t be intimidated; this is beginner-friendly!
For the Dough:
Warm Milk (1 cup): This activates the yeast. Use whole milk for richness, but 2% works fine. Why warm?* Cold milk won’t activate the yeast properly. Aim for about 110°F (43°C) – warm to the touch, not hot.
- Active Dry Yeast (2 1/4 tsp or 1 packet): The leavening agent that makes the dough rise. Ensure it’s fresh!
- Granulated Sugar (1/4 cup): Feeds the yeast and adds a touch of sweetness to the dough.
- Salt (1 tsp): Balances the sweetness and enhances flavor.
- Large Eggs (2), Room Temperature: Adds richness, structure, and moisture. Room temperature eggs incorporate better.
- Unsalted Butter (1/2 cup), Melted and Slightly Cooled: Provides flavor and tenderness. Don’t skip this!
- All-Purpose Flour (4 1/2 cups, plus more for dusting): The base. You might need a bit more or less depending on humidity. The dough should be soft but not sticky.
For the Cinnamon Sugar Filling:
- Brown Sugar (3/4 cup, packed): Adds deep molasses notes and moisture.
- Ground Cinnamon (2 tbsp): The star flavor. Use a good quality cinnamon.
- Unsalted Butter (1/4 cup), Softened: Creates a spreadable, flavorful layer.
- Salt (1/4 tsp): Enhances the cinnamon flavor.
For the Cream Cheese Frosting (Optional but Recommended):
- Cream Cheese (8 oz), Softened: The creamy base.
- Unsalted Butter (1/4 cup), Softened: Adds richness.
- Vanilla Extract (1 tsp): Brightens the flavor.
- Powdered Sugar (2 cups): Sweetens and thickens the frosting. Adjust to taste.
Essential Equipment:
- Stand mixer with dough hook (or large bowl and sturdy spoon)
- Large mixing bowls
- Plastic wrap
- Rolling pin
- Baking sheet or 9×13 inch baking dish
- Parchment paper
- Sharp knife or dental floss (for clean cuts)
- Wire cooling rack
Step-by-Step: From Bowl to Oven
1. Activate the Yeast (10-15 mins):
* In a large bowl or stand mixer bowl, combine warm milk, 1 tsp of the granulated sugar, and the yeast. Stir gently. Let it sit undisturbed for 10-15 minutes. You’ll see it become foamy – this means your yeast is alive and active! If it doesn’t foam, your yeast might be expired, and you’ll need fresh yeast.
2. Build the Dough Base:
* Add the remaining 1/4 cup sugar, salt, room-temperature eggs, and melted (but cooled) butter to the yeast mixture. Mix on low speed with the dough hook until combined.
* Gradually add 4 cups of the flour, mixing until a shaggy dough forms. Increase speed to medium and knead for about 5-7 minutes. The dough should start to pull away from the sides of the bowl and feel smooth and elastic. If it’s too sticky, add flour 1 tbsp at a time. If it’s too dry, add a splash of milk. The goal is a soft, slightly tacky dough.
3. First Rise (1-2 hours):
* Lightly grease a large bowl. Place the dough ball inside, turning it once to coat. Cover tightly with plastic wrap or a damp kitchen towel.
* Let it rise in a warm, draft-free spot until doubled in size. This could take 1 to 2 hours depending on your kitchen temperature. You can test if it’s ready by gently pressing two fingers into the dough; if the indentation stays, it’s risen enough.
4. Prepare the Filling & Pan:
* While the dough rises, make the cinnamon sugar filling: In a small bowl, combine brown sugar, cinnamon, softened butter, and salt. Mix until it forms a thick paste. Set aside.
* Lightly grease a 9×13 inch baking dish or line it with parchment paper. This makes removal easier later.
5. Shape the Rolls (The Fun Part!):
* Punch down the risen dough gently to release air bubbles. Turn it out onto a lightly floured surface.
* Roll the dough into a large rectangle, roughly 12×18 inches. Aim for an even thickness.
* Spread the cinnamon sugar filling evenly over the entire surface of the dough, leaving a small border around the edges.
* Starting from the long end, carefully roll the dough up tightly into a log. Pinch the seam closed.
* Using a sharp knife or unflavored dental floss, cut the log into 12 equal pieces (about 1.5 inches thick each). This can be messy; dental floss gives cleaner cuts.
6. Second Rise (30-45 mins):
* Arrange the rolls cut-side up in the prepared baking dish, leaving a little space between them. They will expand.
* Cover loosely with plastic wrap or a clean kitchen towel. Let them rise again in a warm spot until puffy and nearly doubled, about 30-45 minutes. They should look soft and full.
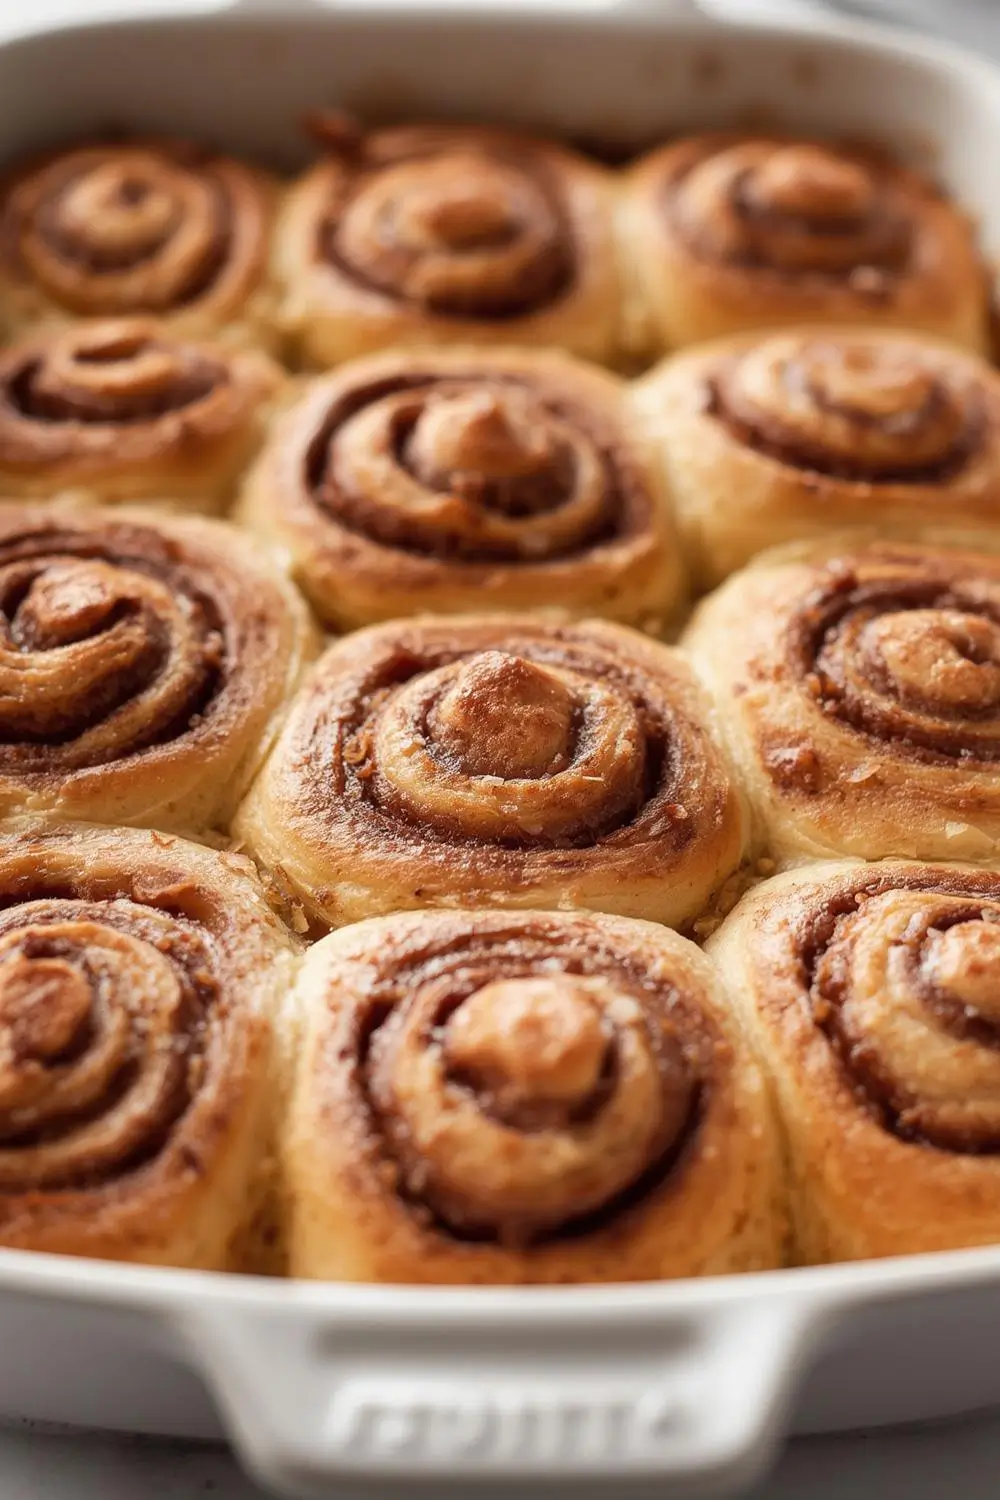
7. Bake to Golden Perfection (20-25 mins):
* Preheat your oven to 375°F (190°C) during the last 10 minutes of the second rise.
* Bake the rolls for 20-25 minutes, or until they are deeply golden brown on top and the edges look set. The internal temperature should reach about 190°F (88°C) if you have a thermometer. They should sound hollow when tapped on the bottom.
8. Frost While Warm (Optional but Recommended):
* While the rolls are still warm, prepare the cream cheese frosting: Beat softened cream cheese and butter together until smooth. Add vanilla and beat well. Gradually add powdered sugar, beating until creamy and spreadable. If it’s too thick, add a tiny splash of milk. If too thin, add more powdered sugar.
* Spread or drizzle the frosting generously over the warm rolls. The warmth helps the frosting melt slightly and soak in slightly, creating an extra layer of decadence.
Variations & Substitutions: Tailor It to Your Taste
- Different Fillings: Swap the cinnamon sugar for a chocolate-hazelnut spread (like Nutella), a simple brown sugar and pecan filling, or even a savory option like caramelized onions and herbs (great for brunch!).
- Dough Swaps: Use bread flour for a slightly chewier texture. Substitute 1 cup of flour with whole wheat flour for a nuttier flavor (may need a touch more liquid). For a dairy-free version, use plant-based milk and a dairy-free butter substitute in the dough and frosting.
- Frosting Alternatives: Skip the cream cheese frosting and make a simple vanilla glaze (powdered sugar + milk + vanilla). Or try a maple glaze for a different twist.
- Size: Make larger rolls (2-inch cuts) for a heartier portion or smaller (1-inch cuts) for more servings.
Storage & Reheating: Enjoy Them Later
- Refrigerated (Best for 2-3 Days): After baking, let rolls cool completely. Place them in an airtight container or wrap tightly with plastic wrap. Store at room temperature for up to 2 days or refrigerate for up to 3 days. Reheat individually in the microwave for 15-20 seconds or in a preheated 350°F (175°C) oven for 5-7 minutes until warmed through.
- Frozen (Best for 1-2 Months): After shaping the rolls (before the second rise), place them on a baking sheet lined with parchment paper and freeze until solid (about 1-2 hours). Transfer to a freezer bag or airtight container. To bake from frozen: Place frozen rolls in a greased baking dish, cover loosely with plastic wrap, and let them thaw and rise in the refrigerator overnight (8-12 hours). Remove from the fridge 30-60 minutes before baking to come to room temperature. Bake as directed, adding 5-10 minutes to the baking time. Alternatively, bake from frozen without thawing: Increase baking time by 10-15 minutes, covering loosely with foil if they brown too quickly.
Common Mistakes to Avoid: Mastering the Process
1. Killing the Yeast: Using water that’s too hot (above 110°F/43°C) or too cold. Test the milk temperature carefully.
2. Over-Kneading: While kneading is important, over-kneading can make the dough tough. Knead just until smooth and elastic (5-7 minutes).
3. Under-Rising: Dough that doesn’t rise enough results in dense rolls. Ensure a warm, draft-free spot and be patient.
4. Too Much Flour: Adding too much flour during kneading makes the rolls dry. Add flour gradually and stop when the dough is soft and slightly tacky.
5. Over-Baking: Rolls that are too dark or hard on top. Bake until golden brown and check for doneness with a thermometer (190°F/88°C) or by tapping the bottom (hollow sound).
6. Frosting Too Early: Frosting warm rolls can make it runny. Wait until they are completely cool for a thick, spreadable frosting, or frost them warm for a melted, decadent effect.
Frequently Asked Questions (FAQs)
- Can I use instant yeast instead of active dry yeast? Yes! Use the same amount (2 1/4 tsp). You don’t need to activate it in warm milk first; just add it directly to the dry ingredients.
- My dough is too sticky. What do I do? Add flour, 1 tablespoon at a time, while kneading. Don’t add too much at once.
- Can I make these rolls ahead of time? Absolutely! You can shape them and refrigerate them overnight after* the second rise. Let them come to room temperature for 30-60 minutes before baking. You can also freeze the shaped rolls before the second rise.
- How do I know when the rolls are done baking? They should be golden brown on top and sound hollow when tapped on the bottom. An internal temperature of 190°F (88°C) is ideal.
- Can I make these rolls without a stand mixer? Yes! You can knead the dough by hand on a lightly floured surface for about 10 minutes until smooth and elastic.
- What can I use if I don’t have cream cheese frosting? A simple vanilla glaze (powdered sugar + milk + vanilla) works wonderfully. A maple glaze is also delicious.
- Can I freeze the unbaked rolls? Yes! After shaping the rolls and placing them in the baking dish, cover tightly with plastic wrap and freeze. Bake from frozen, adding 10-15 minutes to the baking time, or thaw overnight in the fridge before baking.
The Perfect Finish: A Warm, Welcoming Conclusion
There’s something deeply satisfying about pulling a tray of warm, fragrant cinnamon rolls from the oven. The effort invested in the make-ahead process pays off in pure, unadulterated joy. These rolls are more than just breakfast; they’re a gesture of love, a celebration of simplicity, and a testament to the magic of baking. Whether enjoyed with a steaming mug of coffee on a quiet Sunday morning or shared with laughter and conversation, they create moments that linger long after the last crumb is gone. So, gather your ingredients, embrace the process, and experience the unparalleled delight of homemade cinnamon rolls that are ready when you are. Happy baking!
")


