The Ultimate Soft Milk Bread Cinnamon Rolls: Pillowy Perfection
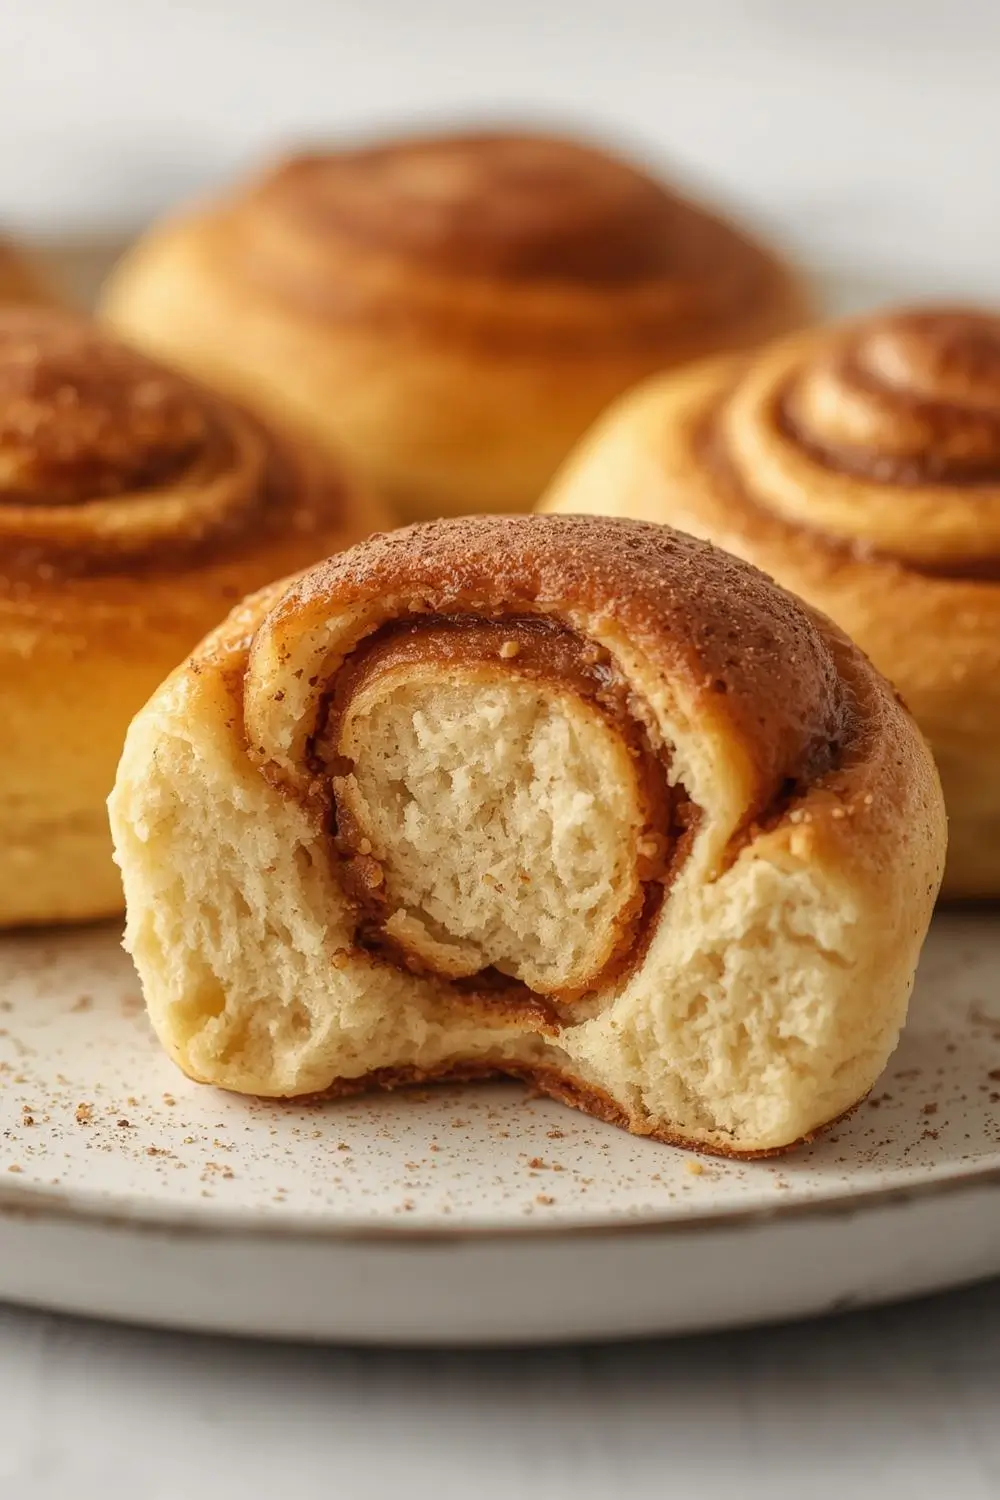
Imagine biting into a cinnamon roll where the dough is so tender and yielding, it feels like a cloud melting on your tongue. No dense, chewy crust here – just pure, melt-in-your-mouth softness that lingers. These aren’t just cinnamon rolls; they’re a revelation, crafted using the magic of milk bread dough. This enriched, buttery dough creates an incredibly light, airy crumb that stays soft for days, even after cooling. Paired with a classic cinnamon-sugar filling and a simple, silky vanilla glaze, these rolls deliver that nostalgic, warm cinnamon hug you crave, but elevated to a whole new level of indulgence. Perfect for a lazy weekend brunch, a special breakfast, or simply satisfying that mid-afternoon sweet tooth, these soft milk bread cinnamon rolls are guaranteed to become a new favorite.
The Secret to Unbeatable Softness: Milk Bread Dough
The key to these extraordinary rolls lies in the dough itself. This isn’t your standard bread dough. It’s a rich, enriched dough, similar to the beloved Japanese milk bread (shokupan) or Chinese bao dough, known for its incredibly soft, fluffy, and slightly sweet crumb. The magic comes from several factors:
1. High Fat Content: A generous amount of butter or oil tenderizes the gluten, creating that melt-in-your-mouth texture.
2. Milk (Not Water): Using milk instead of water adds richness, flavor, and contributes to the soft crumb structure.
3. Egg (Optional but Recommended): Adds richness, color, and helps create a finer crumb.
4. Yeast Activity: Proper fermentation develops flavor and creates the necessary gas bubbles for lightness.
5. Gentle Handling: Overworking the dough develops too much gluten, leading to chewiness. We want tenderness, not toughness.
This dough is surprisingly forgiving and yields results that are truly special. The rolls will be so soft, you might find yourself eating them straight from the fridge days later – they stay incredibly soft!
Gathering Your Ingredients: Simplicity Meets Flavor
The beauty of this recipe is its simplicity. You likely have most of these ingredients on hand. Here’s what you’ll need:
- For the Soft Milk Bread Dough:
* All-Purpose Flour: The foundation. Use a standard 100% protein bread flour for best results, but all-purpose works fine.
* Warm Milk: Crucial for activating the yeast and adding richness. Whole milk is ideal, but any milk works.
* Active Dry Yeast: The leavening agent. Ensure it’s fresh.
* Granulated Sugar: Feeds the yeast and adds a touch of sweetness.
* Salt: Balances the sweetness and enhances flavor.
* Unsalted Butter: Softened. This is the star of the show, adding incredible richness and tenderness. You can use oil, but butter is preferred.
* Large Egg: Adds richness, structure, and color. Room temperature is best.
- For the Cinnamon Filling:
* Brown Sugar: Packed. Provides deeper molasses notes than white sugar.
* Granulated Sugar: Balances the brown sugar.
* Ground Cinnamon: The essential flavor. Use high-quality cinnamon for the best taste.
* Unsalted Butter: Softened. Helps bind the filling and spread easily.
- For the Vanilla Glaze:
* Powdered Sugar (Icing Sugar): Sifts for a smooth glaze.
* Vanilla Extract: Pure vanilla for the best flavor.
* Whole Milk or Heavy Cream: Adjusts the consistency. Whole milk is fine.
Step-by-Step: Crafting Your Soft Milk Bread Cinnamon Rolls
Making these rolls is a rewarding process. Here’s how to achieve perfection:
1. Activate the Yeast (10-15 mins):
* In a small bowl or measuring cup, combine the warm milk (about 110°F / 43°C – test with your finger, should feel warm, not hot), 1 tablespoon of the granulated sugar, and the active dry yeast. Stir gently and let it sit for 5-10 minutes until it becomes foamy and fragrant. If it doesn’t foam, your yeast might be inactive – start over with fresh yeast.
2. Mix the Dough Base (2 mins):
* In the bowl of a stand mixer fitted with the dough hook attachment, combine the flour, remaining 2 tablespoons granulated sugar, and salt. Whisk to combine.
* Pour in the activated yeast mixture and the egg. Mix on low speed until a shaggy dough forms.
3. Incorporate the Butter (5-7 mins):
* Add the softened butter, 1 tablespoon at a time, mixing well after each addition until fully incorporated before adding the next. The dough will look messy and sticky at first.
* Once all butter is added, increase the mixer speed to medium and knead for 5-7 minutes. The dough should become smooth, elastic, and slightly tacky but not sticky. It will pull away from the sides of the bowl. If it’s too sticky, add a tablespoon of flour at a time. If it’s too dry, add a teaspoon of milk.
4. First Rise (1-2 hours):
* Lightly grease a large bowl with oil. Place the dough ball in the bowl, turning it once to coat lightly with oil. Cover the bowl tightly with plastic wrap or a damp kitchen towel.
* Let the dough rise in a warm, draft-free place until doubled in size. This usually takes 1 to 1.5 hours, but it can vary depending on room temperature. The dough is ready when it springs back slowly when gently poked with a finger.
5. Prepare the Filling & Roll Out the Dough (10 mins):
* While the dough rises, make the filling: In a small bowl, combine the brown sugar, granulated sugar, and cinnamon. Whisk until well blended. Set aside.
* Punch down the risen dough gently to release air bubbles. Turn it out onto a lightly floured surface. Roll it into a large rectangle, roughly 18×12 inches (45×30 cm). Aim for an even thickness, about 1/4 inch (0.5 cm). Use a bench scraper to help lift and move the dough if it sticks.
6. Add the Filling & Roll Up (5 mins):
* Spread the softened butter evenly over the entire surface of the dough rectangle, leaving a 1/2-inch border along one long edge.
* Sprinkle the cinnamon sugar mixture evenly over the buttered dough, pressing it gently so it adheres.
* Starting from the long edge opposite the unbuttered border, carefully roll the dough up tightly into a log. Pinch the seam closed firmly to seal. Trim the ends if they look very uneven.
7. Cut and Proof (30-45 mins):
* Using a sharp knife or dental floss, cut the log into 12 equal pieces (about 1.5 inches thick each). Place the rolls cut-side up in a lightly greased 9×13 inch baking dish or two 8-inch round pans, leaving a little space between them.
* Cover the dish loosely with plastic wrap or a damp towel. Let the rolls rise again in a warm place until they look puffy and have doubled in size, and the dough springs back slowly when poked. This usually takes 30-45 minutes.
8. Bake to Golden Perfection (20-25 mins):
* Preheat your oven to 350°F (175°C) while the rolls are proofing.
* Bake the rolls for 20-25 minutes, or until they are deeply golden brown on top and sound hollow when tapped on the bottom. The internal temperature should reach about 190°F (88°C) if you have a thermometer.
9. Make the Glaze & Finish (5 mins):
* While the rolls are baking, whisk together the powdered sugar, vanilla extract, and enough milk (start with 1-2 tablespoons) to create a smooth, pourable glaze. The consistency should be thick but drizzle easily.
* Once the rolls are baked and have cooled in the pan for 5 minutes, drizzle the warm glaze generously over the tops. The glaze will melt slightly into the rolls, adding extra sweetness and shine.
Variations to Suit Your Cravings
- Nutty Twist: Fold 1/2 cup chopped pecans or walnuts into the cinnamon sugar filling before spreading.
- Fruit Infusion: Add 1/2 cup finely diced apples (tossed with a bit of lemon juice to prevent browning) or 1/2 cup dried cranberries to the filling.
- Spice It Up: Substitute 1 teaspoon of the cinnamon with ground cardamom, nutmeg, or ginger for a different flavor profile.
- Chocolate Lover’s Dream: Replace half the brown sugar with cocoa powder in the filling and add 1/2 cup chocolate chips.
- Cream Cheese Glaze: For an extra decadent finish, mix 4 oz softened cream cheese with 1 cup powdered sugar, 1 teaspoon vanilla, and 2-3 tablespoons milk until smooth. Drizzle over the rolls.
- Whole Wheat Option: Substitute up to 50% of the all-purpose flour with whole wheat flour for a nuttier, more fiber-rich roll (may slightly alter texture).
Storage & Reheating: Keeping the Softness Alive
- Room Temperature: Store cooled rolls in an airtight container at room temperature for up to 2 days. They stay remarkably soft!
- Refrigerator: For longer storage (up to 5 days), wrap individual rolls tightly in plastic wrap or place them in a sealed container. Let them come to room temperature before serving.
Freezing: Freeze baked, cooled* rolls in a single layer on a baking sheet until solid (1-2 hours), then transfer to a freezer bag or airtight container. Freeze for up to 3 months. Thaw overnight in the fridge and reheat gently.
- Reheating: To restore that fresh-baked softness:
* Oven: Place rolls on a baking sheet and warm at 300°F (150°C) for 5-10 minutes.
* Microwave: Warm individual rolls for 15-20 seconds on high. Be careful not to overheat, as they can become rubbery.
* Toaster Oven: A great option for a quick reheat, mimicking the oven’s gentle warmth.
Common Mistakes to Avoid: Mastering the Softness
- Hot Milk: Using milk that’s too hot (above 120°F / 49°C) can kill the yeast, preventing the dough from rising.
- Over-Kneading: Overworking the dough develops too much gluten, resulting in tough, chewy rolls instead of tender, soft ones. Knead just until the dough is smooth and elastic.
- Under-Kneading: Under-kneaded dough won’t develop enough structure and may collapse or not hold its shape. The dough should be smooth and elastic.
- Rushing the Rise: Allowing the dough sufficient time to rise is crucial for flavor development and proper texture. Don’t try to rush it.
- Overfilling: Too much filling can cause the rolls to leak and burn in the oven. Spread it evenly and don’t overfill.
- Skipping the Proofing Rise: The second rise is essential for the rolls to reach their full potential height and softness. Don’t skip it.
- Glaze Too Thick: If your glaze is too thick, it won’t drizzle nicely. Add milk a teaspoon at a time until it reaches the desired consistency.
- Over-Baking: Baking too long makes the rolls dry and hard. Watch for the golden color and hollow sound.
Frequently Asked Questions: Your Soft Milk Bread Cinnamon Roll Guide
- Q: Can I use instant yeast instead of active dry yeast?
* A: Yes! You can use instant yeast (also called rapid-rise or bread machine yeast). You don’t need to activate it in warm milk first. Just add it directly to the dry ingredients with the flour and sugar. The process remains the same.
- Q: My dough is too sticky. What can I do?
* A: Add flour, 1 tablespoon at a time, while kneading. Be patient – it will come together. Avoid adding too much flour, as this can make the rolls dense.
- Q: My rolls didn’t rise much in the second rise. Why?
* A: Check your yeast (is it fresh?), the temperature of your rising spot (too cold?), or if the dough was over-kneaded (too much gluten). Ensure the dough wasn’t too cold when you started the second rise.
- Q: Can I make these rolls ahead of time?
* A: Absolutely! You can make the dough through the first rise, punch it down, shape the rolls, and let them proof in the pan overnight in the refrigerator. Take them out 1-2 hours before baking to come to room temperature and finish rising.
- Q: How do I know when the rolls are done baking?
* A: They should be a deep golden brown on top. A good test is to tap the bottom of a roll – it should sound hollow. An internal temperature of 190°F (88°C) is ideal.
- Q: Can I use a different milk, like almond milk?
* A: Yes, you can use unsweetened almond milk or other non-dairy milks. The texture and flavor will be slightly different, but it will still work. Ensure the milk is warmed to the correct temperature.
- Q: Why are my rolls dry?
* A: Over-baking is the most common culprit. Bake only until golden brown and hollow-sounding. Storing them in an airtight container can also trap moisture and make them soggy; storing them uncovered or in a container that isn’t completely airtight helps maintain crispness on the bottom.
- Q: Can I freeze the dough before the second rise?
* A: Yes! After shaping the rolls and placing them in the pan, cover them tightly and freeze. When ready to bake, thaw them overnight in the refrigerator, then let them come to room temperature and rise for 30-45 minutes before baking as directed.
- Q: What’s the best way to store leftover rolls?
* A: Store cooled rolls in an airtight container at room temperature for up to 2 days. For longer storage, wrap individually in plastic wrap and freeze. Reheat gently to restore softness.
- Q: Can I make these rolls without an electric mixer?
* A: Yes! You can knead the dough by hand. After mixing the ingredients together, turn it out onto a lightly floured surface and knead for 10-15 minutes until smooth and elastic. It takes more effort, but it’s very doable.
The Final Bite: A Celebration of Softness
These Easy Cinnamon Rolls with Soft Milk Bread Texture are more than just a breakfast treat; they’re a testament to the magic of simple ingredients transformed through technique. The pillowy, cloud-like dough, born from the richness of milk, butter, and egg, creates a canvas that perfectly cradles the warm, spiced cinnamon filling. Each bite is a journey from the tender exterior to the impossibly soft, yielding interior, all crowned with a drizzle of sweet vanilla glaze that ties it all together. They embody comfort, indulgence, and the pure joy of baking something truly special from scratch. Whether enjoyed fresh from the oven on a crisp morning or gently reheated days later, these rolls offer a slice of pure, melt-in-your-mouth happiness. Give them a try – your taste buds will thank you for the soft, pillowy revolution.
")


