Bakery StyleCinnamon Rolls at Home – Soft Fluffy Gooey Perfection
There’s something undeniably magical about the first bite of a truly exceptional cinnamon roll. That moment when the tender, pillowy dough gives way to a warm, gooey cinnamon-sugar filling, all enveloped in a rich, tangy cream cheese icing – it’s pure, comforting bliss. While the aroma of freshly baked cinnamon rolls wafting from a local bakery is intoxicating, the reality is you can recreate this bakery magic right in your own kitchen. Forget complicated techniques or expensive equipment; this recipe delivers soft, fluffy, gooey perfection with ingredients you likely already have. Get ready to transform your weekend mornings or holiday gatherings with these utterly irresistible homemade treasures.
The Heart of the Roll: The Dough
The foundation of any great cinnamon roll is its dough. It needs to be soft, slightly elastic, and possess that wonderful springiness that melts in your mouth. We’re using a simple yeast dough enriched with butter and milk, creating a tender crumb that’s anything but dense. Don’t be intimidated by yeast! This recipe is designed for success, even for baking beginners. The key is patience during the rising stages – good things come to those who wait.
The Soul: The Filling
The filling is where the magic happens. A generous blend of brown sugar, granulated sugar, and ground cinnamon creates a sweet, aromatic layer. The secret weapon? Softened butter. Melted butter would make the filling soggy; softened butter allows it to spread beautifully into every nook and cranny of the dough, creating those signature gooey pockets. A splash of vanilla extract elevates the filling from good to extraordinary.
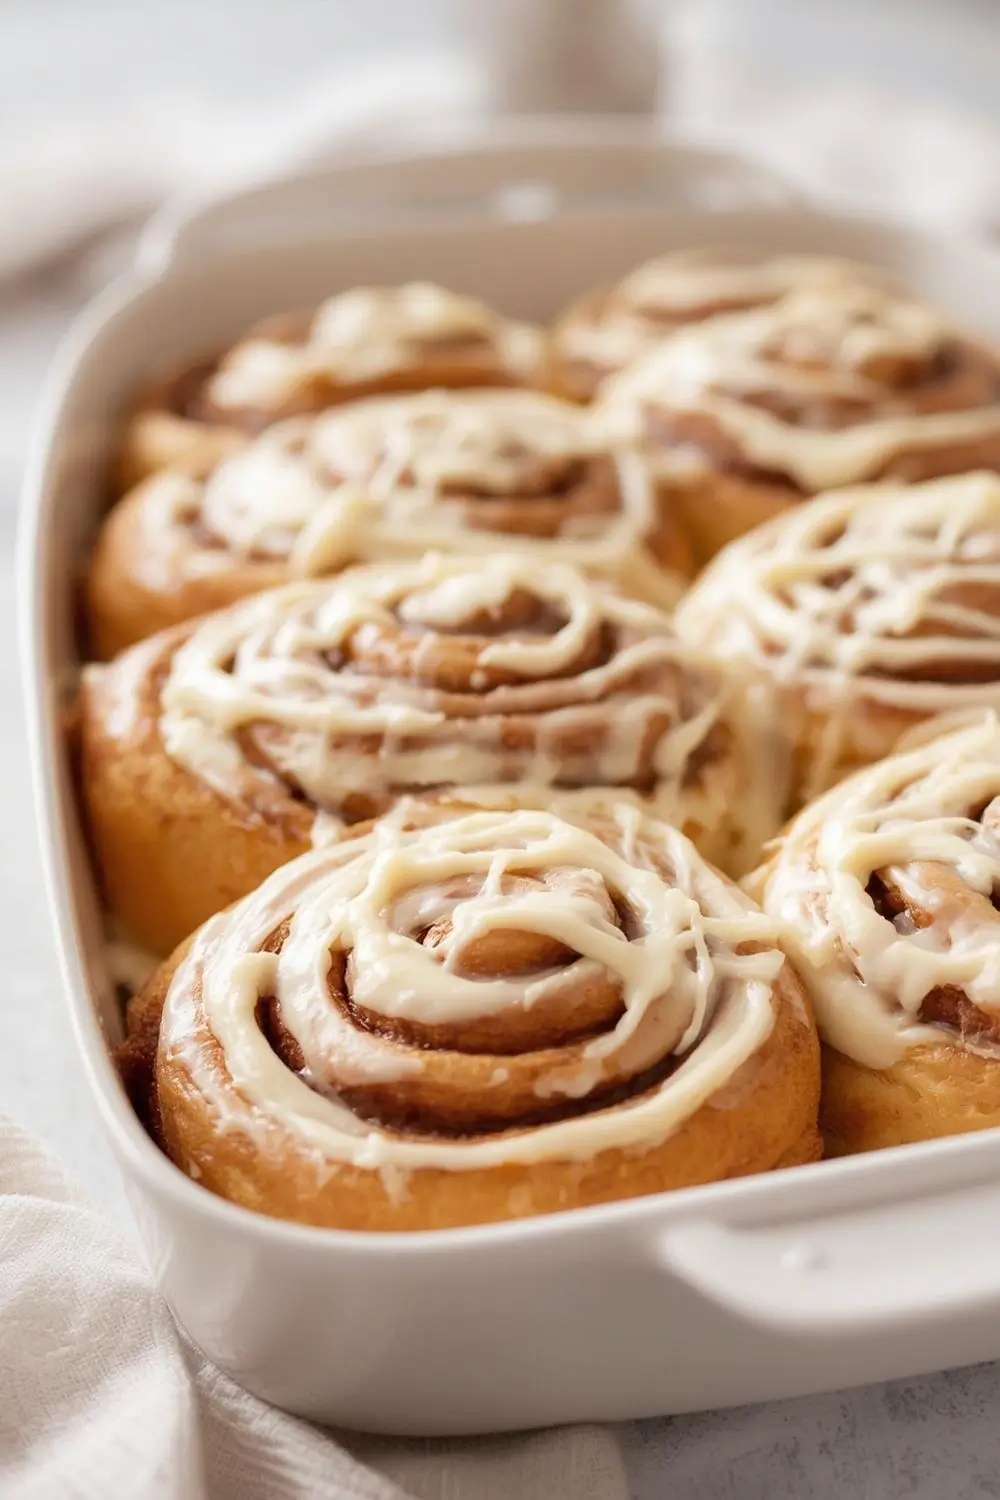
The Crown Jewel: The Cream Cheese Icing
No bakery-style cinnamon roll is complete without its crowning glory: a thick, luscious cream cheese icing. This isn’t just a drizzle; it’s a decadent blanket that seeps into the warm rolls, adding a tangy counterpoint to the sweetness. Made with full-fat cream cheese, butter, powdered sugar, and a hint of vanilla, this icing sets up beautifully yet remains wonderfully spreadable. It’s the perfect balance of rich and creamy.
Your Journey to Cinnamon Roll Bliss
This recipe is meticulously crafted for clarity and success. Each step is explained in detail, with tips woven in to help you avoid common pitfalls. Whether you’re a seasoned baker or a complete novice, you’ll find this guide approachable and encouraging. Let’s embark on this delicious journey together and create something truly special.
Ingredients: The Building Blocks of Perfection
- For the Dough:
1 cup (240ml) whole milk, warmed to about 110°F (43°C) – This temperature is crucial for activating the yeast without killing it.*
2 1/4 teaspoons (1 standard packet) active dry yeast – The leavening agent that makes the dough rise.*
1/4 cup (50g) granulated sugar – Sweetens the dough and feeds the yeast.*
1 large egg, at room temperature – Adds richness, structure, and color.*
1/4 cup (60g) unsalted butter, melted and slightly cooled – Adds tenderness and flavor.*
1 teaspoon salt – Essential for flavor balance.*
4 1/2 to 5 cups (560-625g) all-purpose flour or bread flour – The structure. Bread flour gives slightly more chew; all-purpose is fine.*
1/4 cup (60g) unsalted butter, softened – For the filling and brushing.*
- For the Filling:
1 cup (200g) packed light brown sugar – Adds moisture and deep caramel notes.*
1/2 cup (100g) granulated sugar – Adds sweetness and helps the filling spread.*
2 tablespoons ground cinnamon – The star flavor!*
1/2 teaspoon ground nutmeg (optional, but recommended) – Adds warm complexity.*
1/4 teaspoon salt – Enhances the sweetness.*
1/4 cup (60g) unsalted butter, softened – The glue that binds the filling.*
- For the Cream Cheese Icing:
4 oz (115g) full-fat cream cheese, softened – The tangy base.*
4 tablespoons (57g) unsalted butter, softened – Adds richness.*
2 cups (240g) powdered sugar, sifted – The sweetness and body.*
1 teaspoon pure vanilla extract – Enhances flavor.*
1/4 teaspoon salt – Balances sweetness.*
Optional: 1-2 tablespoons milk or heavy cream, to reach desired consistency.*
Step-by-Step Instructions: From Bowl to Bakery Bliss
1. Activate the Yeast: Warm the milk gently until it feels comfortably warm (not hot) to the touch, about 110°F (43°C). Pour it into a large mixing bowl. Sprinkle the yeast and 1 teaspoon of the granulated sugar over the warm milk. Let it sit undisturbed for 5-10 minutes until it becomes foamy and fragrant. This proves the yeast is active.
2. Combine Wet Ingredients: Add the melted butter, room-temperature egg, and remaining 1/4 cup sugar to the yeast mixture. Whisk gently until well combined.
3. Incorporate Dry Ingredients: Add 4 1/2 cups of the flour and the salt to the wet mixture. Using a sturdy spoon or your hands, stir until a shaggy dough forms. It will be sticky.
4. Knead the Dough: Turn the dough out onto a lightly floured surface. Knead for about 8-10 minutes, adding small amounts of the remaining 1/2 cup flour only as needed to prevent sticking. The dough is ready when it becomes smooth, elastic, and springs back when gently poked. It should feel slightly tacky but not stick excessively to your hands or the surface.
5. First Rise (Bulk Fermentation): Lightly grease a large bowl with butter or oil. Place the dough ball in the bowl, turning it once to coat it lightly with oil. Cover the bowl tightly with plastic wrap or a damp kitchen towel. Let it rise in a warm, draft-free spot until doubled in size, about 1 to 1.5 hours. Tip: A turned-off oven with the light on is often a perfect warm spot.
6. Prepare the Filling: While the dough rises, make the filling. In a medium bowl, whisk together the brown sugar, granulated sugar, cinnamon, nutmeg, and salt. Add the softened butter and use a fork or your fingers to work it in until the mixture resembles coarse crumbs. Set aside.
7. Shape the Rolls: Once the dough has doubled, punch it down gently to release the air. Turn it out onto a lightly floured surface. Roll the dough into a 16×24 inch rectangle (approximately). It should be about 1/4 inch thick.
8. Add the Filling: Spread the softened butter evenly over the entire surface of the dough rectangle. Sprinkle the cinnamon sugar filling mixture evenly over the butter, leaving a small border around the edges.
9. Roll Up: Starting from the long edge closest to you, carefully roll the dough up tightly into a log. Pinch the seam gently to seal. Tip: For even rolls, use a ruler or measuring tape to mark 1.5-inch intervals along the log before cutting.
10. Cut the Rolls: Using a sharp knife or dental floss (for cleaner cuts), slice the log into 12 equal pieces. Place the rolls cut-side up in a lightly greased 9×13 inch baking dish, leaving a little space between them. Cover loosely with plastic wrap or a towel.
11. Second Rise (Proofing): Let the rolls rise again in a warm place until they are noticeably puffy and have nearly doubled in size, about 30-45 minutes. Tip: If your kitchen is cool, place the covered dish in the turned-off oven with the light on.
12. Preheat and Bake: While the rolls rise, preheat your oven to 350°F (175°C). Bake the rolls for 25-30 minutes, or until they are golden brown on top and the edges look set. The internal temperature should reach about 190°F (88°C) when inserted into the center of a roll.
13. Make the Icing: While the rolls bake, prepare the cream cheese icing. In a medium bowl, beat the softened cream cheese and butter together with an electric mixer until smooth and creamy. Gradually add the sifted powdered sugar, beating well after each addition. Beat in the vanilla and salt. If the icing is too thick, add a tablespoon of milk or cream at a time until it reaches a thick but spreadable consistency.
14. Icing the Rolls: As soon as the rolls come out of the oven, spread or drizzle the warm cream cheese icing generously over the top. The heat from the rolls will help the icing melt slightly and seep in, creating that signature gooey texture. Let the rolls cool in the pan for at least 10-15 minutes before serving. This allows the icing to set slightly and the rolls to firm up enough to handle.
Variations and Substitutions: Making it Your Own
- Add-Ins: Fold in 1 cup of chopped pecans, walnuts, or raisins into the filling for extra texture and flavor. Sprinkle a few extra nuts on top before baking.
- Spice It Up: Increase the cinnamon to 3 tablespoons for a stronger kick. Add 1/2 teaspoon of cardamom or allspice to the filling for a unique twist.
- Dairy-Free: Use almond milk warmed to 110°F instead of whole milk. Ensure your yeast and butter are dairy-free if needed. Use a dairy-free cream cheese and butter for the icing.
- Whole Wheat Twist: Substitute up to 1 cup of the all-purpose flour with whole wheat flour for a heartier roll (though the texture will be slightly denser).
- Make-Ahead: Prepare the rolls up to the point of placing them in the pan and letting them rise the second time. Cover tightly and refrigerate overnight. Let them come to room temperature for about 30-45 minutes before baking. Proceed with baking time as directed.
- Freezing: Bake the rolls completely, then let them cool completely. Wrap tightly in plastic wrap and then foil. Freeze for up to 3 months. To reheat, thaw overnight in the fridge, then warm in a 300°F (150°C) oven for 10-15 minutes. Alternatively, reheat frozen rolls (thawed) in the microwave for 30-60 seconds or in a 300°F (150°C) oven for 10-15 minutes.
Storage and Reheating: Keeping the Magic Alive
- Room Temperature: Store leftover rolls in an airtight container at room temperature for up to 2 days. They are best enjoyed fresh!
- Refrigeration: For longer storage (up to 4 days), refrigerate the rolls in an airtight container. Reheat gently in a 300°F (150°C) oven for 10-15 minutes to restore softness.
- Freezing: As mentioned above, freezing is excellent for long-term storage. Thaw overnight in the fridge before reheating.
- Reheating: For the best texture, reheat individual rolls in a 300°F (150°C) oven for 10-15 minutes. Microwaving can make them soggy; if using a microwave, heat for 20-30 seconds on low power and cover with a damp paper towel.
Common Mistakes to Avoid: Ensuring Success
- Killing the Yeast: Using milk that’s too hot (above 120°F/49°C) will kill the yeast. Stick to the 110°F (43°C) sweet spot.
- Under-Kneading: The dough needs sufficient kneading (8-10 minutes) to develop the gluten for structure and elasticity. Under-kneaded dough will be sticky and won’t rise properly.
- Over-Kneading: While kneading is important, over-kneading can make the dough tough. Stop when it’s smooth and elastic.
- Rushing the Rise: Yeast needs time. Don’t rush the first or second rise. Place the dough in a warm spot and be patient.
- Too Much Flour During Kneading: Adding too much flour while kneading makes the dough dry and tough. Only add flour as needed to prevent excessive sticking.
- Filling Too Hot: Adding the filling mixture to the dough while it’s still warm can melt the butter and make the rolls soggy. Let the dough cool slightly after kneading before adding the filling.
- Cutting Without Floss: Using a knife to cut sticky dough can squish the rolls. Dental floss or a very sharp knife works best.
- Icing Too Thick or Thin: The icing should be thick enough to spread but thin enough to drizzle. Adjust with milk or powdered sugar as needed.
- Icing Too Early: Applying the icing while the rolls are piping hot can cause it to melt off. Wait 10-15 minutes for the rolls to cool slightly.
FAQs: Your Burning Questions Answered
1. Why are my cinnamon rolls not fluffy? This is often due to under-proofing (not letting them rise enough) or under-kneading the dough. Ensure you give the dough sufficient time to rise and knead it thoroughly.
2. Can I use instant yeast instead of active dry yeast? Yes, you can substitute instant yeast for active dry yeast. Use the same amount (1 packet = 2 1/4 teaspoons). You don’t need to activate it in warm milk first; just add it directly to the dry ingredients with the flour and salt.
3. My dough is too sticky. What can I do? Kneading develops the gluten, which helps the dough become less sticky. Keep kneading! Only add small amounts of flour (1 tablespoon at a time) if absolutely necessary during kneading. The dough should be tacky but not stick to your hands excessively.
4. How do I know when the rolls are done baking? They should be golden brown on top and sound hollow when tapped on the bottom. An internal temperature of 190°F (88°C) is a reliable indicator.
5. Can I make these rolls ahead of time? Absolutely! You can prepare the dough through the first rise, shape the rolls, and let them rise in the pan overnight in the refrigerator. Bake as directed in the morning. You can also bake them completely, cool, store, and reheat as needed.
6. Why is my icing runny? This usually happens if you added too much liquid (milk or cream) or if the butter and cream cheese weren’t soft enough. Ensure both are softened to room temperature. Start with less liquid and add gradually. Sifting the powdered sugar helps prevent lumps.
7. Can I freeze the baked rolls? Yes! Let them cool completely, then wrap tightly in plastic wrap and then foil. Freeze for up to 3 months. Thaw overnight in the fridge and reheat gently in a 300°F (150°C) oven for 10-15 minutes.
8. What can I use if I don’t have a stand mixer? You can knead the dough by hand! Turn it out onto a lightly floured surface and knead for 8-10 minutes until smooth and elastic. It takes a bit more effort but is perfectly effective.
9. Can I use a different type of milk? Yes, you can use whole milk, 2% milk, or even plant-based milks like almond or oat milk (ensure they are unsweetened and fortified with calcium). Warm them to 110°F (43°C) before using.
10. Why did my rolls stick to the pan? Greasing the pan thoroughly with butter or non-stick spray is essential. Ensure the rolls have risen sufficiently before baking, as they should pull away slightly from the edges. Letting them cool in the pan for 10-15 minutes before transferring to a wire rack also helps prevent sticking.
The Final Touch: A Warm Embrace
There’s a profound satisfaction in pulling a warm, fragrant pan of cinnamon rolls from your own oven. The scent alone is enough to make your kitchen feel like a cozy bakery. These rolls, with their tender, pillowy centers, gooey cinnamon pockets, and rich, tangy icing, are more than just a treat; they’re a celebration of home, comfort, and the simple joy of baking something truly special. They’re perfect for a lazy Sunday brunch, a holiday morning, or simply a moment of pure indulgence. So, gather your ingredients, set aside some time, and let the magic begin. Your family and friends will thank you, and your kitchen will smell like pure, unadulterated happiness. Enjoy every gooey, cinnamon-scented bite!
")