Imagine the aroma filling your kitchen, the soft, pillowy texture of cinnamon rolls fresh from the oven. That dream is absolutely achievable, even if you’re new to baking. This beginner-friendly cinnamon roll dough recipe is your golden ticket. Designed with simplicity and success in mind, it yields a soft, easy-to-handle dough that transforms into irresistibly tender cinnamon rolls. Forget complicated techniques or intimidating steps; this recipe breaks everything down into manageable parts, ensuring your first (or fiftieth!) batch turns out flawlessly. Let’s dive in and create something truly special together.
Why This Dough is Perfect for Beginners
Baking can feel daunting, especially when it comes to yeast doughs. The fear of the dough not rising, becoming too sticky, or collapsing can be overwhelming. This recipe tackles those fears head-on. It uses a straightforward mixing method, clear visual cues for dough readiness, and provides ample tips to troubleshoot common beginner pitfalls. The result? A dough that’s forgiving, delicious, and forms the perfect base for your cinnamon roll adventure. You’ll learn the fundamentals without the frustration.
Gathering Your Ingredients: Understanding Each Role
Before you start mixing, let’s get familiar with what goes into this magical dough and why each ingredient matters. Understanding these roles empowers you to make informed choices and substitutions later.
- All-Purpose Flour (4 1/2 cups / 565g): The backbone of the dough. All-purpose flour provides the right balance of gluten for structure and tenderness. Bread flour (with its higher protein content) can be used for an even chewier texture, but all-purpose works wonderfully for classic cinnamon rolls. Spoon and level your flour for accuracy.
- Instant Yeast (2 1/4 teaspoons / 7g): This is your rising hero. Instant yeast doesn’t need to be dissolved in warm water first; you can mix it directly with the dry ingredients. It works faster and more reliably than active dry yeast, making it ideal for beginners. Ensure it’s fresh for best results.
- Warm Milk (1 1/2 cups / 360ml): Warm (not hot!) milk activates the yeast and adds richness and tenderness to the dough. Whole milk is recommended for the richest flavor and softest texture, but 2% or even skim milk will work. Avoid milk that’s too hot (above 110°F/43°C) as it can kill the yeast.
- Granulated Sugar (1/2 cup / 100g): This does more than just sweeten. It feeds the yeast, helping it produce the gases that make the dough rise. It also contributes to browning and a touch of tenderness.
- Salt (1 1/2 teaspoons / 8g): Essential for flavor development and controlling yeast activity. It strengthens the gluten structure, preventing the dough from becoming too slack and helping the rolls hold their shape.
- Large Eggs (2, room temperature): These add richness, color, structure, and moisture. Room temperature eggs incorporate more easily into the dough, creating a smoother texture.
- Unsalted Butter (1/2 cup / 115g, softened): This is where the magic happens. Softened butter adds incredible flavor, richness, tenderness, and helps create that coveted soft, melt-in-your-mouth texture. It also contributes to the dough’s ability to hold its shape. Use high-quality butter for the best taste.
- Vanilla Extract (1 tablespoon): A classic addition that enhances the overall flavor profile, complementing the cinnamon beautifully.
Mixing the Dough: From Dry to Doughy
Now that your ingredients are ready, it’s time to bring them together. This step-by-step guide will walk you through creating the perfect base.
1. Combine the Dry Ingredients: In a large mixing bowl (or the bowl of a stand mixer), whisk together the all-purpose flour, instant yeast, granulated sugar, and salt. This ensures the yeast and salt are evenly distributed and prevents clumping.
2. Warm the Wet Ingredients: In a separate small bowl or measuring cup, combine the warm milk, softened butter, and vanilla extract. Stir gently until the butter is mostly melted. The mixture should feel comfortably warm to the touch (around 105-110°F / 40-43°C), not hot. If it’s too hot, let it cool slightly.
3. Add the Wet to the Dry: Pour the warm milk mixture into the bowl with the dry ingredients. Add the room temperature eggs.
4. Mix Until Combined: Using a sturdy spoon, wooden spoon, or the paddle attachment of your stand mixer, mix everything together on low speed until a shaggy, sticky dough begins to form. It will look messy, but that’s okay! Don’t be tempted to add extra flour yet.
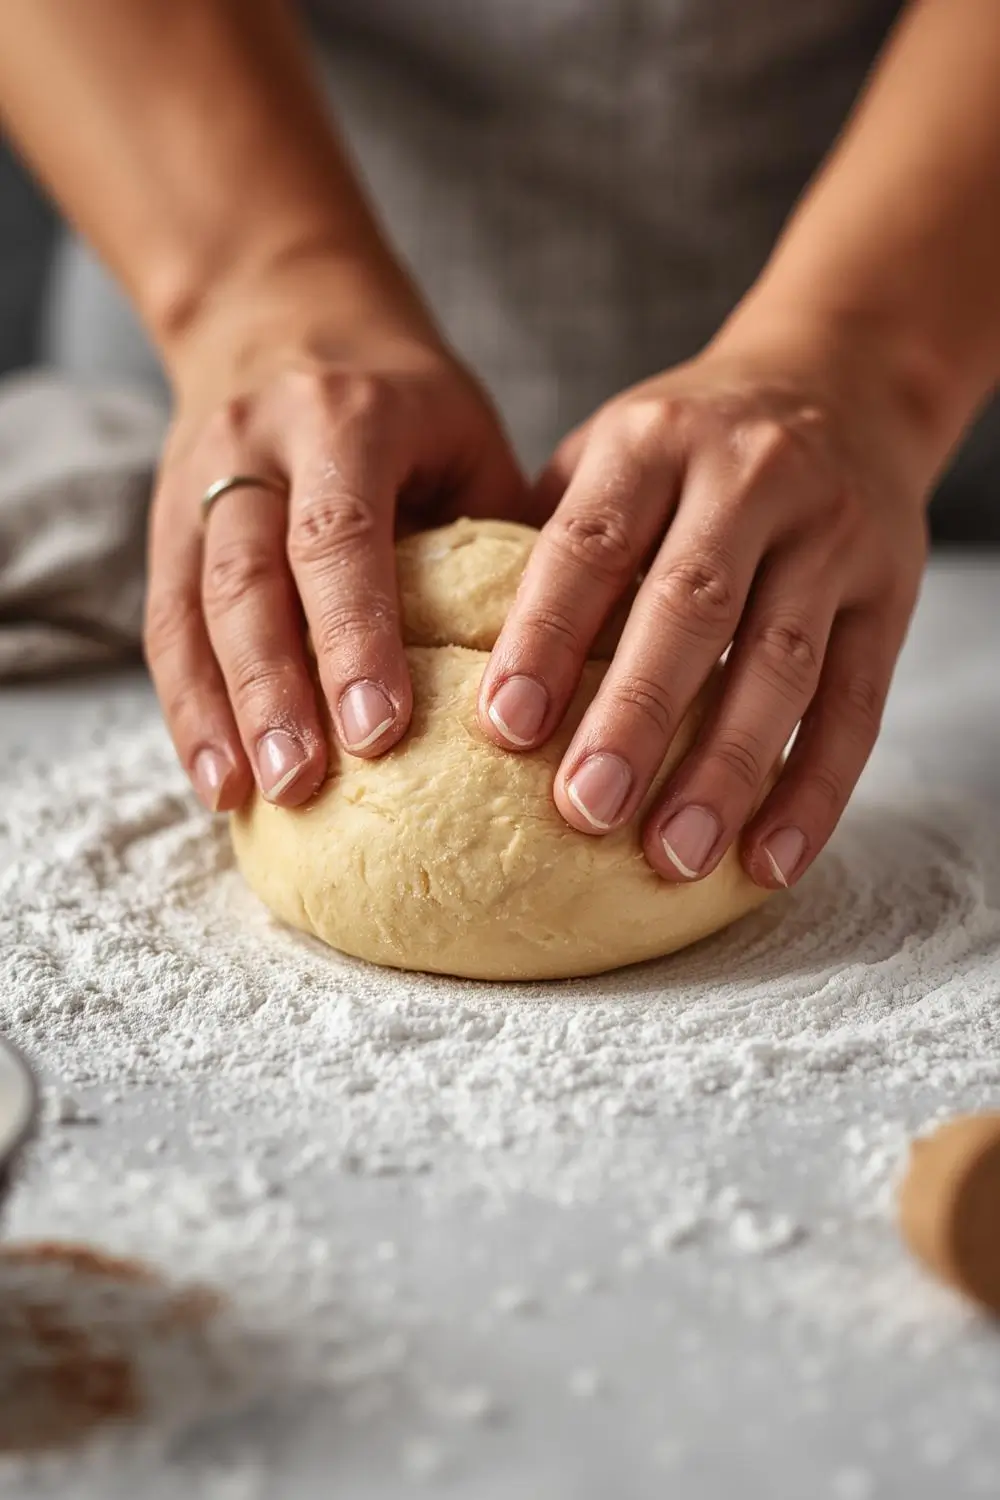
5. Knead the Dough: This is where the magic happens. Turn the dough out onto a lightly floured surface. Begin kneading. Push the dough away from you with the heel of your hand, fold it back over itself, give it a quarter turn, and repeat. Knead for about 8-10 minutes by hand, or 5-7 minutes with a stand mixer fitted with a dough hook. The dough is ready when it becomes smooth, elastic, and springs back when you gently poke it with your finger. It should be soft but not overly sticky. If it’s too sticky, add a tablespoon of flour at a time; if it’s too dry, add a teaspoon of warm milk. Tip: Avoid adding too much flour during kneading, as this can make the rolls tough.
6. First Rise (Bulk Fermentation): Lightly oil a large bowl. Form the kneaded dough into a smooth ball and place it in the bowl, turning it once to coat it lightly with oil. Cover the bowl tightly with plastic wrap or a damp kitchen towel. Place it in a warm, draft-free spot (like an oven with the light on, or near a sunny window) and let it rise until doubled in size. This usually takes 1 to 1.5 hours, but time can vary based on room temperature and yeast activity. Tip: Don’t rush this step! Proper rising develops flavor and texture.
Shaping the Rolls: From Dough to Delight
Once your dough has risen beautifully, it’s time to transform it into cinnamon rolls. This is where you get to be creative!
1. Punch Down the Dough: Gently punch down the risen dough to release the large air bubbles. Turn it out onto a lightly floured surface.
2. Roll into a Rectangle: Using a rolling pin, roll the dough into a large rectangle, roughly 18×12 inches (45×30 cm). Aim for an even thickness, about 1/4 to 1/2 inch (0.6-1.3 cm). A slightly thinner rectangle will yield more rolls, a thicker one will be more decadent.
3. Prepare the Filling: While the dough is rolling, make your cinnamon sugar filling. Combine 1/2 cup (100g) packed brown sugar, 1/4 cup (50g) granulated sugar, 2 tablespoons ground cinnamon, and a pinch of salt in a small bowl. For extra richness, add 1/2 cup (113g) softened butter and 1 teaspoon vanilla extract, mixing until crumbly.
4. Spread the Filling: Spread the softened butter evenly over the rolled-out dough, leaving a 1/2-inch border around the edges. Sprinkle the cinnamon sugar mixture evenly over the butter.
5. Roll Up the Dough: Starting from the long edge closest to you, carefully roll the dough up tightly into a log. Pinch the seam gently to seal it. Trim the ends if they look very uneven.
6. Cut the Rolls: Using a sharp knife or dental floss, cut the log into 12 equal pieces (about 1.5 inches thick each). Place the rolls cut-side up in a lightly greased 9×13 inch baking pan, leaving a little space between them for rising.
7. Second Rise (Proofing): Cover the pan loosely with plastic wrap or a damp towel. Let the rolls rise again in a warm place until they are noticeably puffy and have doubled in size, about 30-45 minutes. Tip: For extra soft rolls, place the covered pan in the refrigerator overnight for a slow, cold rise. Bring them to room temperature for 30-60 minutes before baking.
Baking to Golden Perfection
The moment of truth! Baking transforms your dough and filling into the iconic cinnamon roll.
1. Preheat the Oven: Place your oven rack in the center position and preheat to 350°F (175°C). Ensure your oven is fully preheated before baking.
2. Bake the Rolls: Uncover the rolls and bake for 25-35 minutes, or until the tops are a deep golden brown and the rolls are cooked through. The internal temperature should reach about 190°F (88°C) when measured with a thermometer inserted into the center of a roll. They should sound hollow when tapped on the bottom.
3. Cool Slightly: Remove the pan from the oven and let the rolls cool in the pan for at least 10-15 minutes. This allows them to set and makes them easier to handle. They will continue to firm up slightly.
The Finishing Touch: The Perfect Glaze
While the rolls cool, prepare a simple glaze to drizzle over the warm rolls. This adds sweetness and a beautiful sheen.
- Cream Cheese Glaze: In a medium bowl, beat together 4 ounces (1/2 cup) softened cream cheese and 1/4 cup (50g) softened unsalted butter until smooth. Add 1 1/2 cups (180g) powdered sugar, 1 teaspoon vanilla extract, and a pinch of salt. Beat until creamy. Add 2-3 tablespoons of milk or heavy cream, one tablespoon at a time, until the glaze reaches a pourable consistency.
- Simple Powdered Sugar Glaze: Whisk together 1 1/2 cups (180g) powdered sugar, 2-3 tablespoons milk or heavy cream, 1 teaspoon vanilla extract, and a pinch of salt until smooth and pourable.
Drizzle the glaze generously over the warm rolls. The heat will melt the glaze slightly, creating a beautiful, glossy finish. Serve immediately and enjoy the fruits of your labor!
Variations and Substitutions: Making it Your Own
This versatile dough is a fantastic canvas. Here are some ideas to customize it:
- Nutty Delight: Add 1 cup (120g) chopped pecans, walnuts, or almonds to the cinnamon sugar filling before rolling.
- Fruitful Twist: Fold in 1 cup (150g) chopped apples, pears, or raisins into the filling mixture.
- Spice It Up: Increase the cinnamon to 3 tablespoons. Add 1 teaspoon ground cardamom, 1/2 teaspoon ground nutmeg, or 1/2 teaspoon ground ginger to the filling.
- Chocolate Lover’s Dream: Replace 1/4 cup of the granulated sugar in the filling with 1/4 cup cocoa powder. Add 1/2 cup (113g) chocolate chips to the filling.
- Orange Zest: Add 1 tablespoon of orange zest to the filling mixture.
- Butter Substitute: Use 1/2 cup (113g) softened coconut oil or vegan butter in place of the unsalted butter. The flavor will be slightly different, but it works well.
- Milk Substitute: Use almond milk, soy milk, or oat milk in place of dairy milk. Ensure it’s warmed to the correct temperature.
Storage and Reheating: Keeping the Magic Alive
Enjoy your cinnamon rolls fresh on the day they’re baked for the ultimate experience. For leftovers:
- Room Temperature: Store leftover rolls in an airtight container at room temperature for up to 2 days. Reheat individually in the microwave for 15-20 seconds or in a warm oven (300°F/150°C) for 5-7 minutes.
- Refrigerator: For longer storage (up to 5 days), wrap individual rolls tightly in plastic wrap and place them in an airtight container in the fridge. Reheat as above.
Freezer: For maximum freshness, freeze the cooled* rolls (without glaze) in a single layer on a baking sheet until solid, then transfer to a freezer bag or airtight container. Freeze for up to 3 months. To reheat, thaw overnight in the fridge, then reheat as above, or bake frozen rolls (without glaze) at 300°F (150°C) for 15-20 minutes until warmed through.
Common Mistakes to Avoid: Baking Wisdom
Even experienced bakers encounter hiccups. Here’s how to sidestep the most common pitfalls:
- Too Hot Milk: Killing the yeast is a frequent beginner error. Ensure your milk is warm, not hot (105-110°F / 40-43°C).
- Over-Kneading: Overworking the dough develops too much gluten, resulting in tough rolls. Knead just until smooth and elastic (8-10 minutes by hand).
- Under-Kneading: Under-kneaded dough won’t rise properly or develop structure. Pay attention to the texture – it should be smooth and spring back.
- Rushing the Rise: Yeast needs time. Don’t skip the first rise or proof. Place the dough in a consistently warm spot.
- Overfilling: Too much filling can leak out during baking. Spread it evenly and leave a border.
- Cutting with a Dull Knife: A dull knife can squish the rolls. Use a sharp knife or dental floss for clean cuts.
- Skipping the Second Rise: This step is crucial for light, fluffy rolls. Don’t skip it!
- Over-Baking: Watch the color! They should be golden brown, not dark brown. Use a thermometer if unsure.
Frequently Asked Questions (FAQs)
- Can I use active dry yeast instead of instant yeast? Yes, but you need to activate it first. Dissolve 2 1/4 teaspoons active dry yeast in 1/2 cup warm milk (105-110°F / 40-43°C) with 1 teaspoon of the granulated sugar. Let it sit for 5-10 minutes until foamy before adding it to the dry ingredients.
- My dough is too sticky. What can I do? Add flour very* sparingly, a tablespoon at a time, while kneading. Avoid adding too much, as it can dry out the rolls. The dough should be soft but manageable.
- My rolls didn’t rise much. Why? Check your yeast (is it fresh?), the temperature of your milk (too hot kills yeast), and the rising spot (too cold). Ensure you didn’t over-knead, which can deflate the dough.
- Can I make the dough ahead of time? Absolutely! You can make the dough, shape the rolls, and let them proof overnight in the refrigerator. This develops incredible flavor. Bake as directed in the morning.
- How do I know when the rolls are done baking? They should be a deep golden brown on top and sound hollow when tapped on the bottom. An internal temperature of 190°F (88°C) is a reliable indicator.
- Can I freeze the rolls unbaked? Yes! After shaping and placing them in the pan, cover them tightly and freeze. When ready to bake, thaw them overnight in the fridge, then let them rise until puffy (about 1-2 hours), and bake as directed, adding 5-10 minutes to the baking time.
- What’s the best way to reheat leftover rolls? The microwave is quick (15-20 seconds per roll), but it can make them slightly chewy. For the best texture, reheat in a warm oven (300°F / 150°C) for 5-7 minutes.
Conclusion: Your Journey to Cinnamon Roll Mastery
You’ve conquered the art of beginner-friendly cinnamon roll dough! From understanding the essential ingredients to mastering the kneading, rising, shaping, and baking, you now possess the knowledge and confidence to create these beloved treats anytime. Remember, baking is a journey of experimentation and learning. Don’t be discouraged by minor hiccups; they’re simply stepping stones to perfection. Gather your ingredients, follow the steps with care, and enjoy the incredible aroma and taste of your homemade cinnamon rolls. Share them with loved ones and bask in the warm satisfaction of a baking triumph. Happy baking!
")