There’s something undeniably magical about the aroma of cinnamon rolls baking in the oven. That sweet, warm, spiced scent promises comfort and indulgence. But for many home bakers, the thought of tackling yeast dough can feel intimidating. Fear not! These Beginner Friendly Cinnamon Rolls are designed specifically for you. Forget complicated techniques or hours of kneading. This recipe breaks down the process into simple, manageable steps, ensuring you end up with soft, pillowy rolls bursting with cinnamon flavor – no stress required. Perfect for a weekend treat, a special brunch, or simply satisfying that cozy craving, these rolls are your gateway to baking success.
Why This Recipe is Perfect for Beginners:
- Clear, Step-by-Step Guidance: Every stage is explained in plain language.
- Soft & Tender Dough: Focuses on achieving the ideal texture without toughness.
- Minimal Kneading: Reduces the physical effort involved.
- Simple Filling: Uses pantry staples you likely already have.
- Easy Glazing: A straightforward cream cheese frosting that sets beautifully.
- No Fancy Equipment: Just basic bowls, a rolling pin, and a baking pan.
The Magic Ingredient: Patience (and a Warm Spot)
While the active time is manageable, yeast dough requires a little patience. Allowing the dough to rise properly is crucial for those light, airy rolls. Don’t rush it! Find a warm, draft-free spot in your kitchen – near an oven with the light on, on top of the refrigerator, or in a turned-off oven with the door closed. This gentle warmth helps the yeast work its magic, creating the perfect rise. Trust the process; the wait is worth it!
Ingredients Explained: Building Flavor and Texture
Here’s what you’ll need, with a little insight into why each ingredient matters:
- Warm Milk (1 cup / 240ml): The foundation. Warm it to about 110°F (43°C) – just warm to the touch, not hot. This activates the yeast without killing it. Whole milk adds richness; 2% works fine too.
- Active Dry Yeast (2 1/4 tsp / 1 packet): The leavening agent. It feeds on the sugars in the dough and produces carbon dioxide gas, making the dough rise. Make sure it’s fresh!
- Granulated Sugar (1/4 cup / 50g): Feeds the yeast and adds a touch of sweetness. Also helps create a tender crumb.
- Salt (1 tsp): Essential for flavor balance. It also strengthens the gluten slightly, helping the rolls hold their shape.
- Large Eggs (2, room temperature): Adds richness, structure, and moisture. Room temperature eggs incorporate better.
- Unsalted Butter (1/2 cup / 113g, melted): Adds incredible flavor and tenderness. Let it cool slightly before adding to the warm milk mixture to avoid scrambling the eggs.
- All-Purpose Flour (4 1/2 cups / 560g, plus more for dusting): The main structure. You might need a little more or less depending on humidity. Spoon flour into the measuring cup and level it off.
- Brown Sugar (1 cup / 200g, packed): Creates a deeper, caramel-like sweetness and helps the filling stick to the dough. Packed means firmly packed into the measuring cup.
- Ground Cinnamon (2 tbsp): The star flavor! Use high-quality cinnamon for the best taste.
- Cream Cheese (4 oz / 115g, softened): The base for the frosting. Full-fat cream cheese gives the best flavor and texture.
- Unsalted Butter (4 tbsp / 57g, softened): Adds richness to the frosting.
- Powdered Sugar (2 cups / 240g, sifted): Sweetens the frosting and gives it a smooth texture. Sifting prevents lumps.
- Vanilla Extract (1 tsp): Enhances all the other flavors beautifully.
Step-by-Step Instructions: From Bowl to Baking Sheet
Step 1: Activate the Yeast (The First Rise)
- In a large bowl (or the bowl of a stand mixer), combine the warm milk, 1/4 cup of the granulated sugar, and the active dry yeast. Stir gently and let it sit for about 5-10 minutes. You should see it become foamy on top – this means the yeast is alive and active! If it doesn’t foam, your yeast might be expired, and you’ll need to start over.
Step 2: Build the Dough Base
- Add the salt, the remaining 1/4 cup granulated sugar, the room-temperature eggs, and the melted (but cooled) butter to the yeast mixture. Whisk everything together until well combined.
- Gradually add 4 cups (500g) of the all-purpose flour, one cup at a time, mixing well after each addition. The dough will start to come together but will be quite sticky.
Step 3: Knead to Perfection (The Key to Soft Rolls)
Turn the dough out onto a lightly floured surface. Using floured hands, begin kneading. Push the dough away from you with the heel of your hand, fold it back over itself, give it a quarter turn, and repeat. Knead for about 8-10 minutes. The dough is ready when it becomes smooth, elastic, and springs back when you gently poke it. It should be soft but not overly sticky. If it’s too sticky, add a tablespoon of flour at a time; if it’s too dry, add a teaspoon of water. This kneading develops the gluten just enough for structure without making the rolls tough.*
Tip:* If using a stand mixer with a dough hook, mix on medium speed for 5-7 minutes until smooth and elastic.
Step 4: The First Rise (Let the Dough Breathe)
- Lightly grease a large bowl with a little oil or butter. Place the kneaded dough ball into the bowl, turning it once to coat it lightly with oil. Cover the bowl tightly with plastic wrap or a damp kitchen towel.
- Place the bowl in your chosen warm spot. Let the dough rise until it has doubled in size. This usually takes 1 to 1.5 hours, but it can vary depending on the warmth of your spot. Don’t rush it! The dough needs this time to develop flavor and texture.
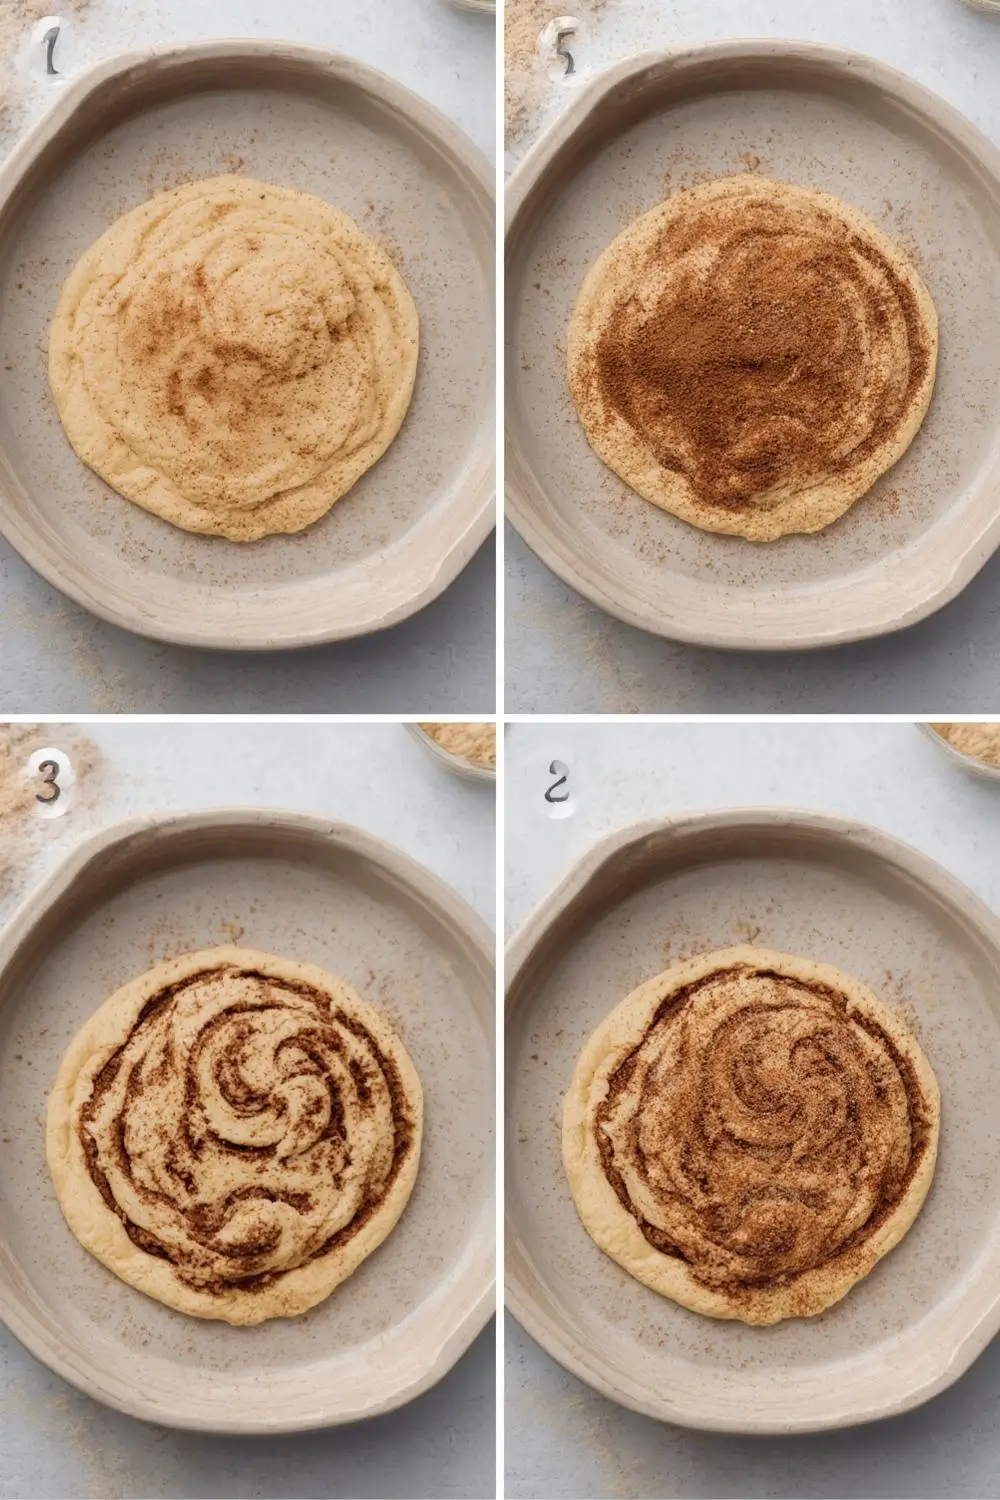
Step 5: Prepare the Filling & Roll Out the Dough
- While the dough rises, make the cinnamon sugar filling. In a small bowl, combine the brown sugar, the 2 tablespoons of cinnamon, and a pinch of salt (optional). Mix well.
- Once the dough has doubled, punch it down gently to release the air. Turn it out onto a lightly floured surface. Roll the dough into a large rectangle, roughly 12 inches by 18 inches. Aim for an even thickness, about 1/4 to 1/2 inch thick.
- Spread the softened butter evenly over the entire surface of the dough, leaving a small border around the edges. Sprinkle the cinnamon sugar mixture evenly over the butter.
Step 6: Roll, Cut, and Arrange
- Starting from the long edge, carefully roll the dough up tightly into a log. Pinch the seam gently to seal it.
- Using a sharp knife or dental floss (for cleaner cuts), cut the log into 12 equal pieces. Place each piece cut-side up into a greased 9-inch round or square baking pan. They should fit snugly but not be crammed together.
Tip:* If the rolls are too tight, they might not rise as well. Leave a little space between them.
Step 7: The Second Rise (The Final Proof)
- Cover the pan loosely with plastic wrap or a damp towel. Let the rolls rise again in the warm spot until they are noticeably puffy and have nearly doubled in size, about 30-45 minutes. They should look much fuller than before.
Step 8: Bake to Golden Perfection
- Preheat your oven to 350°F (175°C) while the rolls are rising.
- Bake the rolls for 25-30 minutes, or until they are a deep golden brown on top and sound hollow when tapped lightly on the bottom. The internal temperature should reach about 190°F (88°C) if you have a thermometer.
Tip:* If the tops start browning too quickly, loosely tent them with foil for the last 10 minutes.
Step 9: Make the Frosting & Finish
- While the rolls are baking, make the cream cheese frosting. In a medium bowl, beat the softened cream cheese and softened butter together until smooth and creamy.
- Gradually beat in the sifted powdered sugar and vanilla extract until the frosting is light and fluffy.
- Once the rolls are baked and have cooled for just 5-10 minutes (they will be very hot!), spread the frosting generously over the warm rolls. The heat will help the frosting melt slightly and soak in slightly, creating an amazing flavor and texture combination. Let them cool slightly before serving.
Variations and Substitutions: Making it Your Own
- Nutty Twist: Add 1/2 to 1 cup of chopped pecans, walnuts, or almonds to the cinnamon sugar filling before rolling.
- Fruitful Flavor: Fold 1/2 cup of raisins, dried cranberries, or diced apples (tossed in a little flour to prevent sinking) into the cinnamon sugar filling.
- Dairy-Free: Use almond milk or oat milk instead of dairy milk. For the frosting, use vegan cream cheese and vegan butter. Ensure your yeast is vegan-friendly.
- Gluten-Free: Use a high-quality gluten-free all-purpose flour blend (check for xanthan gum). You may need slightly more liquid (milk or water) and the dough might be a bit more delicate. Bake for a few minutes longer.
- Sweetener Swap: Replace granulated sugar with coconut sugar or maple sugar in the dough and filling. Adjust to taste.
- Spice It Up: Add 1/2 teaspoon of ground nutmeg or cardamom to the cinnamon sugar filling for extra depth.
Storage and Reheating: Keeping the Magic Alive
- Room Temperature: Store leftover rolls in an airtight container at room temperature for up to 2 days. They are best enjoyed fresh!
- Refrigerator: For longer storage (up to 5 days), wrap individual rolls tightly in plastic wrap and store in the fridge. Let them come to room temperature before serving.
- Freezing: Wrap cooled rolls tightly in plastic wrap, then foil, or place in a freezer bag. Freeze for up to 3 months. Thaw overnight in the fridge, then warm in a 300°F (150°C) oven for 10-15 minutes before frosting and serving.
- Reheating: Warm leftover rolls gently in a 300°F (150°C) oven for 5-10 minutes until warmed through. Avoid microwaving, as it can make them soggy. For frosted rolls, reheat frosted rolls in the oven (uncovered) for 5-7 minutes, then add frosting once warm.
Common Mistakes to Avoid: Baking Success Tips
1. Killing the Yeast: Using milk that’s too hot (above 110°F / 43°C) or adding salt directly to the yeast mixture without dissolving it first can kill the yeast. Always use warm, not hot, milk and dissolve yeast and sugar first.
2. Over-Kneading: While kneading is important, over-kneading develops too much gluten, leading to tough, chewy rolls. Knead just until smooth and elastic (8-10 minutes by hand).
3. Rushing the Rise: Yeast needs time! Don’t skip the first rise or the second rise. Cold environments slow yeast down significantly.
4. Too Much Flour: Adding too much flour while kneading makes the dough dry and tough. Add flour gradually and only as needed. The dough should be soft and slightly sticky.
5. Filling Leakage: Rolling the dough too tightly can cause the filling to leak out during baking. Roll gently but firmly, and seal the seam well.
6. Frosting Too Early: Frosting warm rolls immediately can cause the frosting to melt and slide off. Wait 5-10 minutes for them to cool slightly.
7. Over-Baking: Baking too long makes rolls dry. They are done when golden brown and sound hollow when tapped. Check a few minutes early.
Frequently Asked Questions (FAQs)
- Q: Can I make these rolls ahead of time? A: Absolutely! You can prepare the dough through the first rise, punch it down, shape the rolls, and let them rise again in the pan. Refrigerate them overnight (covered). In the morning, let them come to room temperature for about 30 minutes, then bake as directed. They might need a few extra minutes in the oven.
- Q: Why are my rolls dense and not fluffy? A: This is often due to under-proofing (not letting them rise enough) or over-kneading. Ensure they have a good second rise and knead just until smooth.
- Q: Can I use instant yeast instead of active dry yeast? A: Yes! You can use instant yeast (also called rapid-rise or bread machine yeast) in the same amount. You don’t need to activate it in warm milk first; just add it directly to the dry ingredients with the flour.
- Q: How do I know when the dough has doubled in size? A: Press two fingers gently into the dough. If the indentation stays (the dough doesn’t spring back), it’s ready. The dough should look visibly puffy and expanded.
- Q: Can I use a bread machine? A: Yes! Add all the ingredients to your bread machine in the order recommended by the manufacturer (usually liquids first, then dry ingredients, with yeast last). Select the dough cycle. Once the cycle finishes, proceed with shaping, rising, and baking the rolls as directed.
- Q: What if my frosting is too thick? A: Add a teaspoon of milk or cream at a time until it reaches a spreadable consistency.
- Q: Can I make these rolls without a rolling pin? A: While a rolling pin makes it easier, you can use the bottom of a heavy glass or a clean bottle to gently roll out the dough on a floured surface.
- Q: Why did my rolls stick to the pan? A: Ensure you generously grease the pan before placing the rolls. Using parchment paper in the pan can also help prevent sticking.
A Final Note: The Joy of Baking
Baking cinnamon rolls from scratch is more than just following a recipe; it’s an act of love and care. The process connects you to the food, allowing you to control every ingredient and step. The aroma that fills your kitchen, the warmth of the rolls fresh from the oven, and the shared delight of biting into that first, perfectly spiced, tender roll – these are the true rewards. Don’t be discouraged by the first attempt; each batch teaches you something new. Embrace the process, enjoy the journey, and savor the delicious results of your beginner-friendly baking adventure. Happy baking!
")