Contents
Sourdough isn’t just for crusty loaves and tangy sandwich bread—it’s a powerful ingredient that can create the softest, fluffiest, and most flavorful sweet treats too. If you’ve got a bubbly sourdough starter and a craving for something cozy and comforting, these Beginner-Friendly Sourdough Cinnamon Rolls are just what your kitchen needs.
In this article, we’re diving into the sweet side of sourdough. We’ll walk you through everything you need to know—from understanding how sourdough works in enriched doughs to mixing, shaping, proofing, and baking these irresistible cinnamon rolls. With helpful tips, flexible options, and zero intimidating steps, this guide is perfect whether you’re brand new to sourdough or simply craving a relaxing bake.
Get ready to impress yourself (and your taste buds) with a cinnamon roll recipe you’ll want to make again and again.
Welcome to the Sweet Side of Sourdough
Why Sourdough Cinnamon Rolls Are a Great Place to Start
So, you’ve been feeding your sourdough starter, watching it bubble and grow—but now what? While most folks begin with rustic sourdough bread, sweet recipes like these cinnamon rolls are actually more forgiving. That’s right—soft, sweet, enriched doughs offer a gentle learning curve with plenty of room for flexibility.
These cinnamon rolls don’t just taste amazing—they give you a hands-on way to understand how sourdough behaves in different settings. From long proofing times to gluten development, this is real-life baking knowledge… and dessert!
What Makes This Recipe Beginner-Friendly?
This isn’t one of those recipes that demands perfection. It’s crafted with new bakers in mind. Whether you’ve just mixed your fifth starter or still aren’t sure what “bulk ferment” means, this recipe has your back.
Let’s take a closer look at why this recipe is a no-brainer for beginners:
-
✅ Foolproof, flexible method: You can adjust proofing times to fit your schedule.
-
✅ No commercial yeast required: Your sourdough starter does all the work.
-
✅ No stand mixer? No sweat!: You can knead everything by hand with ease.
-
✅ Simple vanilla glaze: No frosting drama—just whisk and drizzle.
-
✅ Low pressure: Even if your starter isn’t at “beast mode,” these rolls will still rise and shine.
Best of all, these cinnamon rolls are made with real, recognizable ingredients. You likely have most of them in your pantry already.
Ingredient Overview: What You’ll Need
Let’s break things down so you can get prepped and excited to bake.
For the Dough:
-
1 cup active sourdough starter (fed 4–6 hours before using)
-
¾ cup warm milk (dairy or plant-based)
-
1 large egg
-
¼ cup granulated sugar
-
½ cup unsalted butter, softened
-
1 tsp vanilla extract
-
1 tsp salt
-
3¾ to 4¼ cups all-purpose flour
💡 Tip: Start with less flour and add as needed until your dough is soft and slightly tacky—not sticky.
For the Cinnamon Filling:
-
½ cup packed brown sugar
-
1½ tbsp ground cinnamon
-
¼ cup softened butter
This combo creates the signature swirl that makes every bite rich and gooey.
For the Vanilla Glaze:
-
¾ cup powdered sugar
-
1½ tbsp milk (or cream for a richer result)
-
½ tsp vanilla extract
-
Pinch of salt
It’s a classic, no-fuss glaze that melts right into the rolls for that iconic sticky-top finish.
Add-Ins and Customizations
Want to get creative? Here are some optional mix-ins and upgrades that work beautifully with the base recipe:
-
Chopped pecans or walnuts – add crunch to the filling
-
Diced apples or raisins – add natural sweetness and texture
-
Cream cheese glaze – for a tangy twist
-
Flaky sea salt – sprinkle on top to balance sweetness
These cinnamon rolls are yours to customize, so don’t be afraid to play with flavor.
Common Concerns from Sourdough Newbies
Let’s tackle a few worries right out of the gate:
-
❓What if my starter isn’t super bubbly?
Don’t worry. If it’s been fed recently and shows signs of activity (like doubling in volume), it’s good to go. -
❓Can I use discard instead of active starter?
Unfortunately, no. This recipe relies on live, active yeast from your starter to make the dough rise properly. -
❓Is overnight proofing necessary?
Nope! You can make these on the same day. But if you want deeper flavor or to save time in the morning, the overnight option is a nice bonus.
Why You’ll Fall in Love with This Bake
These cinnamon rolls are more than just a recipe—they’re a delicious entry point into the world of enriched sourdough baking. There’s no sour tang, no need for a fancy Dutch oven, and no long bake times. Just soft, swirled, warm-from-the-oven comfort food that makes your kitchen smell like heaven.
Step-by-Step Instructions for Sourdough Cinnamon Rolls
Welcome to the heart of the recipe—this is where the magic happens. Whether you’re new to sourdough baking or just love a good cinnamon roll, these easy-to-follow steps will guide you from raw ingredients to warm, gooey perfection. Grab your mixing bowl and let’s get started!
Step 1: Mix the Dough
The dough is the foundation of your cinnamon rolls. It should be soft, slightly tacky, and beautifully elastic—don’t stress, we’ll get there together.
Start with the wet ingredients:
In a large bowl, whisk together:
-
1 cup active sourdough starter (fed 4–6 hours ago)
-
¾ cup warm milk (dairy or plant-based—your choice)
-
1 large egg
-
¼ cup granulated sugar
-
½ cup softened butter
-
1 tsp vanilla extract
Once everything is smooth and well blended, it’s time to bring in the flour.
Add flour and salt gradually:
Mix in:
-
3¾ to 4¼ cups all-purpose flour
-
1 tsp salt
Start with 3¾ cups of flour and add more as needed. Stir until the dough pulls away from the sides of the bowl, then turn it out onto a floured surface or knead directly in the bowl.
Knead for 5–8 minutes by hand (or use a stand mixer with the dough hook). You’re looking for a soft, elastic dough that doesn’t stick to your fingers.
💡 Hydration Tip:
If the dough is sticky, add flour 1 tablespoon at a time. If it’s too dry and cracking, drizzle in a bit more milk. The ideal dough should feel smooth like playdough—not wet, not crumbly.
Step 2: First Rise (Bulk Fermentation)
Now that your dough is ready, it’s time for its first rest. This phase helps the gluten relax and allows the sourdough culture to do its rising magic.
Let it rise for 4–6 hours at room temperature in a covered bowl. You want it to almost double in size. Depending on your kitchen’s temperature and the strength of your starter, the rise time may vary.
💡 What if my starter is sluggish?
Don’t panic. If your starter isn’t very bubbly, just give it more time. A slower rise is totally okay—as long as the dough becomes noticeably puffier, you’re on track.
Warm Kitchen = Faster Rise
Cool kitchen? Try placing the bowl in your oven (turned off!) with just the oven light on for gentle warmth.
Make-Ahead Option
Not ready to roll tonight? No problem.
Once the dough finishes its first rise, cover it and pop it in the fridge overnight.
Why chill the dough?
-
Enhances flavor with slow fermentation
-
Makes it easier to roll and shape in the morning
-
Great for prepping ahead of brunch, holidays, or weekend treats
Just bring it to room temperature for 20–30 minutes before moving on to the next step.
Step 3: Roll, Fill, and Shape
Time to transform that pillowy dough into irresistible cinnamon spirals!
-
Roll it out:
On a lightly floured surface, roll the dough into a 12×16″ rectangle. Try to keep the edges even. -
Add the filling:
-
Spread ¼ cup softened butter evenly across the surface.
-
In a small bowl, mix ½ cup brown sugar and 1½ tablespoons cinnamon. Sprinkle this mixture over the buttered dough.
-
-
Roll it up:
Starting from the long edge, roll the dough tightly into a log. -
Slice and arrange:
Slice the log into 9 even pieces. Place the rolls into a greased or parchment-lined 9×9″ or 9×13″ baking dish, leaving space between each roll for expansion.
Step 4: Final Proof
Let your shaped rolls puff up one more time before baking.
Cover and proof at room temperature for 1–2 hours until the rolls have noticeably expanded. They should look plump and almost touching in the pan.
💡 Proofing Tip:
Gently press a finger into one roll—if the dent springs back slowly, they’re ready. If it bounces back quickly, give them a little more time.
Cold kitchen again? Try that oven-with-light trick again to speed things up gently.
Step 5: Bake the Rolls
Your rolls are shaped, proofed, and ready to shine. Time to bake!
-
Preheat your oven to 375°F (190°C)
-
Bake the cinnamon rolls for 22–28 minutes, until golden on top and just set in the center.
💡 Check around the 20-minute mark.
If the tops are browning too quickly, loosely cover the pan with aluminum foil and continue baking. You want golden, not burnt!
When done, remove from the oven and let cool for 5–10 minutes before glazing.
Step 6: Glaze and Serve
While the rolls are still warm (but not too hot), whip up your vanilla glaze:
-
¾ cup powdered sugar
-
1½ tbsp milk (or cream)
-
½ tsp vanilla extract
-
Pinch of salt
Whisk everything together until smooth. Drizzle over the rolls for a glossy, bakery-style finish.
These rolls are best enjoyed fresh, but you can absolutely reheat them for gooey deliciousness the next day.
Optional Glaze Variations
Looking to jazz things up? Try these fun glaze twists:
-
Cream cheese glaze – mix in 2 oz cream cheese for a tangy topping
-
Citrus glaze – add lemon or orange zest for brightness
-
Maple drizzle – swap milk for maple syrup and skip the vanilla
You’re now just a few steps away from becoming the go-to cinnamon roll baker in your home! This final section includes expert tips, troubleshooting FAQs, smart storage solutions, and some closing encouragement to help you feel 100% confident every time you bake.
Expert Tips for Perfect Sourdough Rolls
Even though this recipe is designed with beginners in mind, a few expert insights can make a big difference. Here’s how to elevate your cinnamon roll game from good to “please make these again!”
Know Your Starter
The backbone of any sourdough recipe is your starter, and understanding how it works will set you up for success.
🔬 What does “active” mean here?
For this recipe, your starter should be:
-
Recently fed (within 4–6 hours)
-
Bubbly and doubled in size
-
Smelling mildly sweet or tangy—not overly sour
💡 Tip: To check readiness, drop a spoonful of your starter into water. If it floats, it’s active and airy—perfect for baking.
🕐 Timing your feedings
To sync your baking with peak starter activity:
-
Feed your starter first thing in the morning
-
Bake your dough by mid-afternoon
-
Chill overnight if using the make-ahead method
Don’t Rush the Proofing
One of the biggest shifts when switching to sourdough is patience. Unlike commercial yeast, sourdough takes its sweet time—and that’s a good thing.
⏳ Why it matters
Slow fermentation allows deeper flavor development, better texture, and more digestible gluten.
🗓️ Proofing schedule options
-
Same-day:
Mix dough in the morning → shape by afternoon → bake in the evening. -
Overnight:
Mix dough in the evening → refrigerate after first rise → shape and bake the next morning.
Both work beautifully. Just choose what fits your lifestyle best!
Customize with Confidence
Once you’ve made this recipe once, the real fun begins: personalizing it to your tastes! Here are some tasty add-in ideas to make each batch your own:
🌰 Nuts
-
Pecans or walnuts pair naturally with cinnamon.
-
Add chopped nuts to the filling before rolling.
🍎 Fruit
-
Diced apples, raisins, or dried cranberries bring a pop of sweetness and texture.
🍂 Spice upgrades
-
Mix chai spice or pumpkin pie spice into your cinnamon-sugar blend for a seasonal twist.
🍊 Glaze enhancements
-
Try adding orange zest, maple syrup, or a dash of cardamom to your glaze for something special.
These rolls are a blank canvas—get creative!
FAQ: Beginner Sourdough Cinnamon Rolls
Even with a solid recipe, questions pop up. Let’s clear up the most common ones for a smoother baking experience.
Can I use sourdough discard instead of active starter?
Nope—you’ll need active starter for this one. Discard lacks the rising power needed for the dough to properly ferment and expand. Save your discard for pancakes or crackers!
What if my starter isn’t super bubbly?
Totally fine. As long as it’s recently fed and showing signs of activity (even mild bubbling or rising), your dough will still do its job. This recipe is forgiving and flexible—ideal for newer bakers.
Can I skip the overnight option?
Yes, absolutely! The overnight option adds depth of flavor and scheduling flexibility, but the same-day version works just as well if you’re short on time or planning a spontaneous bake.
Can I use whole wheat flour?
Yes—but only up to 50%. Whole wheat flour is more absorbent and can make the dough denser. If you go this route, add a splash more milk to keep the dough soft and hydrated.
How do I store leftovers?
If you (somehow) have leftovers, here’s how to keep them soft and delicious:
-
Room temperature: Store in an airtight container for 1–2 days.
-
Refrigerator: Lasts up to 4 days. Bring to room temp or reheat gently.
🔁 Best way to reheat:
Pop a roll in the microwave for 15–20 seconds or warm in the oven at 300°F (150°C) for 5–8 minutes. Add a touch of glaze or butter for a fresh-from-the-oven taste.
Final Thoughts: Why You’ll Make These Again
There’s something magical about taking your starter—something alive, unpredictable, and homemade—and turning it into something sweet, soft, and comforting.
These beginner-friendly sourdough cinnamon rolls are:
-
Confidence-boosting for new bakers
-
Family-friendly and freezer-friendly
-
Fun to share at brunch, holidays, or as gifts
-
Creative and customizable—your signature swirl awaits
-
Proof that sourdough isn’t just about crusty bread—it’s about comfort too
So go ahead—mix, roll, proof, and bake your way into the world of sweet sourdough. With each batch, you’ll learn more, enjoy more, and build memories you’ll love sharing.
Print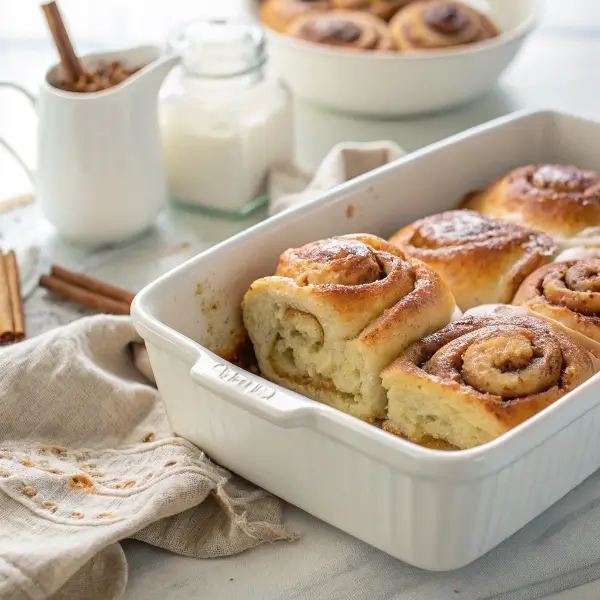
Beginner-Friendly Sourdough Cinnamon Rolls (Foolproof!)
Soft, fluffy, and full of cozy cinnamon flavor, these sourdough cinnamon rolls are the perfect entry into sweet sourdough baking. Made without commercial yeast and topped with a smooth vanilla glaze, they’re approachable, flexible, and deeply rewarding—ideal for beginners and weekend bakers alike.
- Total Time: 8 hours (including rise time)
- Yield: 9 rolls 1x
Ingredients
For the Dough:
- 1 cup active sourdough starter (fed within 4–6 hours)
- ¾ cup warm milk (dairy or plant-based)
- 1 large egg
- ¼ cup granulated sugar
- ½ cup unsalted butter, softened
- 1 teaspoon vanilla extract
- 1 teaspoon salt
- 3¾ to 4¼ cups all-purpose flour
For the Cinnamon Filling:
- ½ cup packed brown sugar
- 1½ tablespoons ground cinnamon
- ¼ cup unsalted butter, softened
For the Glaze:
- ¾ cup powdered sugar
- 1½ tablespoons milk (or cream)
- ½ teaspoon vanilla extract
- Pinch of salt
Instructions
In a large bowl, whisk together sourdough starter, warm milk, egg, sugar, butter, and vanilla. Slowly stir in flour and salt until a soft dough forms. Knead for 5–8 minutes until smooth and elastic.
Tip: Add flour 1 tablespoon at a time if the dough is too sticky; add a splash of milk if too dry.
Cover dough and let rise at room temperature for 4–6 hours, until nearly doubled in size.
Make-Ahead Option: Cover and refrigerate overnight after this step.
On a floured surface, roll dough into a 12×16 inch rectangle. Spread softened butter across dough. Mix brown sugar and cinnamon, and sprinkle evenly. Roll tightly into a log and slice into 9 even pieces. Place in a greased or parchment-lined 9×9” or 9×13” pan.
Cover and let the rolls rise again for 1–2 hours until puffy and nearly doubled.
Tip: Place in a warm oven with the light on for a quicker rise.
Preheat oven to 375°F (190°C). Bake for 22–28 minutes, until golden and set. Tent with foil if browning too quickly.
Whisk together powdered sugar, milk, vanilla, and salt. Drizzle over warm rolls and enjoy!
Notes
- Add chopped nuts or fruit before rolling for extra texture and flavor.
- Substitute with a cream cheese glaze or citrus zest for variation.
- Rolls can be frozen before final proof or after baking for future enjoyment.
- Reheat leftovers in the microwave for 15 seconds or oven at 300°F for 5–8 minutes.
- Prep Time: 25 minutes
- Cook Time: 25 minutes
- Category: Breakfast
- Method: Baking
- Cuisine: American
- Diet: Vegetarian
Nutrition
- Serving Size: 1 roll
- Calories: 280
- Sugar: 16g
- Sodium: 180mg
- Fat: 12g
- Saturated Fat: 7g
- Unsaturated Fat: 4g
- Trans Fat: 0g
- Carbohydrates: 37g
- Fiber: 1g
- Protein: 5g
- Cholesterol: 40mg
Keywords: sourdough cinnamon rolls, beginner sourdough recipe, homemade breakfast rolls, sweet sourdough baking, no yeast cinnamon rolls



These are Delicious. They truly are fool proof. I didn’t read recipe correctly so put if fridge as soon as mixed (didn’t let raise) then when I took them out I was rushed and made rolls a little before time. They still returned out great. I will make these again.
★★★★★
These turned out amazing and so delicious!! The recipe was very easy to follow as a new sourdough baker.
Could you roll, cut these and have them in a baking dish but keep them in fridge till ready to bake? And just take out, get room temp then bake?
★★★★★
These turned out amazing! I made small changes to mine and did apple spice instead of just cinnamon and mixed the seasoning with the butter and spread it out altogether. The recipe turned out magnificent! My husband said they were the best cinnamon rolls he’s ever had!! I made cream cheese icing for them too.
★★★★★