Contents
- 1 What You’ll Need to Make Sourdough Seed Crackers
- 2 Crafting Your Crunchy Masterpiece: Step-by-Step
- 3 Recipe Variations & Creative Twists
- 4 Serving Suggestions That Shine
- 5 Storage Tips for Lasting Crunch
- 6 7 Common Mistakes & How to Avoid Them
- 7 Still Have Questions? We’ve Got Answers
- 8 Why This Recipe Deserves a Spot in Your Routine
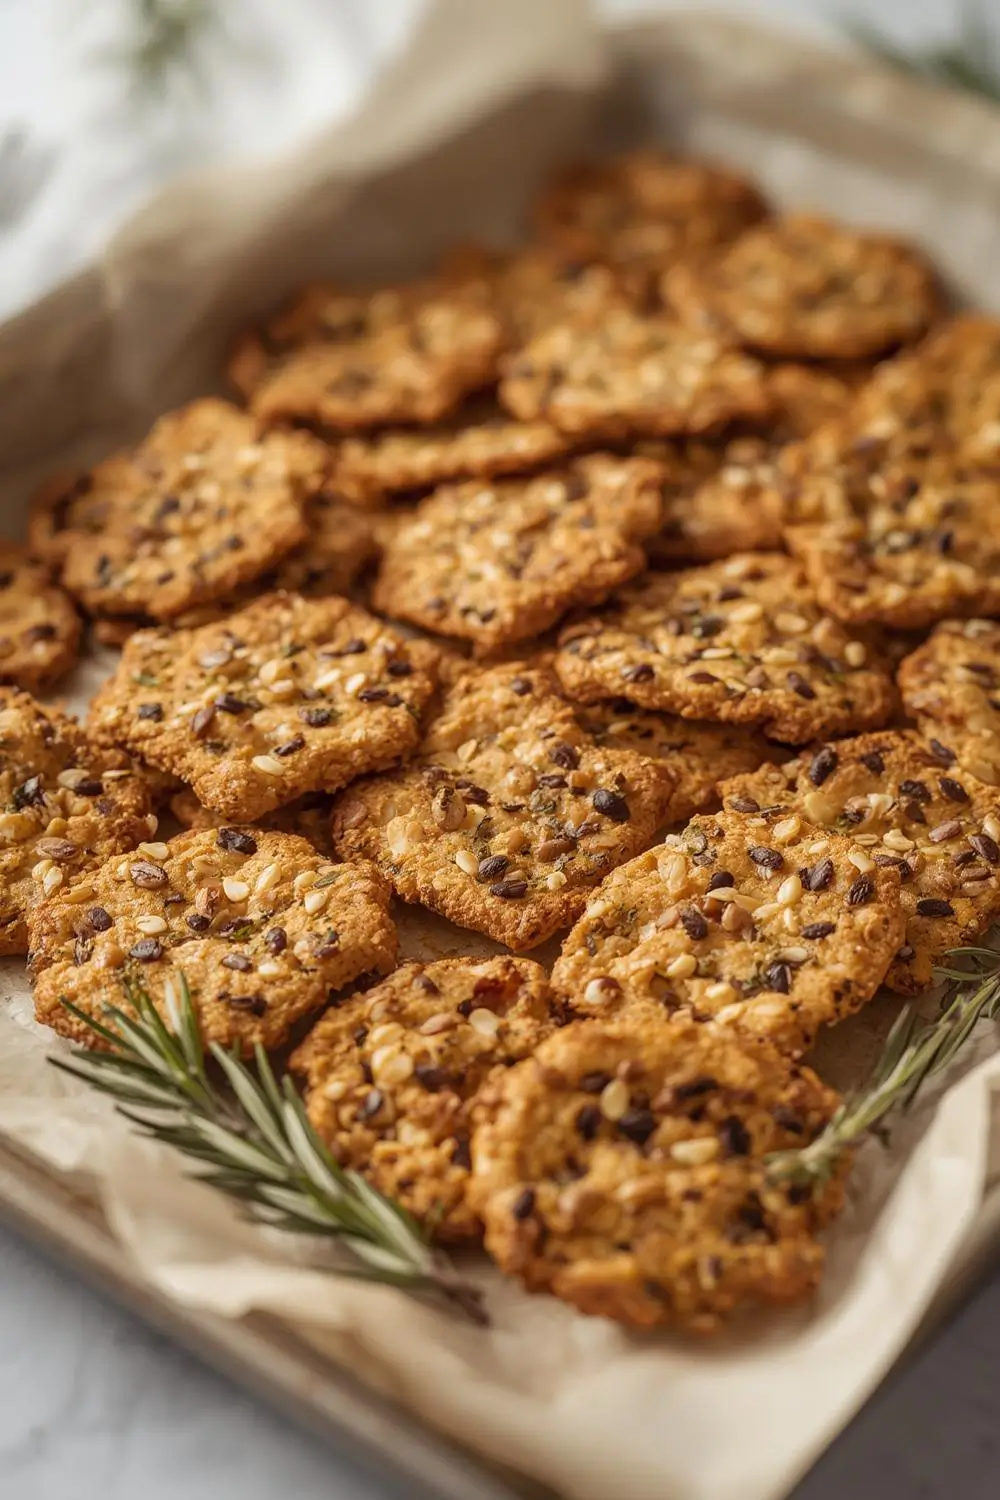
Have you ever looked at that jar of sourdough discard sitting in your fridge and wondered, “What magic could I create with this?” Let me tell you, these Crunchy Homemade Sourdough Seed Crackers are nothing short of alchemy. As someone who’s rescued countless batches of discard from the compost bin, I can confidently say this recipe turns what seems like waste into pure gold. The first time my kitchen filled with the nutty aroma of toasted seeds melding with tangy sourdough, I knew I’d struck snacktime paradise.
What makes these crackers truly special isn’t just their satisfying crunch or beautiful golden speckles – it’s how they transform pantry staples into something extraordinary. Perfect for beginners yet impressive enough for seasoned bakers, this recipe requires no fancy equipment or obscure ingredients. Just mix, roll, and bake your way to wholesome satisfaction that pairs beautifully with dips, cheeses, or those quiet moments when you need a mindful crunch.
What You’ll Need to Make Sourdough Seed Crackers
Gather these simple ingredients from your pantry and fridge – most are probably already there waiting to shine:
Main Ingredients
-
- 1 cup sourdough discard (100% hydration) – Your tangy starter’s second act
-
- 1 cup whole wheat flour – Adds nutty depth and wholesome fiber
-
- ⅓ cup mixed seeds – Use equal parts pumpkin, sunflower, and flax seeds for perfect texture
-
- 3 tbsp olive oil – Extra virgin gives the best flavor
-
- 1 tbsp honey or maple syrup – For subtle sweetness to balance acidity (maple keeps it vegan)
The Flavor Enhancers
-
- 1 tsp sea salt – Flaky crystals create delightful bursts of flavor
-
- ½ tsp garlic powder – Umami depth without overwhelming
-
- 1 tbsp fresh rosemary – Finely chopped for aromatic freshness
-
- 2 tbsp water – Adjusts consistency as needed
Crafting Your Crunchy Masterpiece: Step-by-Step
Mixing the Dough
In a large bowl, combine your sourdough discard and olive oil. Stir until the mixture resembles a lumpy pancake batter. Add honey or maple syrup, mixing until fully incorporated. Sprinkle in the garlic powder and half the rosemary, reserving some for topping.
Pro Tip: If your discard is especially thick, warm it slightly at room temperature for easier mixing. Cold starter straight from the fridge works too but may require extra elbow grease.
Incorporating Dry Ingredients
Gradually mix in the whole wheat flour about ¼ cup at a time. After the first addition, toss in your seed mixture (reserve 1 tablespoon for later). The dough will transform from shaggy to cohesive as you mix. When it starts pulling away from the bowl, switch to kneading with your hands for about 2 minutes.
Texture Check: You want a slightly sticky dough that holds together without being wet. If it crumbles, add water ½ teaspoon at a time. Too sticky? Sprinkle in tiny amounts of flour.
Rolling Like a Pro
Divide dough into two equal portions. Place one between two sheets of parchment paper. Roll into a rectangle as thin as a credit card – about ⅛ inch thick. This thinness ensures maximum crispness!
Rolling Hack: Rotate the dough 90 degrees every few rolls to maintain even thickness. If edges crack, gently press them back together with damp fingers.
Seeding & Scoring
Brush the surface lightly with water using a pastry brush. Sprinkle reserved seeds and rosemary evenly across the surface. Gently press them into the dough with your rolling pin. Using a pizza cutter or sharp knife, score crackers into squares or rectangles – no need to separate completely.
Presentation Perfection: For rustic charm, leave edges irregular rather than trimming them. Those crispy bits will become prized pieces!
Baking to Golden Perfection
Slide parchment with dough directly onto a baking sheet. Bake at 350°F (175°C) for 25 minutes. Rotate pan halfway through. When edges turn deep golden, remove from oven and immediately recut along scored lines.
Doneness Test: Crackers should feel firm when tapped. They’ll crisp up further while cooling – patience rewards you with perfect snap!
Recipe Variations & Creative Twists
Seed Combinations to Try
-
- Everything Bagel: Sesame seeds, poppy seeds, dried garlic, onion flakes
-
- Southwest Fiesta: Chili flakes, cumin seeds, chia seeds with lime zest
-
- Mediterranean: Za’atar blend, nigella seeds, dried oregano
Dietary Adjustments
-
- Gluten-Free: Substitute whole wheat flour with GF 1:1 baking blend
-
- Oil-Free: Use unsweetened applesauce instead of olive oil
-
- Nutty Boost: Replace ¼ cup flour with almond flour for richer flavor
Flavor Infusions
-
- Cheesy Delight: Add 2 tbsp nutritional yeast before mixing
-
- Spicy Kick: Mix in ½ tsp cayenne pepper with dry ingredients
-
- Citrus Zing: Add 1 tbsp lemon or orange zest to the dough
Serving Suggestions That Shine
These crackers transform ordinary snacks into special occasions. Try them with:
-
- Dips: Classic hummus, roasted red pepper spread, or white bean garlic dip
-
- Cheeses: Sharp cheddar, creamy brie, or tangy goat cheese
-
- Charcuterie: Pair with cured meats like turkey pepperoni or smoked salmon
-
- Breakfast: Top with smashed avocado and everything bagel seasoning
Storage Tips for Lasting Crunch
Store completely cooled crackers in an airtight container at room temperature:
-
- Room Temperature: 1-2 weeks (include silica packet to absorb moisture)
-
- Freezer: Up to 3 months in freezer bags (re-crisp at 300°F for 5 minutes)
Reviving Stale Crackers: Spread on baking sheet and bake at 300°F for 3-5 minutes. Let cool completely before storing again.
7 Common Mistakes & How to Avoid Them
-
- Rolling Too Thick: Creates hard crackers instead of crisp ones. Use rolling guides or measure thickness periodically.
-
- Forgetting to Score: Cracks haphazardly during baking. Score deeply enough before baking.
-
- Skipping the Parchment: Leads to sticking disasters. Never substitute wax paper!
-
- Uneven Seed Distribution: Creates hotspots. Mix seeds with dough AND top after rolling.
-
- Opening Oven Too Soon: Releases steam needed for crispness. Wait until minimum bake time.
-
- Storing Before Cooling: Traps steam and creates soggy crackers. Cool completely 1 hour minimum.
-
- Using Old Seeds: Results in bitter flavors. Taste seeds before adding to confirm freshness.
Still Have Questions? We’ve Got Answers
Can I use active sourdough starter instead of discard?
Absolutely! The crackers will have slightly more tang but same great texture. No need to adjust other ingredients.
Why did my crackers puff up like pita bread?
This happens when the dough is rolled unevenly or scored too shallowly. Ensure consistent thickness and cut at least halfway through the dough.
Can I make these without seeds?
Yes, though the seeds add structural integrity. If omitting, increase flour by 2 tbsp and expect a slightly different texture.
How thin should I really roll the dough?
Test with a dime – you should be able to see the coin’s outline through the dough. Transparent-thin equals perfect crisp!
Why are my crackers chewy instead of crunchy?
Usually due to underbaking or high humidity in storage. Extend bake time by 5-minute increments until golden brown at the edges.
Can I double the recipe?
Yes, but mix in two separate batches. Doubling makes dough too difficult to roll thin uniformly.
Why This Recipe Deserves a Spot in Your Routine
In our busy lives, having wholesome snacks shouldn’t mean sacrificing flavor or precious time. These sourdough seed crackers solve three dilemmas at once: reducing food waste, creating nutritious snacks, and satisfying that need for crunchy comfort. The magic lies in how such simple ingredients can transform into something extraordinary with just a little patience and rolling pin prowess.
Once you taste that first cracker snapping between your teeth, releasing the earthy whisper of seeds and tangy sourdough notes, you’ll understand why this recipe has become my most requested. Whether you’re packing lunchboxes, assembling charcuterie boards, or sneaking a midnight snack, these golden beauties deliver on every front. Happy baking – may your discard jar always lead to delicious discoveries!
")