The Ultimate Guide to Fluffy Sourdough Discard Sandwich Rolls: Zero Waste, Maximum Flavor
Imagine biting into a soft, pillowy roll that practically melts in your mouth, bursting with that unmistakable tangy sourdough flavor. Now, picture creating this culinary delight almost effortlessly, using something you were probably going to throw away – your sourdough discard! These Easy Sourdough Discard Soft Sandwich Rolls are your ticket to bakery-quality results at home, transforming kitchen scraps into pure satisfaction. Perfect for sandwiches, burgers, toast, or simply slathered with butter, they embody the magic of sourdough without any pork, alcohol, or complicated techniques. Let’s dive into mastering this beginner-friendly recipe that celebrates your discard and delivers incredible results.
Why Sourdough Discard is Your Secret Weapon
Sourdough discard often gets a bad rap – it’s that tangy, bubbly mixture sitting in your jar, seemingly useless after feeding your starter. But savvy bakers know better! This discard is pure potential. It adds incredible flavor depth, improves texture, and boosts nutrition compared to regular bread flour. Using it up isn’t just eco-friendly; it elevates your baked goods to new heights. These rolls are proof positive that sourdough discard deserves a starring role, not a trip to the compost bin.
The Magic of Simple Ingredients
The beauty of these rolls lies in their simplicity. You likely have everything you need right in your pantry:
- Sourdough Discard: The star! Use discard that’s been fed recently (1-3 days old is ideal for tanginess). The exact amount matters for the right dough consistency.
- All-Purpose Flour: Provides structure and a neutral base. Bread flour can be used for extra chew, but AP flour keeps it soft and tender.
- Warm Water: Activates the yeast in the discard and hydrates the flour. Use water between 100-110°F (38-43°C).
- Salt: Essential for flavor development and controlling yeast activity. Fine sea salt or table salt work perfectly.
- Olive Oil or Neutral Oil: Adds richness, tenderness, and helps with browning. Vegetable oil, avocado oil, or melted coconut oil are great substitutes.
- Honey or Maple Syrup (Optional): A tiny bit (1/2 tsp) can gently feed any remaining yeast and promote browning, but it’s not strictly necessary.
Getting Started: Mixing the Dough
1. Combine Dry Ingredients: In a large mixing bowl, whisk together the flour and salt. This ensures even distribution.
2. Incorporate Discard & Liquid: Make a well in the center of the dry ingredients. Pour in the sourdough discard and warm water (and optional sweetener if using). Using a sturdy spoon or your clean hands, start mixing until a shaggy, sticky dough forms. Don’t worry about perfect smoothness yet.
3. Kneading for Softness: This is where the magic happens. Turn the dough out onto a lightly floured surface. Knead vigorously for about 8-10 minutes. The key is to develop the gluten just enough to create a soft, pliable dough that holds its shape but remains incredibly tender. You’ll feel it become smoother and less sticky. If it’s too sticky, add a tiny bit more flour; if too dry, add a teaspoon of water. The goal is a soft, slightly tacky dough.
First Rise: Patience is a Virtue
Place the kneaded dough in a lightly oiled bowl, turning it once to coat. Cover tightly with plastic wrap or a damp kitchen towel. Let it rise in a warm, draft-free spot until doubled in size, usually 1 to 1.5 hours. The warmth helps the sourdough yeast work its tangy magic. Don’t rush this step – good things come to those who wait!
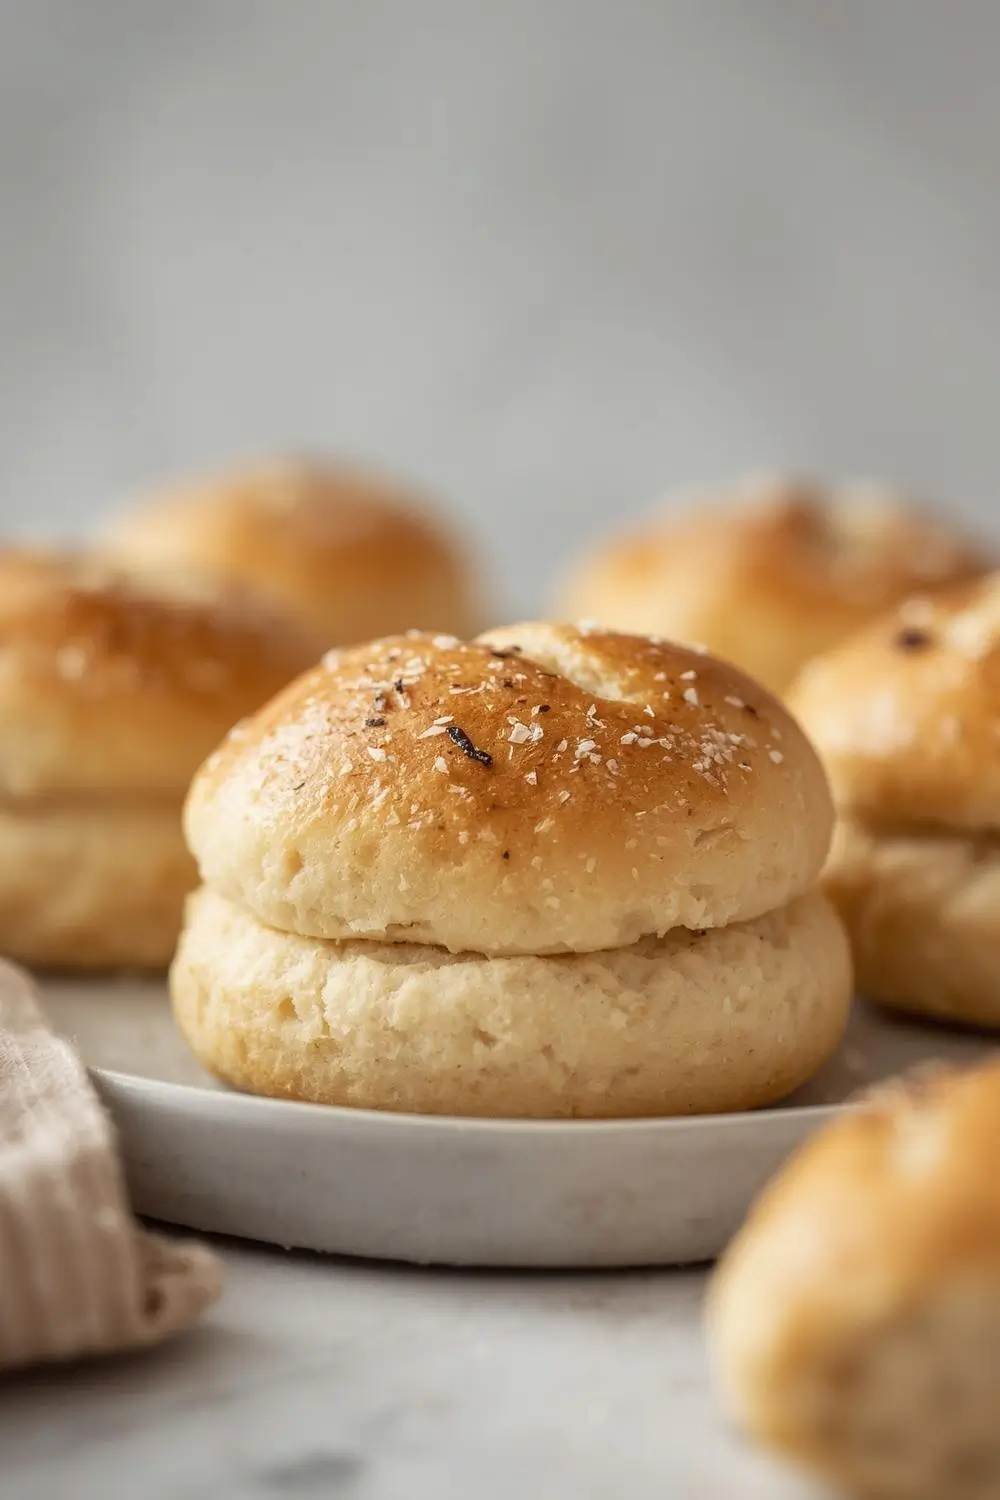
Shaping Perfection: Creating Soft Rolls
1. Deflate & Divide: Gently punch down the risen dough to release air bubbles. Turn it out onto a lightly floured surface.
2. Shape into Rolls: Divide the dough into 8 equal pieces (about 60-70g each). For soft, tender rolls, shape each piece into a smooth ball by gently pulling the edges underneath and pinching to seal. Place the rolls seam-side down on a parchment-lined baking sheet or in a greased 8-inch round cake pan.
3. Second Rise (Proofing): Cover the shaped rolls loosely with plastic wrap or a towel. Let them rise again in a warm spot until noticeably puffy, about 30-45 minutes. They should spring back slowly when gently poked.
Baking to Golden Perfection
1. Preheat & Slash: Preheat your oven to 375°F (190°C) with a rack in the center. Just before baking, gently brush the tops of the rolls with a little olive oil or water. Using a sharp knife or razor blade, make 2-3 shallow diagonal slashes across the top of each roll. This allows steam to escape and prevents cracking.
2. Bake: Place the rolls in the preheated oven. Bake for 20-25 minutes, or until the rolls are deep golden brown and sound hollow when tapped on the bottom. An instant-read thermometer inserted into the center should read 190-200°F (88-93°C).
3. Cool Completely: This is crucial! Resist the urge to slice them hot. Let the rolls cool completely on a wire rack. This allows the internal structure to set, ensuring maximum softness and preventing a gummy texture. It takes patience, but trust us, the wait is worth it!
Variations & Substitutions: Make it Your Own
- Whole Wheat Twist: Substitute up to 1 cup of the AP flour with whole wheat flour for a nuttier flavor and added fiber. The dough may be slightly denser.
- Seedy Delight: Mix in 2-3 tablespoons of sesame seeds, poppy seeds, or flax seeds into the dough after kneading for added texture and flavor.
- Herb-Infused: Add 1-2 teaspoons of dried herbs (like rosemary, thyme, or oregano) to the dry ingredients for savory rolls perfect for sandwiches.
- Sweet Roll Option: Omit the salt and add 1-2 tablespoons of sugar or honey to the dry ingredients. Brush the tops with melted butter and sprinkle with cinnamon sugar before baking for a sweet treat.
- Gluten-Free Adaptation: Unfortunately, traditional sourdough discard sandwich rolls aren’t easily adapted to gluten-free flours while maintaining the same soft, sandwich-style texture. Focus on other sourdough discard recipes like crackers or flatbreads.
Storage & Reheating: Keeping Them Perfect
- Room Temperature: Store completely cooled rolls in an airtight container or resealable bag at room temperature for up to 2 days. They stay wonderfully soft this way.
- Refrigeration: For longer storage (up to 5 days), refrigerate the rolls. They may firm up slightly. To restore softness, wrap them in a damp paper towel and microwave for 10-15 seconds before serving, or place in a 300°F (150°C) oven for 5-7 minutes.
- Freezing: Freeze cooled rolls in a single layer on a baking sheet until solid, then transfer to a freezer bag or airtight container. Freeze for up to 3 months. Thaw at room temperature or reheat from frozen in the microwave or oven as above.
Common Mistakes to Avoid: Baking Success
- Over-Kneading: Overworking the dough develops too much gluten, leading to tough rolls. Knead just until smooth and elastic.
- Rushing the Rise: Cold environments or insufficient time will result in dense, flavorless rolls. Find a consistently warm spot.
- Cutting Too Soon: Slicing into hot rolls traps steam, making them gummy. Patience is key!
- Using Old Discard: Discard that’s too old (more than 3 days) or too fresh (less than 24 hours) can lead to inconsistent fermentation and flavor. Aim for 1-3 days old.
- Skipping the Slash: Forgetting to slash the tops can cause the rolls to crack unpredictably or not rise properly in the oven.
Your Sourdough Journey Continues
Mastering these Easy Sourdough Discard Soft Sandwich Rolls is more than just baking bread; it’s embracing the rhythm of sourdough. You’re transforming waste into wonder, harnessing natural fermentation, and creating something deeply satisfying. The tangy flavor, the pillowy texture, the sense of accomplishment – it’s all part of the magic. These rolls are your canvas. Experiment with herbs, seeds, or sweet variations. Share them with friends and family, or simply savor the quiet joy of a perfectly soft, homemade sandwich. Your sourdough discard has never been more valuable. Happy baking!
Frequently Asked Questions (FAQs)
1. What if my discard is very sour? Will it make the rolls taste too tangy?
* A very sour discard can add a stronger tang, which many love! If you prefer a milder flavor, use discard that’s 1-2 days old instead of 3 days old. You can also reduce the amount slightly, though the flavor difference is usually subtle in rolls compared to a loaf.
2. Can I use rye flour or other flours instead of all-purpose?
* While you can experiment, using 100% rye flour or other non-wheat flours will significantly change the texture and structure, likely resulting in dense, crumbly rolls. You can try a small percentage (e.g., 1/4 cup) mixed with AP flour for flavor, but AP flour provides the best balance for soft, sandwich-style rolls.
3. My rolls didn’t rise much in the second rise. What went wrong?
* Check your starter’s activity – is it lively? Ensure your rising spot is warm enough (around 75-80°F is ideal). If the dough was too cold when shaped, it might not rise well. Also, ensure your discard is active and not too old or inactive.
4. How do I know when the rolls are done baking?
* The most reliable method is the internal temperature: 190-200°F (88-93°C). Visually, they should be a deep, golden brown all over. Tapping the bottom should sound hollow. If they look done but feel soft inside, they might need a few more minutes.
5. Can I make these rolls without a stand mixer?
* Absolutely! These rolls are perfect for hand-kneading. The 8-10 minute kneading time is crucial for developing the right texture, so be patient and use your body weight to push and fold the dough effectively.
6. What can I do with leftover discard if I don’t want to make rolls?
* The possibilities are endless! Make sourdough pancakes, waffles, crackers, pizza crust, or even sourdough banana bread. Discard is incredibly versatile and a fantastic way to reduce food waste while adding flavor to countless dishes.
")