Contents
- 1 What Makes Sourdough Focaccia Airy?
- 2 Ingredients for Extra Airy Sourdough Focaccia
- 3 Why High Hydration Matters
- 4 Step-by-Step Method for Extra Airy Focaccia
- 5 Understanding What’s Happening Inside the Dough
- 6 Signs of a Perfectly Fermented Airy Focaccia
- 7 Troubleshooting Common Issues
- 8 How to Store Airy Focaccia
- 9 Extra Tips for Achieving Maximum Airiness
- 10 The Science of Open Crumb
- 11 Flavor and Texture Balance
- 12 Serving Suggestions
- 13 Frequently Asked Questions
- 14 Final Thoughts
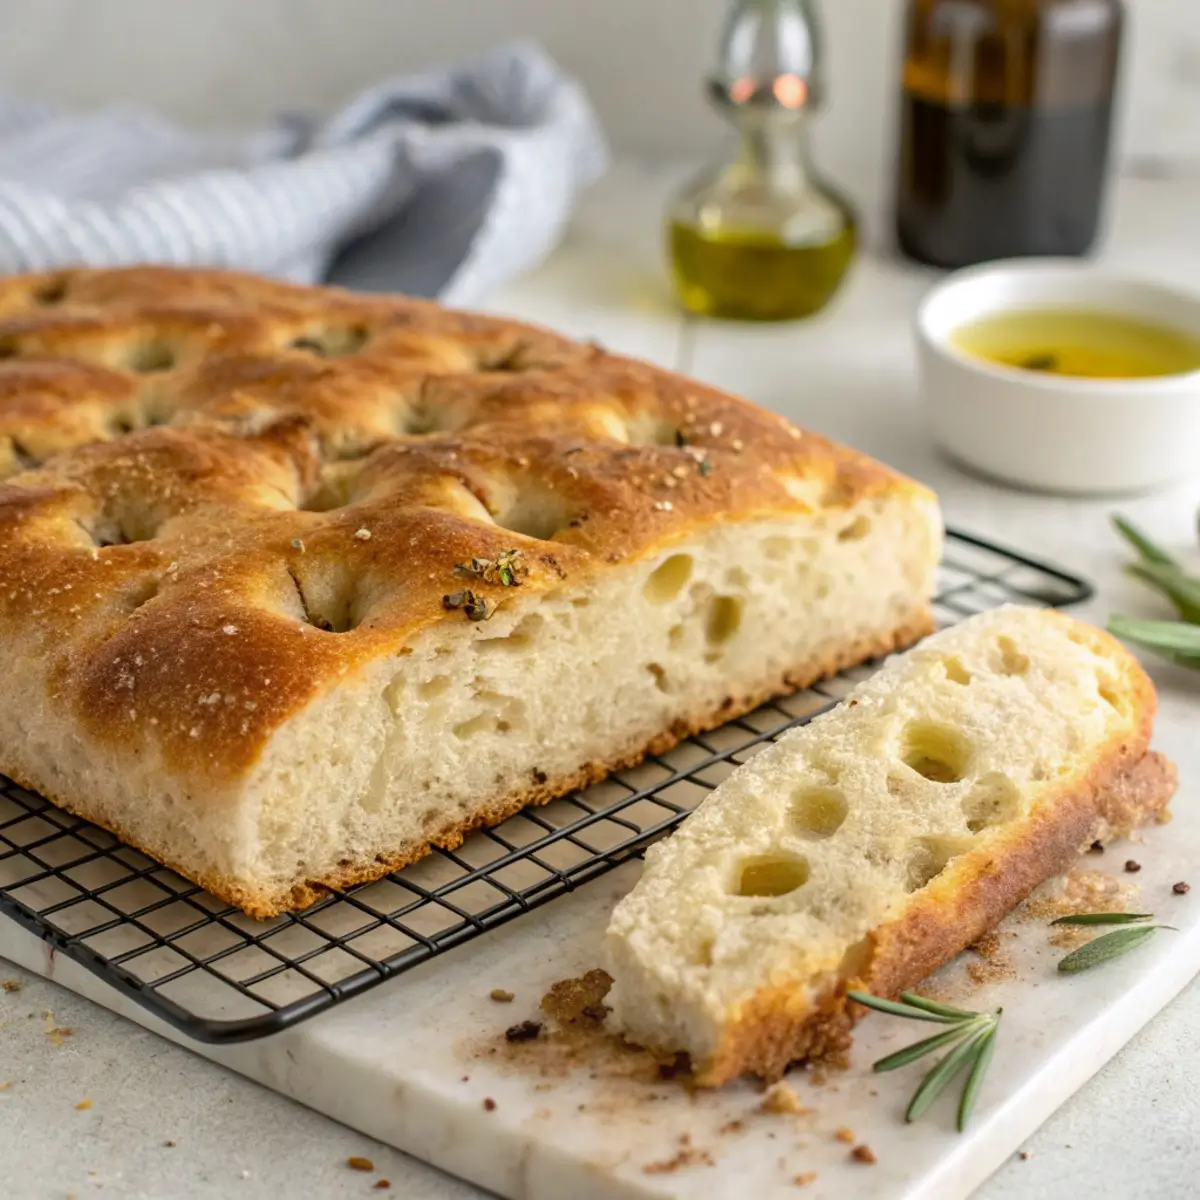
Few things in baking are as satisfying as cutting into a perfectly baked focaccia and seeing that network of large, irregular holes — the mark of an extra airy sourdough crumb. Each bubble tells a story of time, fermentation, and technique.
If you’ve ever wondered how artisan bakeries achieve that beautifully puffy texture, the secret lies in method — not just ingredients. This guide breaks down the Extra Airy Sourdough Focaccia Dough Method step by step, showing how to control hydration, fermentation, handling, and shaping for consistent, professional-quality results.
Whether you’re an ambitious beginner or an experienced baker perfecting your crumb, this comprehensive walkthrough will help you master the art of the tall, cloudlike focaccia.
What Makes Sourdough Focaccia Airy?
The secret to an airy crumb is in balanced fermentation and gentle dough handling. Airy focaccia relies on three main pillars:
-
Hydration: The higher the hydration (water-to-flour ratio), the more extensible and open the dough structure becomes.
-
Fermentation: Slow, well-controlled fermentation allows yeast and bacteria to develop both gas and flavor.
-
Technique: Stretch-and-folds, lamination, and minimal degassing preserve the internal air bubbles that expand during baking.
When all three come together, you get focaccia that’s soft, tall, and filled with glossy air pockets — light enough to melt in your mouth but still strong enough to hold olive oil and toppings beautifully.
Ingredients for Extra Airy Sourdough Focaccia
For the Dough:
-
500g bread flour (strong white flour, 12–13% protein)
-
100g active sourdough starter (at 100% hydration)
-
425g water (85% hydration; adjust as needed)
-
10g fine sea salt
-
20g extra virgin olive oil (plus more for the pan and topping)
Optional Toppings:
-
Flaky sea salt
-
Fresh herbs (rosemary, thyme, or oregano)
-
Sliced olives, tomatoes, or caramelized onions
Why High Hydration Matters
A high-hydration dough (between 80–85%) gives focaccia its signature lift and open crumb. The extra water allows gluten strands to stretch more easily, trapping gas bubbles without tearing.
At first, this dough feels sticky and loose — but don’t worry. Through proper folding, gluten strength will build naturally. The payoff is a tall, light bread that feels almost weightless when you lift it.
Step-by-Step Method for Extra Airy Focaccia
Step 1: Feed and Activate Your Starter
Feed your sourdough starter about 6–8 hours before you begin mixing, ensuring it’s at its peak activity — bubbly, doubled in size, and slightly domed.
A strong, active starter is the foundation of a well-aerated focaccia. If it’s sluggish or underfed, the dough won’t rise properly, no matter how perfect the rest of your process is.
Step 2: Autolyse the Dough
In a large bowl, mix flour and 400g of water (reserve 25g for later) until no dry bits remain. Cover and let it rest for 45–60 minutes.
This resting stage — called the autolyse — allows flour enzymes to start gluten development naturally, improving dough elasticity and hydration absorption. It makes high-hydration dough easier to handle later on.
Step 3: Add Starter and Salt
Add your 100g active starter to the dough, and mix with wet hands until incorporated. Let it rest for 30 minutes, then sprinkle in the 10g salt and the remaining 25g of water.
Gently squeeze and fold the dough to mix — don’t knead aggressively. This ensures even salt distribution without tearing the developing gluten.
Step 4: The Bulk Fermentation Phase
Bulk fermentation is where your dough transforms from sticky and heavy to lively, elastic, and full of air.
Total Time: 4–6 hours at 75°F (24°C)
During this time, you’ll perform a series of stretch-and-folds to strengthen the gluten network while maintaining gas retention.
Stretch-and-Fold Schedule:
-
After 30 minutes: Perform 1 set of stretch and folds (lift and fold from all four sides).
-
After 60 minutes: Repeat 1 more set.
-
After 90 minutes: Perform a third set.
Each time, you’ll notice the dough becoming smoother, more cohesive, and easier to handle.
Let it then rest undisturbed for the remainder of the bulk fermentation until it has increased by 50–75% in volume.
Step 5: The Lamination Technique (Optional but Powerful)
For an even more open crumb, try lamination — a technique where you gently stretch the dough into a large rectangle and fold it like a letter.
After the last set of stretch-and-folds:
-
Lightly oil a clean surface.
-
Carefully stretch the dough outward until thin (don’t tear).
-
Fold it from left to center, right to center, then top and bottom inward.
This redistributes the air bubbles, evens out fermentation, and gives structure to high-hydration doughs without losing lift.
Step 6: Cold Retard for Flavor and Air Pockets
Once bulk fermentation is complete, lightly oil the top of your dough and cover it tightly. Refrigerate overnight (8–16 hours).
Cold fermentation slows yeast activity but enhances flavor complexity and creates more defined bubbles. It also firms up the dough, making it easier to handle when shaping.
Step 7: Shape the Focaccia
The next day, remove the dough from the fridge and let it rest at room temperature for 1–2 hours to relax.
Generously oil your baking pan (a rectangular pan or cast iron skillet works beautifully). Transfer the dough gently — avoid pressing too hard or deflating it.
With oiled fingers, softly coax the dough to fill the pan. If it resists, let it rest for 10 minutes and try again.
Step 8: The Final Proof
Cover the pan and let the dough proof for another 2–4 hours at room temperature.
By the end of this stage, your dough should look alive — domed, jiggly, and filled with visible bubbles beneath the surface.
Tip: Do not rush this step. A fully proofed focaccia gives that light, cloudlike texture that defines airy sourdough.
Step 9: Dimpling and Topping
Preheat your oven to 450°F (232°C).
Drizzle olive oil generously over the dough’s surface. With oiled fingertips, gently press down to create dimples — these not only give focaccia its signature look but also help distribute bubbles evenly.
Sprinkle with flaky sea salt, fresh herbs, or any toppings you like.
Step 10: Bake for the Perfect Rise
Bake on the center rack for 25–30 minutes, or until golden brown and crisp around the edges.
The dough will spring dramatically in the first 10 minutes, forming tall air chambers that create the signature open crumb.
Let the focaccia cool slightly before slicing — cutting too soon can collapse some of the delicate internal bubbles.
Understanding What’s Happening Inside the Dough
During baking, the trapped carbon dioxide inside the dough expands rapidly, inflating the gluten “balloons.”
Because your fermentation and hydration levels were balanced, the gluten network is strong enough to hold that gas until it sets in the oven’s heat.
This is why gentle handling and proper fermentation timing are so critical — they determine how those bubbles develop and survive the bake.
Signs of a Perfectly Fermented Airy Focaccia
-
The dough quivers slightly when the pan is shaken.
-
Large, irregular air pockets are visible on the surface.
-
The baked crumb has both big and small bubbles — a natural, lace-like texture.
-
The crust is golden and crisp, while the interior remains moist and light.
If your focaccia meets these signs, congratulations — you’ve mastered the extra airy sourdough method!
Troubleshooting Common Issues
| Problem | Likely Cause | Solution |
|---|---|---|
| Dense crumb | Under-fermented or too cold dough | Extend bulk ferment, ensure starter is active |
| Collapsed dough | Over-proofed or handled too roughly | Shorten proof time, use gentler shaping |
| Sticky, tearing dough | Over-hydration or weak gluten | Add one extra fold next time |
| Flat focaccia | Weak starter or insufficient stretch-and-folds | Feed starter more often, improve gluten strength |
| Uneven bubbles | Inconsistent fermentation | Perform lamination step for even gas distribution |
How to Store Airy Focaccia
-
Room Temperature: Store in an airtight container for up to 2 days.
-
Refrigerator: Keeps for 3–4 days but reheat before serving.
-
Freezer: Slice and freeze for up to 1 month. Reheat at 375°F (190°C) for 8–10 minutes to restore crispness.
Extra Tips for Achieving Maximum Airiness
-
Use strong flour: Bread flour with higher protein helps retain gas bubbles.
-
Hydration is your friend: Don’t fear wet dough — it’s the key to open crumb.
-
Avoid excessive degassing: Handle gently when transferring or dimpling.
-
Use cold fermentation: The fridge rest enhances both flavor and structure.
-
Monitor proofing visually: When in doubt, let the dough tell you when it’s ready.
The Science of Open Crumb
When flour, water, and starter mix, enzymes begin breaking down starches into sugars that yeast consume, releasing carbon dioxide. Gluten forms a network that traps this gas, creating the crumb structure.
A longer fermentation gives yeast time to produce gas slowly, resulting in larger, irregular bubbles rather than small uniform ones.
Hydration supports this by making gluten extensible — allowing air pockets to stretch instead of burst. That’s why airy focaccia depends on both patience and hydration.
Flavor and Texture Balance
While the airy crumb is the star, the flavor shouldn’t be overlooked. Proper fermentation adds subtle sweetness and tang that complement the olive oil richness.
Cold fermentation, in particular, balances the acidity and sweetness for a deep, savory finish. The result: a bread that’s not only beautiful inside but also perfectly seasoned and satisfying to eat on its own.
Serving Suggestions
Airy sourdough focaccia is incredibly versatile. Try it:
-
As a base for Mediterranean sandwiches with roasted vegetables and hummus
-
Alongside soups or stews for dipping
-
Cut into cubes for salads or bruschetta
-
Served warm with extra virgin olive oil and herbs
The light texture makes it ideal for soaking up flavors without feeling heavy.
Frequently Asked Questions
How can I tell if my dough is hydrated enough?
The dough should feel soft, elastic, and slightly tacky — not dry. A properly hydrated dough spreads easily when dimpled.
Can I reduce hydration if I find the dough too sticky?
Yes, start around 75–78% hydration for easier handling and increase as you gain confidence.
What pan size works best?
A 9×13-inch rectangular pan gives ideal thickness for airy focaccia. For a thicker version, use a smaller pan.
Why didn’t my focaccia rise much?
Your starter may not have been active enough, or the dough was under-proofed before baking.
Is cold fermentation necessary?
It’s optional, but highly recommended. It improves both texture and flavor while fitting conveniently into a baker’s schedule.
Can I make this recipe with whole wheat flour?
Yes, but replace only 20–25% of the flour with whole wheat to maintain a light structure. Whole grain flours absorb more water and ferment faster.
Final Thoughts
Making extra airy sourdough focaccia isn’t just about following a recipe — it’s about learning how your dough feels, moves, and reacts.
Every variable, from temperature to starter health, plays a role in shaping those beautiful open bubbles. But once you understand the rhythm of fermentation and handle the dough gently, you’ll find that bakery-style focaccia is absolutely achievable at home.
So, take your time. Watch your dough. Let it teach you patience. When you pull that golden, puffy loaf from the oven and see the light shimmer through its airy crumb, you’ll know every minute was worth it.
")