Golden Sourdough Discard Waffle Bites: Crispy, Fluffy, and Utterly Irresistible
Imagine transforming that mysterious, tangy liquid sitting in your sourdough jar into something utterly magical. Something golden, crispy on the outside, impossibly fluffy within, and bursting with that unique sourdough tang. Welcome to the world of Golden Sourdough Discard Waffle Bites – your secret weapon for turning kitchen scraps into pure, delicious gold. These aren’t just a recipe; they’re a celebration of resourcefulness, a love letter to your sourdough starter, and a guaranteed crowd-pleaser that disappears faster than you can say “second breakfast.”
Forget complicated techniques or exotic ingredients. These bites harness the power of your everyday sourdough discard, requiring minimal effort for maximum flavor and texture. They’re the perfect solution for using up that small amount of discard you’d otherwise struggle to incorporate, transforming it into something truly special. Crispy, golden, and packed with character, they offer a delightful contrast to the soft, pillowy interior, making every bite a little adventure.
The beauty lies in their simplicity and versatility. They cook quickly in a standard waffle iron, turning out perfectly portioned, bite-sized treats that are ideal for snacking, breakfast on the go, or even as a unique appetizer. The natural acidity of the sourdough creates a lovely tang that balances beautifully with sweet or savory toppings. Best of all, they’re incredibly forgiving, making them perfect for baking beginners eager to explore sourdough beyond the loaf.
So, gather your sourdough discard, dust off your waffle iron, and prepare to be amazed. These Golden Sourdough Discard Waffle Bites aren’t just food; they’re a testament to the magic hiding in your kitchen scraps. Let’s dive in and unlock that potential together.
Ingredients: The Stars of the Show
The beauty of this recipe is its reliance on just a few key players, primarily your sourdough discard. Here’s what you’ll need:
- Sourdough Discard: This is the absolute hero! Use about 1 cup (240ml) of your active sourdough discard, roughly 50-75% hydration. The tang and texture it imparts are irreplaceable. If your discard is very thick, you might need a splash more liquid.
- All-Purpose Flour: 1 1/2 cups (190g) provides the perfect structure and chew. Bread flour can be used for an even chewier bite, but AP flour is ideal for beginners.
- Baking Powder: 1 1/2 teaspoons. This is your primary leavening agent, creating those crucial air pockets for fluffiness.
- Salt: 1/2 teaspoon. Enhances all the other flavors beautifully.
- Sugar: 1 tablespoon. A touch of sweetness balances the sourdough tang and aids browning.
- Milk (or Buttermilk): 3/4 cup (180ml). Adds moisture and tenderness. Buttermilk is fantastic for extra tang and tenderness, but regular milk works perfectly fine. For a dairy-free option, unsweetened almond milk or oat milk works well.
- Egg: 1 large. Provides structure, richness, and helps bind everything together. For a vegan version, a well-whisked flax egg (1 tbsp ground flax + 3 tbsp water, rested 5 mins) works well.
- Butter (or Neutral Oil): 2 tablespoons, melted. Adds richness, flavor, and helps achieve that gorgeous golden color. Olive oil or avocado oil are good neutral choices.
- Vanilla Extract: 1 teaspoon. A subtle depth that complements the sourdough beautifully.
- Toppings (Optional but Recommended): The possibilities are endless! Consider:
* Sweet: Maple syrup, honey, powdered sugar, fresh berries, sliced bananas, whipped cream, cinnamon sugar.
* Savory: Butter, sour cream or Greek yogurt, crispy bacon (note: bacon is excluded by dietary rules), grated cheese, sliced avocado, chives, a sprinkle of everything bagel seasoning.
Why These Ingredients Work Together:
- Sourdough Discard: Provides acidity, flavor, and natural fermentation. It makes the batter slightly sticky and unique.
- Flour: The base structure. AP flour gives a tender crumb.
- Baking Powder: Creates lift and airiness.
- Salt: Enhances flavor.
- Sugar: Balances tang, aids browning.
- Milk: Adds moisture and tenderness.
- Egg: Binds, adds richness, structure.
- Butter/Oil: Adds richness, flavor, and promotes browning.
- Vanilla: Adds a warm, comforting note.
Step-by-Step Instructions: From Bowl to Golden Perfection
1. Prepare Your Waffle Iron: Start by preheating your waffle iron to the manufacturer’s recommended temperature, usually medium-high. Lightly grease the plates with a bit of butter or oil to prevent sticking. This step is crucial for easy release later.
2. Combine the Dry Ingredients: In a large mixing bowl, whisk together the all-purpose flour, baking powder, salt, and sugar. This ensures even distribution of the leavening agent and salt.
3. Combine the Wet Ingredients: In a separate medium bowl, whisk together the sourdough discard, milk (or buttermilk), melted butter (or oil), and vanilla extract. If using a flax egg, whisk it in now.
4. Mix Wet into Dry: Pour the wet ingredients into the bowl with the dry ingredients. Using a spatula or wooden spoon, gently fold the mixture just until combined. Crucially, do not overmix! A few small lumps are perfectly fine and actually help keep the waffles tender. Overmixing develops gluten, leading to tough, rubbery waffles instead of light and fluffy ones.
5. Rest the Batter: This is a vital step! Let the batter rest for at least 15-20 minutes (up to 30 minutes). This allows the baking powder to activate fully and the flour to fully hydrate, resulting in lighter, fluffier waffles. The batter will thicken slightly as it rests.
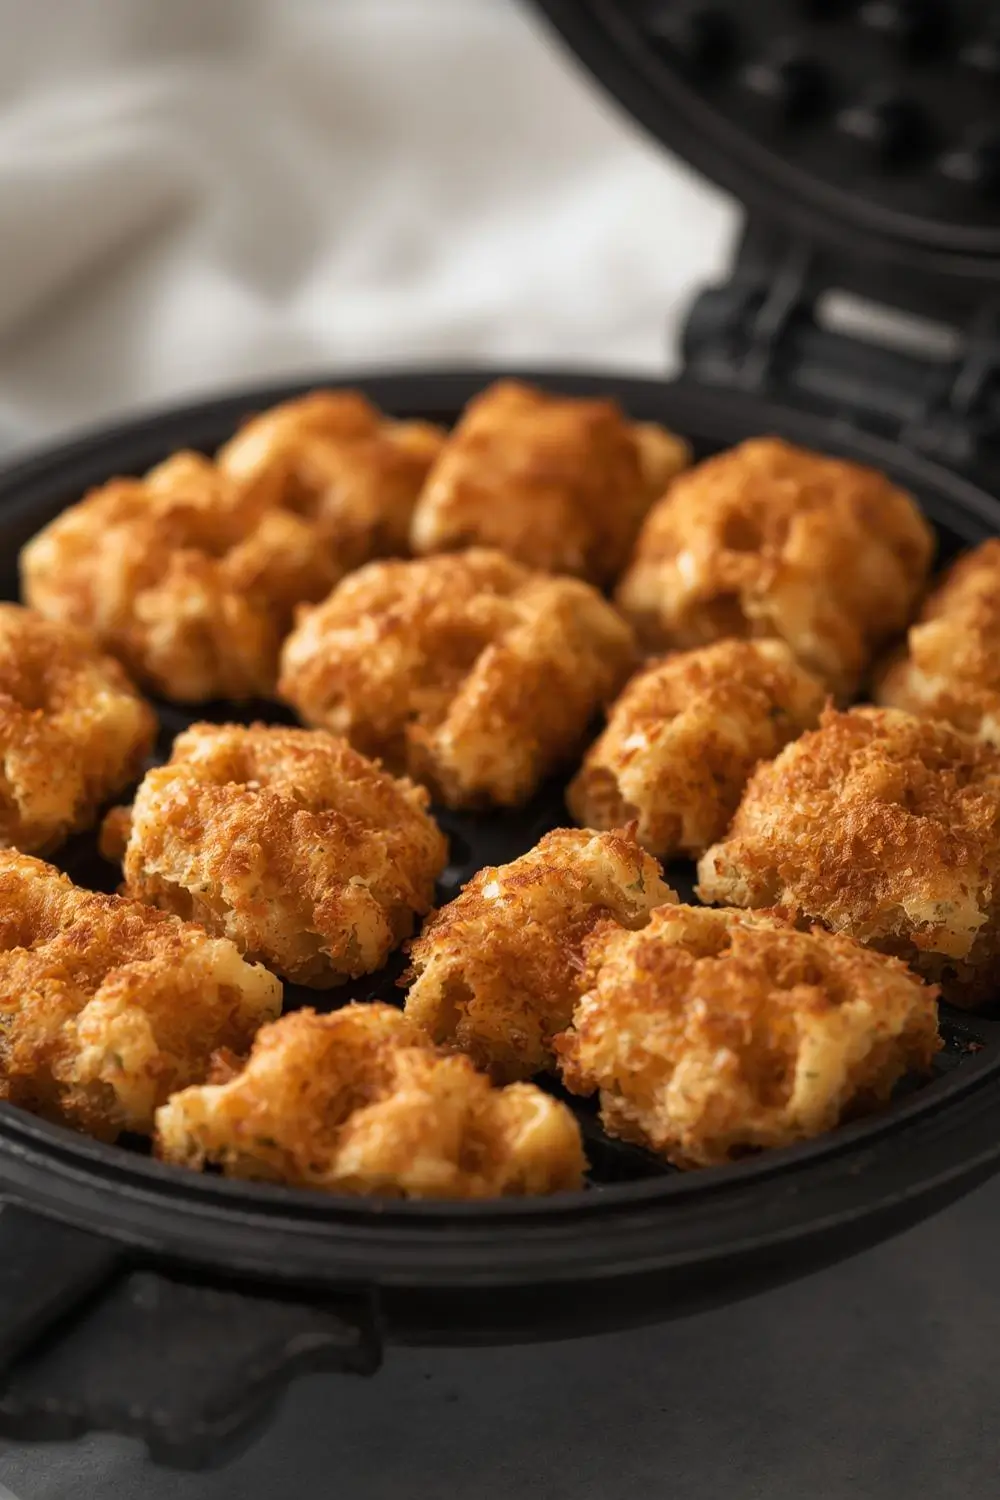
6. Cook the Waffle Bites: Pour about 1/4 cup (60ml) of batter onto the center of the preheated waffle iron. Close the lid firmly. Cook for 3-5 minutes, or until the waffle iron indicates it’s done (often by a light turning off or a beep) and the waffles are golden brown and crisp on the outside. Cooking times vary significantly between waffle irons, so start checking around the 3-minute mark. The key is a deep golden brown color and a crisp exterior.
7. Release and Serve: Carefully open the waffle iron and use a fork or spatula to gently lift the waffle bites out. They should release easily if properly greased. Place them on a wire rack to cool slightly. They are best enjoyed warm and fresh, but they hold their texture well for a short time.
8. Repeat: Continue with the remaining batter, greasing the iron lightly between batches if needed. The batter might thicken slightly between batches; if it becomes too thick, stir in a teaspoon or two of milk to loosen it up.
Tips for Waffle Bite Perfection:
- Don’t Overmix: This is the golden rule for tender waffles.
- Rest is Key: Don’t skip the resting time! It makes a huge difference.
- Preheat Thoroughly: Ensure your waffle iron is hot before adding batter.
- Don’t Overfill: Use about 1/4 cup per bite. Too much batter will make thick, dense waffles.
- Golden is Good: Cook until deep golden brown and crisp. Undercooked waffles will be doughy.
- Use a Waffle Iron: While a regular skillet can work, a waffle iron is designed to create the signature crisp exterior and fluffy interior. If you don’t have one, a well-greased skillet over medium heat works, but the texture won’t be identical.
- Adjust Consistency: If your discard is very thick or the batter seems too thick after resting, add a tablespoon or two of milk to reach a pourable consistency.
Variations and Substitutions: Make it Your Own
- Flavoring the Batter: Stir in 1/2 teaspoon of cinnamon, nutmeg, or pumpkin pie spice into the dry ingredients for a spiced twist. Add 1/4 cup of finely chopped nuts (walnuts, pecans) or chocolate chips to the batter before resting.
- Savory Waffle Bites: Omit the sugar. Add 1/2 teaspoon of dried herbs (oregano, thyme, rosemary), a pinch of garlic powder, and a dash of onion powder to the dry ingredients. Top cooked bites with sour cream, Greek yogurt, grated cheese, or a sprinkle of everything bagel seasoning.
- Fruit Additions: Fold in 1/2 cup of fresh or frozen berries (thawed and patted dry) into the batter just before cooking. They add bursts of sweetness and color.
- Cheese & Herb: Mix in 1/2 cup of finely grated sharp cheddar or Parmesan cheese and 2 tablespoons of chopped fresh herbs (chives, parsley, dill) into the batter.
- Sweet & Savory Combo: Top with a dollop of whipped cream and a sprinkle of cinnamon sugar, or a scoop of ice cream with a drizzle of honey.
- Dairy-Free: Use unsweetened almond milk, oat milk, or soy milk instead of dairy milk. Use melted coconut oil or avocado oil instead of butter. Ensure your baking powder is dairy-free.
- Vegan: Use a flax egg (1 tbsp ground flax + 3 tbsp water, rested 5 mins) instead of the egg. Use dairy-free milk and oil as above.
Storage and Reheating: Keeping the Magic Alive
- Cooling: Allow the cooked waffle bites to cool completely on a wire rack. This prevents condensation and sogginess.
- Airtight Container: Once completely cool, store any leftovers in an airtight container at room temperature for up to 2 days. They will soften slightly but remain enjoyable.
- Freezing: For longer storage, place the cooled, completely dry waffle bites in a single layer on a baking sheet and freeze for 1-2 hours until solid. Transfer to a freezer-safe bag or airtight container. They freeze beautifully for up to 1 month.
- Reheating:
* Oven/Fryer: For the best texture, reheat in a preheated 350°F (175°C) oven on a baking sheet for 5-8 minutes, or until crisp. Alternatively, reheat in a toaster oven or air fryer at 350°F (175°C) for 3-5 minutes.
* Microwave: This is the quickest method but can make them slightly softer. Place 1-2 bites on a microwave-safe plate and heat for 15-20 seconds. Add a few seconds if needed, but be careful not to overheat and make them rubbery.
* Stovetop: Lightly toast them in a dry skillet over medium heat for 1-2 minutes per side until warmed through and crisp again.
Common Mistakes to Avoid: Steering Clear of Soggy or Tough Bites
Overmixing the Batter: This is the #1 culprit for tough waffles. Mix just* until combined.
- Skipping the Rest: Rushing this step sacrifices fluffiness. Be patient!
- Undercooking: Pale, doughy waffles are disappointing. Cook until deep golden brown and crisp.
- Overfilling the Iron: Too much batter leads to thick, dense, undercooked centers.
- Using Cold Batter: Let the batter rest at room temperature. Cold batter cooks unevenly.
- Not Preheating the Iron: A cold iron leads to pale, soggy waffles.
- Using Expired Baking Powder: Old baking powder won’t provide enough lift. Test it by mixing 1 tsp with 1/3 cup hot water – it should fizz vigorously.
- Using Too Much Liquid: If your discard is very thin or you add too much milk, the batter will be too runny and won’t hold shape. Adjust with a touch more flour.
Frequently Asked Questions: Your Burning Sourdough Questions Answered
1. What if my sourdough discard isn’t active? Your discard needs to be active (bubbly and smelling sour) to leaven the waffles properly. If it’s inactive, it won’t rise well. Use discard that’s been fed recently and is showing signs of life. If it’s inactive, you might need to add a little extra baking powder (1/2 tsp) to compensate, but active discard is best.
2. Can I use discard that’s been in the fridge for weeks? Yes! Fridge-stored discard is perfectly fine to use. It might be less active, so you might need a bit more baking powder (start with 1/2 tsp extra). It still provides great flavor.
3. Why are my waffles dense? This usually means you overmixed the batter or didn’t rest it long enough. Check your baking powder expiration date. Undercooking can also cause denseness.
4. Why are my waffles tough? Overmixing is the most common cause. It develops gluten. Also, using bread flour instead of AP flour can make them chewier, which some prefer, but it’s not “tough” in a bad way. Ensure you’re not overmixing.
5. Can I make these without a waffle iron? Yes! Pour the batter into a well-greased skillet or griddle over medium heat. Cook for 3-4 minutes per side, until golden brown and cooked through. They won’t have the classic waffle pattern, but they’ll still be delicious.
6. How do I know when the batter is ready to rest? It should be thick enough to hold its shape slightly when scooped, but still pourable. It will thicken further as it rests.
7. Can I freeze the batter? It’s not recommended. Freezing batter can affect the texture and rise. Cook the batter fresh for best results.
8. What’s the best way to store leftover cooked bites? Let them cool completely, then store in an airtight container at room temperature for up to 2 days, or freeze for up to a month. Reheat in the oven or toaster oven for best texture.
9. Can I make these gluten-free? This recipe relies on wheat flour for structure. Gluten-free waffle recipes exist but will be different in texture and flavor. They won’t be identical to these sourdough bites.
10. Do I need to use a specific type of sourdough discard? No! Any active sourdough discard works. The flavor will vary slightly depending on your starter, which is part of the charm.
Conclusion: Embrace the Discard, Celebrate the Bite
There you have it – your journey to creating irresistibly crispy, fluffy, and utterly delicious Golden Sourdough Discard Waffle Bites. This recipe is more than just a way to use up leftover starter; it’s a delicious exploration of flavor, texture, and resourcefulness. The tangy depth of the sourdough, perfectly balanced by the sweetness and the comforting crunch, makes these bites a standout breakfast, snack, or dessert.
Remember the golden rules: don’t overmix, let the batter rest, cook until deeply golden, and embrace the variations. Whether you keep it simple with a pat of butter or go wild with sweet or savory toppings, these bites are guaranteed to become a beloved staple in your baking repertoire. They transform the ordinary into the extraordinary, proving that sometimes, the most magical creations come from what we might otherwise overlook.
So, gather your discard, preheat your waffle iron, and get ready to savor the delicious results of your sourdough alchemy. Enjoy every crispy, fluffy, tangy bite!
")