Contents
- 1 Choosing the Right Cupcake Base & Frosting
- 2 Decorating Ideas & Techniques
- 3 Tools, Materials & Edible Supplies Needed
- 4 Step‑by‑Step Workflow for Decorating
- 5 Dietary Adaptations & Allergy‑Friendly Ideas
- 6 Make‑Ahead, Storage & Transport Tips
- 7 Troubleshooting & Decorating Challenges
- 8 Presentation & Serving Suggestions
- 9 Frequently Asked Questions
- 10 Final Thoughts
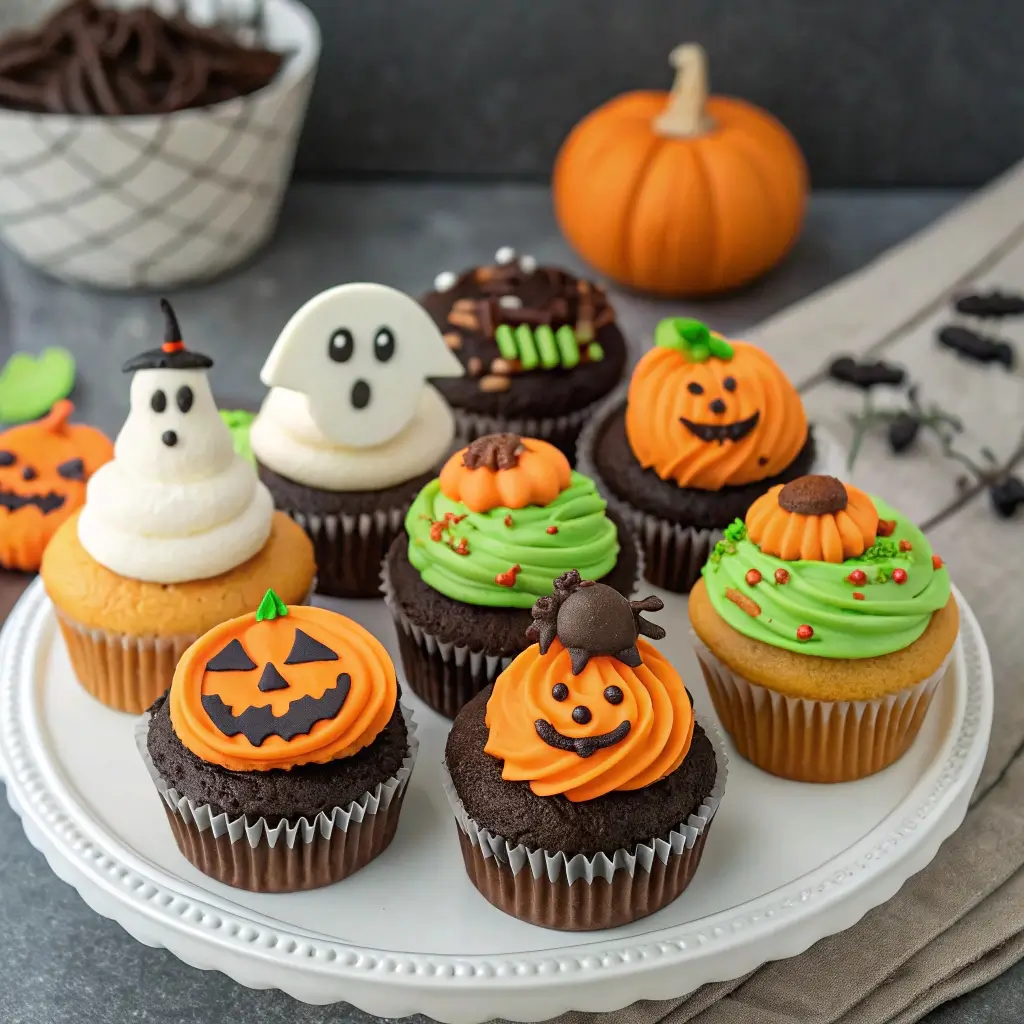
There’s something magical about a cupcake—its small size, its ability to deliver flavor and creativity in one bite. At Halloween, cupcakes become even more fun: they’re tiny canvases for frosting, fondant, sprinkles, and candy that let you bring ghosts, monsters, pumpkins, and more to life. Whether you’re baking with kids or prepping for a party, spooky Halloween cupcake decorating ideas make desserts memorable.
In this comprehensive guide, you’ll find:
-
Tips for choosing cupcake bases and frostings
-
Dozens of decorating ideas: ghosts, monsters, pumpkins, spooky faces
-
Step‑by‑step instructions, tricks, and shortcuts
-
Tools, materials, and edible supplies you’ll need
-
Dietary adaptations (vegan, gluten‑free, allergy safe)
-
Make‑ahead, storage, and transport tips
-
Troubleshooting common decorating problems
-
Frequently asked questions
Let’s turn your cupcakes into ghoulish delights!
Choosing the Right Cupcake Base & Frosting
Before you decorate, you need a stable canvas. Here’s how to get cupcakes that hold up under spooky toppings.
Cupcake Base Suggestions
-
Use a moist but firm batter—vanilla, chocolate, pumpkin spice—something that doesn’t collapse under heavy frosting.
-
Fill liners about ⅔ full so baked cupcakes rise without doming excessively.
-
Always let cupcakes cool completely before decorating—warm cupcakes melt frosting and distort shapes.
-
If you want strong Halloween flavor, you can infuse pumpkin purée, cinnamon, or cocoa into your batter.
Frosting & Base Layers
-
American Buttercream: easy, forgiving, and pipeable. Use mounds or swirls as base.
-
Cream Cheese Frosting: tangy and smooth—great with pumpkin or spice cakes.
-
Swiss / Italian Meringue Buttercream: smoother and less sweet, but requires more technique.
-
Stabilized Whipped Cream: lighter option (especially for warm environments); stabilize with gelatin or cream of tartar.
-
Fondant or Modeling Chocolate: for sculpted toppers, faces, or flat decorative panels.
For many decorations, a thin “crumb coat” (a light frosting layer) helps prevent crumbs in your final decoration. Then chill briefly before final piping or decorating.
Decorating Ideas & Techniques
Below are categorized themes and techniques to decorate cupcakes for Halloween in fun, creative ways.
Ghost Cupcakes
Ghosts are classic and relatively simple. Here are several ghost cupcake ideas:
Piped Meringue Ghosts
-
Pipe a swirl of meringue or stabilized whipped cream in a ghost shape (a spiraled cone).
-
Use tiny chocolate chip or candy eyes pressed gently into the meringue before it sets (or after, if stable).
-
Optionally dust with powdered sugar or ghostly shimmer for visual contrast.
Marshmallow Ghost Toppers
-
Use large marshmallows standing vertically on top of cupcakes.
-
Dip or drizzle white chocolate over the marshmallow to create a smooth ghost body.
-
Add candy eyes or draw a mouth with edible marker or melted chocolate.
Ghost Face Frosting
-
Frost the cupcake with white or pale gray frosting in a mound.
-
Use mini chocolate chips, black icing, or candy eyes to create ghostly facial expressions (wide “O”, spooky grin, sleepy eyes).
Ghost cupcakes are adorable and great for kid participation—they’re forgiving!
Monster Face Cupcakes
Let your imagination run wild with fun monster faces, horns, eyes, and textures.
Single-Eye Monster
-
Frost with a bright color (green, purple, orange).
-
Use a single large candy eye (store-bought) or white chocolate disc + chocolate dot.
-
Add “hair” using shredded coconut dyed or buttercream piped spiky.
-
Use candy horns (candy corn, pieces of colored chocolate) or fondant horns.
Two-Eyed Monsters
-
Use two candy eyes.
-
Add sometimes a tooth or fang made from white chocolate or fondant.
-
Pipe fur texture around the face using a grass tip or small star tip.
-
Experiment with misaligned eyes or funny faces.
Fuzzy Monsters
-
Pipe frosting with grass tip or small petal tip in random clusters to mimic fur.
-
Use multiple colors of frosting to create stripes or patches.
-
Add candy bits for “grotesque” details, like gumdrop tongue or candy eyeball studs.
Monsters are playful and forgiving—imperfections add charm.
Pumpkin & Jack‑O’‑Lantern Cupcakes
Make tiny pumpkins or jack‑o’ lantern faces on top of cupcakes.
Pumpkin Topper (Fondant or Buttercream)
-
Color fondant or buttercream orange.
-
Form small pumpkin balls or disks; indent rib lines with toothpick.
-
Add a green fondant stalk or small chocolate stem.
-
For jack‑o’ lantern version, carve facial features into the fondant pumpkin or use black icing pieces.
Frosting Carved Face
-
Frost cupcake with orange buttercream in smooth dome.
-
Use black icing or melted chocolate (in a piping bag) to draw eyes, nose, mouth in jack‑o’ lantern style.
-
You can dust around edges with cocoa powder to give “shadows.”
Pumpkin Patch Theme
-
Make small green “vines” with piped frosting curling around pumpkin toppers.
-
Use mini candy pumpkins or orange candy pieces around cupcakes for effect.
-
Add leaf shapes made from green fondant or frosting.
Pumpkin cupcakes are instantly thematic and showy.
Mixed Themes on One Board
You can mix ghosts, monsters, pumpkins in one display for variety and whimsy.
-
Alternate cupcakes in rows: ghost, pumpkin, monster, ghost, etc.
-
Use complementary color palettes so the board looks cohesive.
-
Provide a sign or label telling guests which cupcakes are which (ghost, monster, pumpkin).
-
For dramatic effect, place cupcakes on black or dark trays to make bright colors pop.
Tools, Materials & Edible Supplies Needed
Having the right tools and supplies makes decorating easier:
-
Piping bags and multiple tips (round, star, grass)
-
Small offset spatula or flat palette knife
-
Toothpicks or skewers for fine detail
-
Fondant modeling tools
-
Edible markers or food pens
-
Candy eyes, small candies, sprinkles
-
Food coloring gels or paste (bright colors)
-
Shimmer dust or edible glitter
-
Fondant or modeling chocolate (for sculpted toppers)
-
Small silicone molds (subject, moon, bat shapes)
-
Cooling racks, baking sheets, tray liners
Organize them and group them before you begin decorating so you move smoothly from one stage to the next.
Step‑by‑Step Workflow for Decorating
A suggested order of operations to stay organized:
-
Bake cupcakes and let cool fully.
-
Apply crumb coat (thin layer of frosting) and chill 10–15 minutes.
-
Prepare your frostings, tinted fondant, candy eyes, and other decorative elements.
-
Pipe or spread base frosting in your choice of style (swirls, domes, smooth tops).
-
Add larger toppers first (pumpkins, marshmallow ghosts) so they set.
-
Use piping or candies to add faces, hair, horns, vines, etc.
-
Add finishing touches—sprinkles, shimmer dust, edible glitter.
-
Chill or stabilize the board before display and serving.
By following a logical workflow, you avoid smudging, melted icing, or drooping accents.
Dietary Adaptations & Allergy‑Friendly Ideas
-
Vegan / plant‑based: Use vegan buttercream or whipped coconut cream, dairy‑free milk in batters, and vegan candies or sprinkles.
-
Gluten‑free: Use gluten-free cupcake batter and certified gluten-free candies and decorations.
-
Nut allergies: Avoid nut-containing ingredients or use seed-based alternatives.
-
Reduced sugar: Use natural sweeteners, less sugary cocoa, or frosts with powdered sweeteners.
-
Food dye sensitivities: Use natural colorants (e.g. beet powder for red/pink, turmeric for yellow, spirulina for green) or fewer, milder color shades.
By adapting ingredients carefully, you can make spooky cupcakes accessible to many.
Make‑Ahead, Storage & Transport Tips
-
Many elements (fondant toppers, candy eyes, molded pieces) can be made a day or two ahead and stored in airtight containers.
-
Store baked cupcakes (without frosting) wrapped in foil or containers; frost just before serving.
-
Frosted cupcakes can be stored in a cool place (refrigerator if needed) in sealed boxes; avoid stacking.
-
If transporting, use cupcake carriers or boxes with inserts to prevent tipping.
-
For outdoor parties, shade the cupcakes to prevent melting of frosting or decorations.
-
Avoid direct sunlight or heat to preserve shapes and colors.
Troubleshooting & Decorating Challenges
-
Frosting too soft or melts: Use higher fat content frosting, chill before and after piping.
-
Fondant peeling or cracking: Condition fondant before rolling, avoid extreme dryness, use cornstarch or powdered sugar to knead gently.
-
Candy eyes sinking: Press lightly into slightly firm frosting or use a dot of additional frosting under the eye as glue.
-
Colors bleeding / bleeding dye: Use gel or paste colorants (not liquid), allow colored frosting to set before adding adjacent colors.
-
Uneven cupcake tops: Level with knife or trim tops before decorating for better symmetry.
-
Overcrowded board: Leave space between cupcakes so decorative details are visible.
Presentation & Serving Suggestions
-
Use a tiered cake stand or cupcake tower for height and drama.
-
Arrange cupcakes on black slate boards or dark trays to make the colors pop.
-
Add decorative props: mini pumpkins, plastic spiders, faux cobwebs, skeleton picks.
-
Provide a sign or label board with names (Ghost Cupcake, Monster Munch, Pumpkin Delight).
-
Use decorative cupcake wrappers in Halloween colors (black, orange, purple).
-
Pair with other themed desserts: spooky cookies, candy bark, monster dips.
-
Provide cocktail napkins or dessert plates themed with Halloween motifs.
When photographed, the contrast of bright frostings and dark props makes visuals pop.
Frequently Asked Questions
Is it hard to decorate these cupcakes?
Not necessarily—some designs (ghosts, simple pumpkin faces) are very manageable. Start with simple ones and add complexity as confidence builds.
Can kids help with decorating?
Absolutely! Kids can press candy eyes, sprinkle glitter, pipe simple swirls, or position toppers under supervision.
How far in advance should I decorate?
You can bake cupcakes ahead. Many decorative elements (fondant, toppers) can be made days early. Frosting and final touches best done 1–2 hours before serving.
How do I keep colors vivid?
Use gel or paste food colors, avoid overmixing, and keep cupcakes cool. Avoid direct sunlight.
What’s the best frosting for detailed piping?
American buttercream or stabilized buttercreams (Swiss or Italian) hold up best for details, piping, and shape retention.
Final Thoughts
Halloween cupcake decorating combines creativity, festivity, and deliciousness in one bite. From ghost swirls and monster faces to mini pumpkins and playful textures, you can transform ordinary cupcakes into hauntingly fun treats. With the right frosting base, candy eyes, fondant toppers, and presentation, your cupcakes will be showstoppers.
Whether baking with kids, prepping for a party, or decorating a dessert table, start simple and let your imagination grow. The best part: everyone gets to eat the art. Happy haunting—and happy frosting!
")