Contents
- 1 The Rice Krispie Treat Base: Best Practices
- 2 Shape & Decorating Idea #1: Mummy Rice Krispie Treats
- 3 Shape & Decorating Idea #2: Pumpkin / Jack‑O’‑Lantern Rice Krispie Treats
- 4 Shape & Decorating Idea #3: Ghost Rice Krispie Treats
- 5 Alternative Mix & Theme Variations
- 6 Step‑by‑Step Instructions & Tips
- 7 Tools & Materials You’ll Want
- 8 Dietary & Allergy-Friendly Adaptations
- 9 Presentation & Serving Ideas
- 10 Make-Ahead, Storage & Transport Tips
- 11 Troubleshooting & Common Decorating Challenges
- 12 Frequently Asked Questions
- 13 Final Thoughts
Rice Krispie treats are a holiday classic: easy to make, no baking needed, and endlessly customizable. For Halloween, they become a perfect canvas for spooky shapes—mummies, pumpkins, ghosts—and fun decorating. Whether you’re prepping for a classroom party, a family gathering, or just want a fun treat, these themed Rice Krispie creations deliver both charm and flavor.
In this guide, you’ll find:
-
The base Rice Krispie treat recipe and tips
-
Three shape ideas: mummy, pumpkin, ghost
-
Decorating techniques and supplies
-
Dietary and allergy‑friendly variations
-
Presentation, packaging, and serving ideas
-
Make‑ahead, storage, and transport advice
-
Troubleshooting and tips
-
Frequently asked questions
Let’s get spooky, gooey, crispy, and creative.
The Rice Krispie Treat Base: Best Practices
Before you mold spooky shapes, you need a reliable base that holds together and is easy to work with.
Ingredients for the Base (makes ~12–15 medium pieces)
-
4 cups rice cereal (crisp, puffed rice)
-
3 tablespoons unsalted butter (or plant‑based butter)
-
1 package (10 oz) marshmallows, or about 8 cups mini marshmallows (or dairy‑free marshmallows)
-
Optional: ½ teaspoon vanilla extract
-
Optional: pinch of salt
Technique & Tips
-
Use a large pot so you can melt marshmallows and butter without overflowing.
-
Melt butter first, then add marshmallows, stirring constantly until smooth and fully melted.
-
Remove from heat before fully thick, then stir in cereal quickly to coat before mixture sets.
-
Grease your hands or utensils (butter or nonstick spray) so the sticky mixture doesn’t cling too much when shaping.
-
Press mixture into pans (9×13) or molds lightly (not too firmly) to maintain crispness and avoid dryness.
-
Let it cool slightly before shaping (still warm but firming up).
With a good base, your decorations will stick, shapes will hold, and texture will remain pleasantly crispy-chewy.
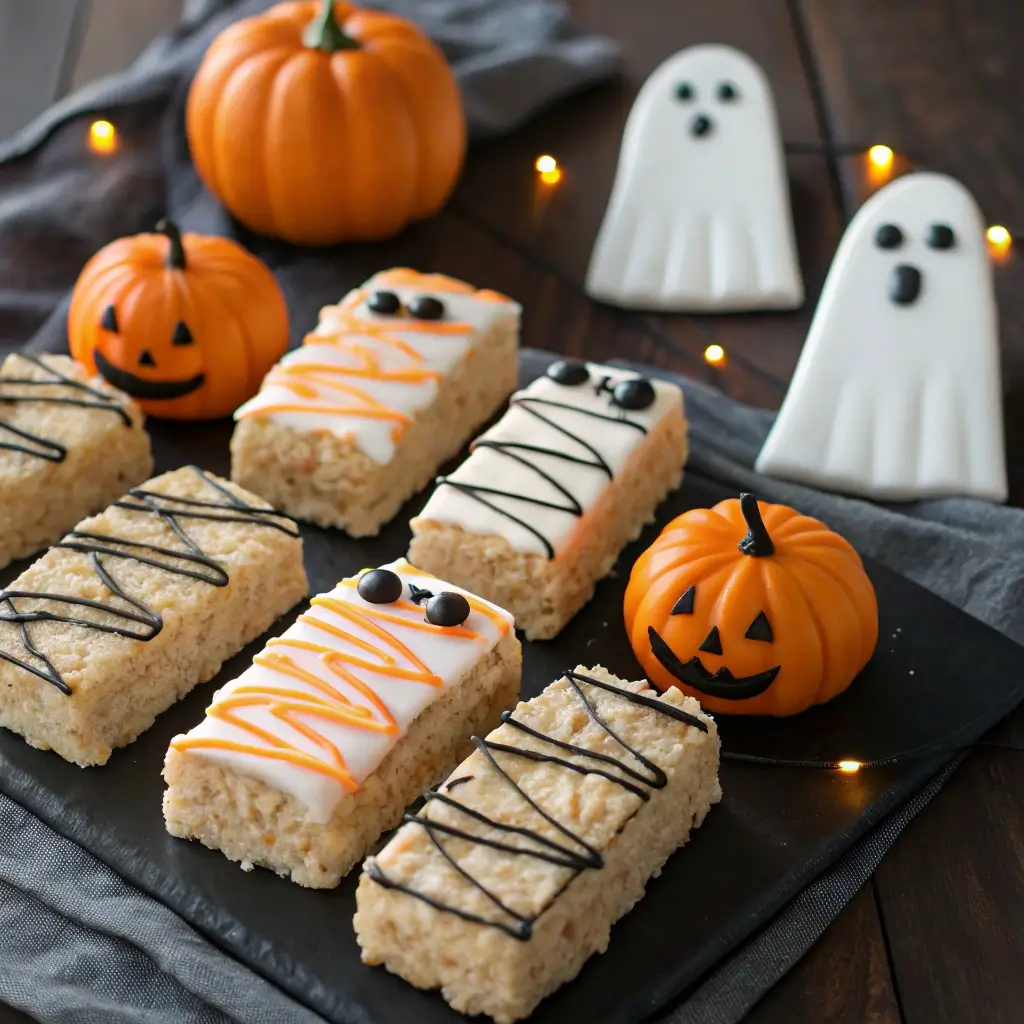
Shape & Decorating Idea #1: Mummy Rice Krispie Treats
Mummies are fun, cute, and relatively easy for novices. Here’s how to make them:
How to Shape Mummies
-
Take a portion of the Rice Krispie mixture (about palm size) and roll into a cylinder (finger shape) or oval bar.
-
Use your greased fingers to smooth edges if needed.
-
You can also cut shapes with cookie cutters (rounded rectangles) rather than free‑rolling.
Decorating as Mummies
-
Use white candy melts, white chocolate drizzle, or white frosting (thin) to create “bandages” over the body. Drizzle in horizontal back-and-forth lines, overlapping.
-
Add small candy eyes (googly eyes, edible eyes) by pressing them into the treat before the drizzle hardens.
-
For extra effect, dust lightly with a bit of cocoa or gray dust for “aging.”
These mummy treats are visually striking and kid‑friendly.
Shape & Decorating Idea #2: Pumpkin / Jack‑O’‑Lantern Rice Krispie Treats
Pumpkins give shape and symmetry. You can make them round or dome style.
How to Shape Pumpkins
-
Roll a portion into a ball, then flatten slightly to form a pumpkin dome shape.
-
Use a small knife or tool to press shallow lines from top toward bottom to mimic pumpkin ridges.
-
Leave enough flat surface on top for a “stem” or decorative bit.
Decorating as Pumpkins
-
Tint a portion of melted white chocolate or candy melts in orange (gel food coloring) and coat or drizzle over the pumpkin shape.
-
Use green candy or fondant to make stems or leaves on top.
-
Use black icing or melted chocolate to draw jack‑o’ lantern faces on the orange coating.
-
Optionally dust edges with cocoa or orange colored dust for shading.
When you cut INTO them, the orange exterior and white interior create dramatic contrast.
Shape & Decorating Idea #3: Ghost Rice Krispie Treats
Ghosts bring a playful, spooky vibe. They’re light and fun.
How to Shape Ghosts
-
Roll a portion into a tear-drop or bell-like shape with a rounded top and slightly flared bottom.
-
Smooth edges and ensure bottom is flat enough to stand upright (or you can lay them flat on a plate).
Decorating as Ghosts
-
Coat with white candy melts or drizzle thick white chocolate to fully cover.
-
Before coating fully sets, press small candy eyes or use black icing dots for the face.
-
Use a small bit of melted dark chocolate to draw a mouth under the eyes.
-
Optionally dust with shimmer or ghostly pale dust for shine.
These ghost treats are whimsical, and their white coating stands out beautifully among colorful treats.
Alternative Mix & Theme Variations
-
Black & Orange Mix: After coating base shapes in white or orange, drizzle black chocolate or dark cocoa chocolate for contrast.
-
Spooky Graveyard Version: Use orange pumpkins and ghost shapes on a “soil” bed of crushed cocoa Rice Krispies or crushed chocolate cookies.
-
Pops / Skewers: Insert lollipop sticks into shapes before coating so they’re Rice Krispie pops.
-
Sprinkle Variations: Use Halloween sprinkles (bat shapes, ghost sprinkles, orange & black confetti) while drizzle is still wet.
-
Flavor additions: Mix in peanut butter, flavored extracts (pumpkin spice, vanilla, cinnamon) into the marshmallow base before adding cereal.
-
Layered treats: Make half orange tinted and half plain, layer in molds to create color contrast inside.
Step‑by‑Step Instructions & Tips
1. Prepare & Cool Base
-
Pop your marshmallow mixture, stir in cereal, press into flat pan or mold.
-
Allow to cool until just warm—not fully set but firm enough to cut or manipulate.
2. Cut or Shape
-
Use cookie cutters or your hands (greased or coated) to carve shapes (mummies, pumpkins, ghosts).
-
Clean edges by trimming with a knife or gently pressing edges flat.
3. Coat or Drizzle
-
Melt candy melts or white chocolate. Tint desired portions.
-
Use spoon or piping bag to drizzle or coat shapes.
-
Immediately, press candy eyes or facial features before coating sets.
4. Let Decorations Set
-
Allow treats to rest on parchment paper until coating and drizzles solidify fully.
-
For layered or heavy decorations, chill briefly to firm the base before adding.
5. Final Touches
-
Add shading or dusting using cocoa powder, food dusts, or edible glitter.
-
Place onto a spooky tray, perhaps surrounded by decorative props.
Tools & Materials You’ll Want
-
Large mixing bowl & spatula
-
Parchment paper or silicone mats
-
Cookie cutters (pumpkin, ghost, rectangle)
-
Small sharp knife or modeling tool
-
Piping bags or small spoons
-
Candy melts, white chocolate, food coloring gels
-
Edible candy eyes, sprinkles, food dusts
-
Cooling rack or flat tray
-
Storage containers or treat bags
Having these ready helps the workflow go smoothly.
Dietary & Allergy-Friendly Adaptations
-
Vegan / dairy-free: Use plant-based margarine, dairy-free marshmallows, and vegan candy melts.
-
Nut-free: Avoid mix-ins with nuts; use seed butters or simple flavors.
-
Gluten-free: Use gluten-free puffed rice cereals and ensure candy decorations are certified gluten-free.
-
Lower sugar: Use mini marshmallows less, reduce candy coating, or choose sugar-reduced candy melts.
-
Food dye sensitivities: Use natural dyes or fewer, muted tones—don’t overdo bright gels.
By carefully selecting your base and coatings, you can create accessible and delightful Halloween treats for many.
Presentation & Serving Ideas
-
Arrange on a black or Halloween-themed tray so the bright treats stand out.
-
Spread crushed dark cookies around as “graveyard soil” for pumpkins or ghosts standing up.
-
Use mini cupcake liners under each treat so guests can pick them up easily.
-
Label shapes (“Mummy Bite,” “Pumpkin Crunch,” “Ghost Puff”) with fun tent cards.
-
For classroom or party, package in clear treat bags with Halloween ribbon.
-
Serve alongside drinks like spooky punch or cider to complement.
Decorative accents like mini spiders, pumpkin picks, or ghost stickers elevate the display.
Make-Ahead, Storage & Transport Tips
-
You can make the Rice Krispie base a day or two ahead; wrap tightly in cling wrap.
-
Shape and store in sealed containers until ready to coat/decorate.
-
Coated treats should be stored in airtight containers at room temperature; avoid stacking heavy items on top.
-
For transport, use a flat box or tray with dividers or parchment paper between layers to prevent sticking or damage.
-
Keep out of direct sunlight or heat, as coatings (chocolate, candy melts) may soften.
Troubleshooting & Common Decorating Challenges
-
Candy melts seizing or thickening: Warm gently and stir frequently; don’t overheat.
-
Shapes fall apart: Let base cool slightly more before shaping, or bind mixture slightly tighter (a little extra butter or marshmallow).
-
Eyes or decorations not adhering: Apply small dots of melted chocolate or drizzle under them as glue.
-
Coating cracking: Use a thinner coating or drizzle rather than full coating.
-
Color bleeding: Use gel/paste colors, not liquid dyes, and allow each tinted layer to set before another.
-
Overcrowded tray causes smudging: Leave space between shapes while setting.
Frequently Asked Questions
Do these treats taste messy?
They can be a little sticky, but if your coating is set well and shapes aren’t overfilled, they’re quite manageable.
How far in advance can I make them?
Base and mix-ins can be made up to 1–2 days ahead; coating and final decoration best done on party day.
Can I use store-bought Rice Krispie bars instead of making base?
You could use them, but freshly mixed base tends to bind better for shaping and holds decorations more reliably.
What kinds of candy eyes work best?
Edible candy eyes, small sugar eyes, or mini chocolate chips work well. Choose flat ones to press into coating.
How many treats does one recipe yield?
It depends on size. From the base recipe, you could get ~12–15 medium sized treats, or 20–24 smaller ones.
Final Thoughts
Halloween Rice Krispie Treats are one of the most fun, accessible, and creative desserts you can make. The no-bake base means minimal fuss, and shaping into mummies, pumpkins, ghosts, or a mix allows endless variation. The key is a firm base, good coatings, and fun decoration.
Let your imagination guide face shapes, color combinations, and textures. Whether for school parties, trick-or-treat handouts, or a cozy family baking night, these treats deliver spooky charm and snacking joy.
")