Contents
- 1 Bring Magic to Your Kitchen with Homemade Lucky Charms Treats
- 2 Magic-In-A-Pan Ingredients (Plus Smart Swaps)
- 3 Crafting Your Magical Treats: Step-by-Step Wizardry
- 4 Bending the Rules: Creative Variations
- 5 Troubleshooting Magic Gone Wrong
- 6 Your Magical Questions Answered
- 7 Your Turn to Make Magic Happen!
Bring Magic to Your Kitchen with Homemade Lucky Charms Treats
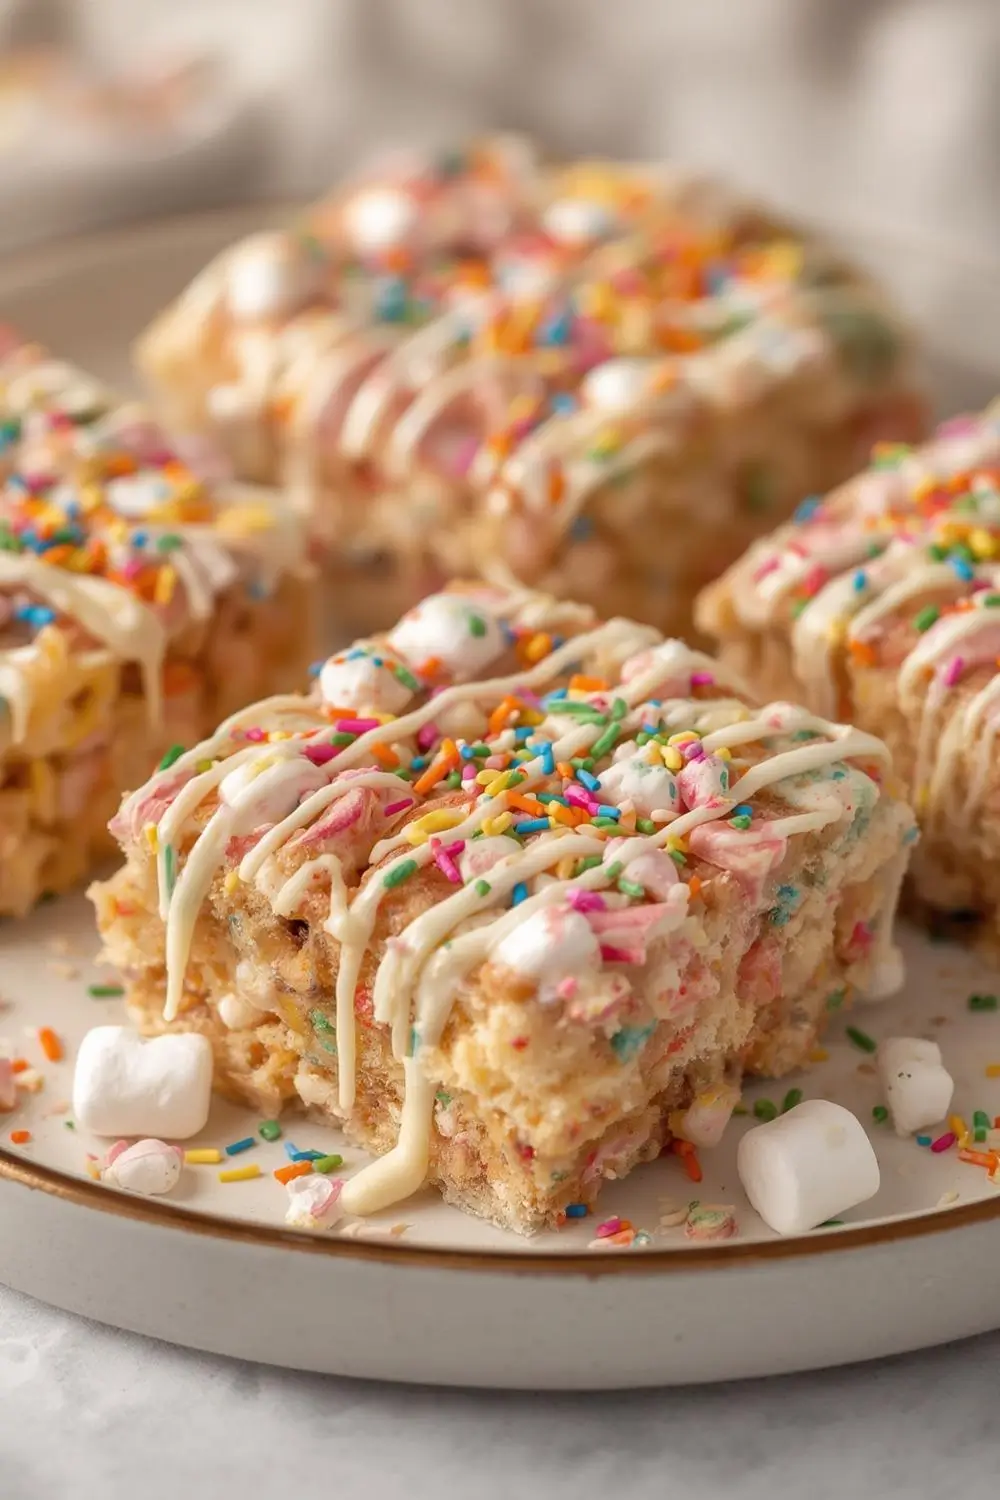
Imagine biting into a chewy, sweet bar that combines nostalgic childhood breakfast flavors with the excitement of a birthday party. These Lucky Charms treats aren’t just eye-catching – they’re happiness you can hold in your hands! Perfect for busy parents, last-minute party planners, or anyone craving simple joy, this recipe transforms ordinary pantry items into edible magic in just 15 minutes.
What makes these treats particularly special is their versatility. While perfectly suited for St. Patrick’s Day celebrations with their green marshmallows and rainbow sprinkles, they work equally well for birthday parties, after-school snacks, or “just because” moments. The best part? No oven required – just a saucepan, some basic ingredients, and a little sprinkle of imagination.
Why You’ll Fall in Love with These Magical Bars
- 15-minute magic: Faster than ordering delivery!
- No-bake simplicity: Great for hot days or kitchen newbies
- Endlessly customizable: Change up sprinkles and decorations for any holiday
- Crowd-pleasing flavor: Combines sweet, salty, and crunchy textures
- Vegetarian-friendly: Uses common ingredients without hidden animal products

The Secret Behind Perfect Texture
Creating that ideal chewy-yet-crunchy texture might seem like luck, but it’s really about technique. The trick lies in how you combine your ingredients and control the marshmallow melting process. We’ll walk through each critical step to ensure your bars come out perfectly every time – no four-leaf clover required!
Magic-In-A-Pan Ingredients (Plus Smart Swaps)
Makes 16 generously sized bars
The Foundation
- 6 cups Lucky Charms cereal: Provides that iconic combination of toasted oat pieces and rainbow marshmallows – be sure to measure after removing any dust from the bottom of the bag
- 10 oz mini marshmallows: Creates that signature chewiness (regular marshmallows work too – just chop them into smaller pieces)
- 3 tbsp butter: Salted butter adds depth, but unsalted works if you prefer less saltiness
- 1/4 tsp fine sea salt: Balances the sweetness – don’t skip!
- 1/2 tsp vanilla extract: Adds warmth and complexity to the marshmallow base
- 1/3 cup rainbow sprinkles: Choose jimmies rather than nonpareils for better texture
- 1/2 cup white chocolate chips: For decorative drizzle (microwave-safe chocolate works too)
- 2 tbsp rainbow sprinkles: Additional topping for visual pop
- Butter alternatives: Coconut oil works well (use refined for neutral flavor)
- Sprinkle alternatives: Crushed freeze-dried strawberries add natural color
- Cereal alternatives: Combine plain puffed rice cereal with additional marshmallows
- Line an 8×8 baking pan with parchment paper, leaving “handles” hanging over two sides
- Press 2 tablespoons rainbow sprinkles evenly across bottom (this creates a sparkling crust!)
- Measure all ingredients before starting – this recipe moves quickly once heated
- Melt butter in large saucepan over LOW heat – high temperatures will make bars hard
- Add marshmallows and salt, stirring constantly with silicone spatula until 90% melted
- Remove from heat immediately (residual heat will finish melting) and stir in vanilla
- Pour Lucky Charms over marshmallow mixture, gently folding until evenly coated
- Working quickly before mixture cools, transfer to prepared pan
- Dampen your hands lightly and press FIRMLY (key for holding shape!) into even layer
- Room temperature: 3-4 days in airtight container with parchment between layers
- Refrigerator: Up to 1 week – let sit at room temperature 10 minutes before eating
- Freezer: 2 months tightly wrapped – thaw overnight in fridge
- St. Patrick’s Day: Add green food coloring to marshmallow mix, use shamrock sprinkles
- Birthdays: Mix in mini M&M’s, use confetti sprinkles
- Valentine’s Day: Swirl pink marshmallow fluff into mixture, top with heart sprinkles
- Chocolate charms: Add 1/4 cup cocoa powder to marshmallow mixture
- S’mores style: Layer with graham cracker crumbs, use chocolate drizzle
- Peanut butter lovers: Swirl 1/4 cup peanut butter into marshmallow base
- Treat pops: Roll mixture into balls, insert popsicle sticks, decorate
- Mini bites: Press into mini muffin tins for portion-controlled treats
- Bars-on-the-go: Wrap individual bars in wax paper for lunchboxes
- Problem: Hard, crunchy bars
Fix: You overcooked the marshmallows – next time remove from heat sooner - Problem: Bars crumble when cut
Fix: Press mixture more firmly into pan – use bottom of measuring cup - Problem: Marshmallows burning
Fix: Always use low heat and constant stirring - Problem: Sprinkles bleeding color
Fix: Use oil-based sprinkles (look for “candy makers” varieties)
Flavor Boosters
The Magic Coatings
Ingredient Wisdom
Vegetarian Note:
Standard Lucky Charms and most marshmallows contain gelatin, which some vegetarians avoid. For 100% vegetarian version, use:
– Dandies vegan marshmallows
– Annie’s Organic Bunny Cereal (similar marshmallow shape/sweetness)
Smart Substitutions:
Crafting Your Magical Treats: Step-by-Step Wizardry
Setting Up Your Workshop
The Marshmallow Alchemy

Bringing the Magic Together
Storage Enchantment
Bending the Rules: Creative Variations
Theme Magic (Perfect for Holidays!)
Flavor Twists
Mess-Free Alternatives
Troubleshooting Magic Gone Wrong
Common Mistakes and Solutions
Your Magical Questions Answered
Can I use a different cereal?
Absolutely! Try similar marshmallow cereals or create your own mix. For every 6 cups of cereal, maintain the same marshmallow-butter ratio. Note that puffed cereals like Rice Krispies will create different textures.
Are these treats gluten-free?
Standard Lucky Charms contains oat flour that may have cross-contamination. For gluten-free version, use certified GF crispy rice cereal and add 1 cup mini marshmallows to the mix.
Can I make these ahead of time?
These bars actually taste best 3-4 hours after making when flavors meld. Prepare up to 2 days in advance – store tightly covered at room temperature. Add fresh sprinkles and drizzle just before serving.
My marshmallow mixture is too sticky. Help!
Lightly coat your hands and utensils with cooking spray or butter. If mixture cools too quickly while working, gently warm the saucepan and knead briefly.
Can I use sugar substitutes?
The marshmallow structure requires sugar. You could try sugar-free marshmallows, but texture will differ significantly. For lower sugar option, reduce sprinkles and use dark chocolate drizzle.
Why isn’t my sprinkle crust sticking?
Press the cereal mixture firmly into the sprinkle-lined pan immediately after mixing. The warm marshmallow acts as “glue” – if it cools too much before pressing, the sprinkles won’t adhere properly.
Your Turn to Make Magic Happen!
There’s something undeniably joyful about creating treats that make people’s eyes light up. Whether you’re surprising your kids with rainbow-colored snacks after school or bringing a touch of whimsy to your next potluck, these Lucky Charms bars deliver pure edible happiness. Remember – the best magic happens when you make it your own. Try swirling in food coloring for holiday themes, creating different shapes with cookie cutters, or packaging them in cellophane bags as sweet gifts.
What magical twist will you add to your Lucky Charm treats? Will you make sparkling unicorn bars with edible glitter? Galaxy-themed treats with black cocoa and star sprinkles? The beauty of this recipe lies in its adaptability to your imagination. Whatever version you create, don’t forget to share the magic – because joy tastes even sweeter when passed along.
")