The Ultimate Make-Ahead Egg and Cheese Breakfast Sliders: Your Freezer-Friendly Morning Savior
Imagine waking up on a hectic weekday, knowing a perfectly cooked, cheesy, egg-filled breakfast sandwich is waiting, ready to grab and go. No more scrambling eggs or rushing to the toaster. This is the magic of Make-Ahead Egg and Cheese Breakfast Sliders. These little bundles of joy are your secret weapon for stress-free mornings, effortless meal prep, and satisfying freezer breakfasts. Packed with fluffy scrambled eggs, gooey melted cheese, and nestled perfectly in soft, pillowy slider buns, they’re the ultimate portable breakfast solution. Whether you’re a busy parent, a professional on the go, or simply someone who loves a delicious start to the day, these sliders are about to become your new obsession.
Why Make-Ahead Breakfast Sliders Are a Game-Changer
Let’s face it, mornings can be chaotic. Getting everyone fed and out the door feels like a marathon. That’s where these sliders shine. By preparing them in advance, you reclaim precious time and sanity. Here’s why they’re worth the initial effort:
- Zero Morning Stress: Grab a slider straight from the freezer, pop it in the toaster or microwave, and you’re out the door in minutes. No more burnt toast or forgotten eggs.
- Perfect Portion Control: Each slider is a complete, satisfying breakfast, helping you avoid overeating or grabbing unhealthy options.
- Meal Prep Mastery: Batch cooking these is incredibly efficient. Spend a few hours on the weekend, and you’ve got breakfasts for the entire week (or even longer!).
- Freezer Friendly: They freeze beautifully, maintaining their texture and flavor. Just remember to thaw overnight in the fridge before reheating.
- Customizable Comfort: The beauty lies in the simplicity and the ability to tweak it to your liking. Swap out the cheese, add veggies, or adjust the seasoning – it’s all up to you.
- Kid Approved (and Adult Loved): The soft bun, creamy egg, and melty cheese combo is universally appealing. It’s a breakfast win for the whole family.
Gathering Your Ingredients: The Building Blocks of Breakfast Bliss
The magic happens with just a handful of simple, accessible ingredients. You likely have most of these staples in your pantry or fridge right now. Here’s what you’ll need:
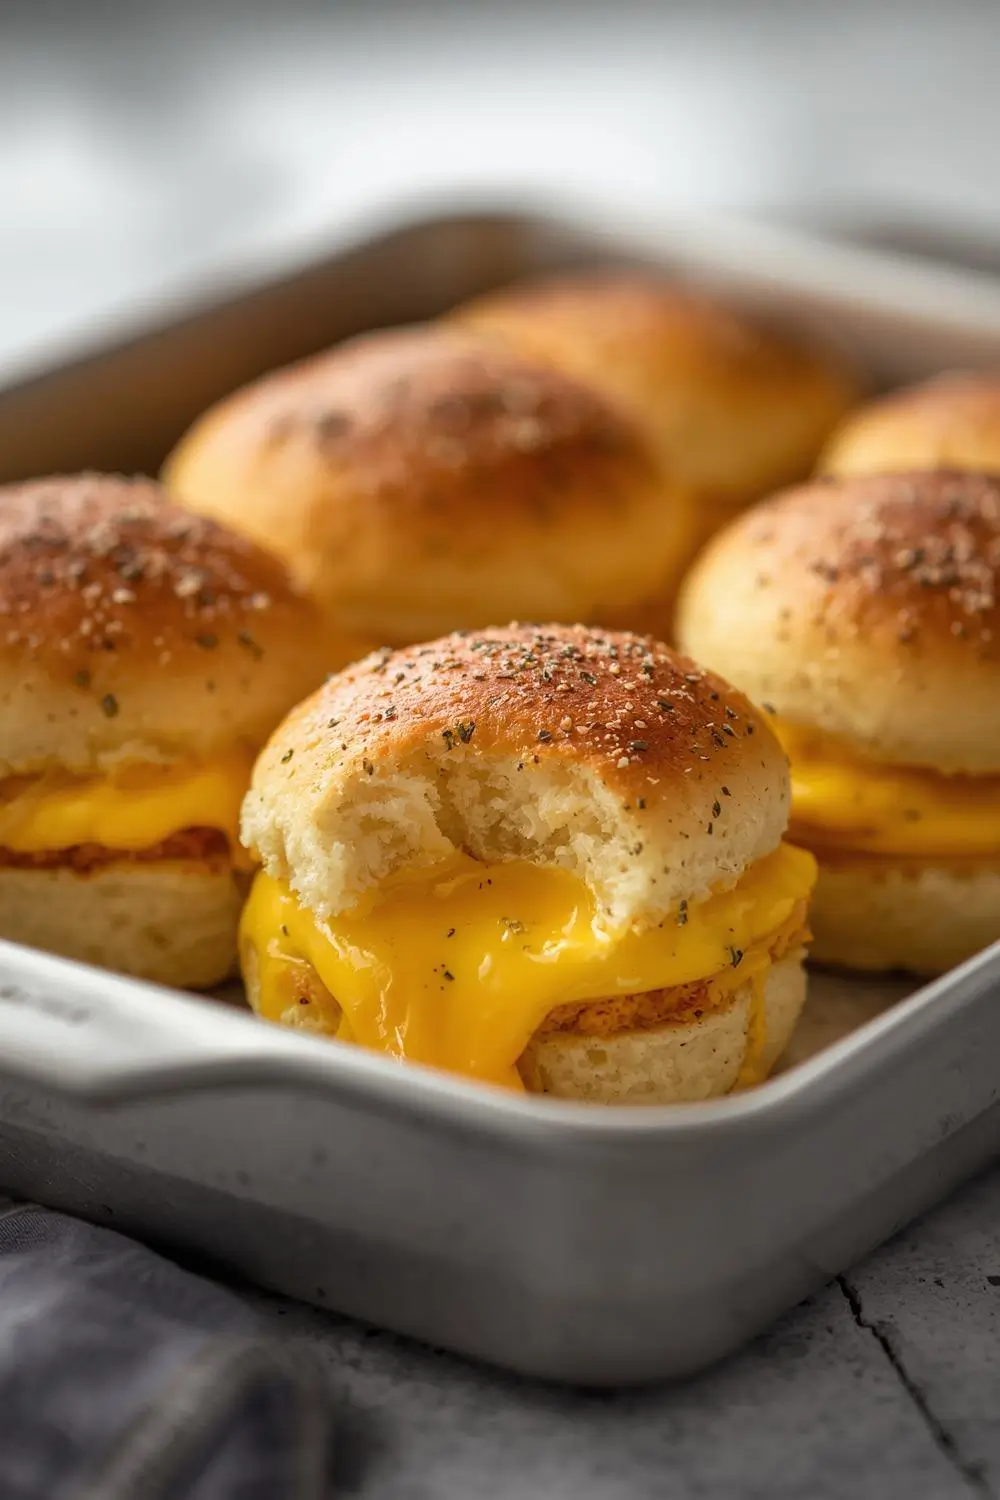
- The Star: Slider Buns: Soft, slightly sweet dinner rolls or Hawaiian rolls are ideal. They provide the perfect pillowy base that holds up well when toasted or reheated. Avoid crusty rolls – they can get soggy. You’ll need about 12-15 buns, depending on size.
- The Heart: Eggs: Large eggs are standard. They provide the protein and creamy texture. For extra richness, you can add a splash of milk or cream, but it’s optional.
- The Glue: Cheese: Sharp cheddar, Monterey Jack, or a blend work wonderfully. The cheese should melt beautifully and add that essential savory punch. You’ll need about 1.5 to 2 cups shredded cheese.
- The Flavor Boosters (Optional but Recommended):
* Diced Onions: Yellow or white onions add a subtle sweetness when cooked. Finely dice them.
* Bell Peppers: Any color adds crunch, color, and vitamins. Dice them small.
* Salt & Pepper: Essential for seasoning the eggs. Start with ½ teaspoon salt and ¼ teaspoon pepper, adjusting to taste.
* Butter or Oil: For cooking the egg mixture in the pan before assembling.
- The Binder (Optional): A tablespoon of milk or cream whisked into the eggs before cooking helps create a fluffier texture.
Step-by-Step: Crafting Your Breakfast Sliders
Now, let’s turn those ingredients into delicious, make-ahead magic. This process is straightforward and doesn’t require any fancy skills. Here’s how to do it:
1. Prep the Egg Mixture:
* Crack your eggs into a large bowl. Add the milk or cream if using. Whisk vigorously until the yolks and whites are fully combined and slightly frothy.
* Stir in the diced onions and bell peppers (if using). This ensures they’re evenly distributed.
* Season generously with salt and pepper. Taste and adjust – you can always add more later, but you can’t take it out. Set aside.
2. Cook the Egg Mixture:
* Heat a non-stick skillet over medium heat. Add a tablespoon of butter or oil.
* Pour in the egg mixture. Let it sit undisturbed for about 10-15 seconds to start setting around the edges.
Using a spatula, gently push the cooked edges towards the center, tilting the pan to let the uncooked egg flow into the empty spaces. Repeat this process, moving the spatula in large, gentle sweeps, until the eggs are mostly set but still slightly moist and glossy. This is crucial for fluffy eggs.* They will continue to cook slightly as they bake in the oven.
* Remove from heat immediately. The residual heat will finish cooking them perfectly. Let the cooked egg mixture cool slightly for about 5-10 minutes. This prevents the cheese from melting too quickly and the buns from getting soggy.
3. Assemble the Sliders:
* Preheat your oven to 350°F (175°C). Lightly grease a 9×13 inch baking dish or a rimmed baking sheet.
* Place the slider buns cut-side up in a single layer in the prepared dish. You might need to arrange them snugly.
* Divide the cooled egg mixture evenly among the buns, spooning it generously onto each one. Press down gently so the eggs are packed in.
* Sprinkle the shredded cheese evenly over the top of each filled bun.
4. Bake to Perfection:
* Place the baking dish in the preheated oven. Bake for 15-20 minutes, or until the cheese is melted, bubbly, and golden brown on top, and the buns are lightly toasted.
* Keep a close eye towards the end to prevent over-browning. The internal temperature should reach at least 165°F (74°C) for food safety.
5. Cool and Slice:
* Remove the dish from the oven and let the sliders cool for at least 10-15 minutes. This allows them to set firmly, making them much easier to slice without falling apart.
* Once cooled, slice the entire dish into individual slider portions using a sharp knife. You can slice them into rows and columns to create neat squares or rectangles.
Variations to Suit Your Taste
The beauty of this recipe is its adaptability. Here are some delicious twists to keep things interesting:
- Veggie Power-Up: Add diced mushrooms, spinach (wilted first), diced tomatoes, or sliced olives to the egg mixture for extra flavor and nutrients.
- Meat Lover’s Version (Optional): If you’re not avoiding pork, add cooked, crumbled bacon or sausage to the egg mixture before baking. Use sparingly to avoid overpowering the eggs.
- Spice It Up: Add a pinch of garlic powder, onion powder, smoked paprika, or a dash of hot sauce to the egg mixture for a flavor kick.
- Cheese Swap: Experiment with different cheeses! Pepper jack adds heat, Swiss adds a nutty flavor, or a blend of cheddar and mozzarella ensures excellent meltiness.
- Gluten-Free Option: Use gluten-free slider buns or rolls as a substitute. Ensure your baking dish is also gluten-free if necessary.
- Lower Fat Version: Use egg whites only or a combination of whole eggs and egg whites. Reduce the amount of cheese slightly or use a reduced-fat cheese.
Storage and Reheating: Keeping Your Sliders Fresh and Delicious
The best part? These sliders are designed for convenience, both in preparation and storage.
- Cooling Completely: This is non-negotiable. Let the assembled, baked sliders cool completely to room temperature on a wire rack. This prevents condensation and sogginess when stored.
- Freezing for Long-Term Storage:
* Once completely cooled, wrap each individual slider tightly in plastic wrap, ensuring no air is trapped.
* Place the wrapped sliders in a large freezer bag or airtight freezer container. Squeeze out as much air as possible before sealing.
* Label the bag/container with the date.
* They will keep beautifully in the freezer for up to 3 months.
- Reheating from Frozen:
* Toaster Oven or Regular Oven: Preheat your oven to 325°F (160°C). Place the frozen slider directly on a baking sheet. Bake for 15-20 minutes, or until heated through and the cheese is melted. This method gives the best texture.
* Microwave: Place the frozen slider on a microwave-safe plate. Microwave on high for 1-2 minutes, checking frequently to prevent overheating and sogginess. The texture won’t be as crisp as oven-reheating, but it’s quick and convenient.
- Reheating from Refrigerated (Not Frozen):
* Oven: Preheat oven to 325°F (160°C). Place the slider on a baking sheet. Bake for 8-10 minutes, or until heated through.
* Toaster Oven: Similar to oven method, but usually faster.
* Microwave: Place the slider on a microwave-safe plate. Microwave on high for 30-60 seconds, checking frequently. Add a small splash of water to the plate or cover loosely with a damp paper towel to help retain moisture and prevent drying out.
Common Mistakes to Avoid: Ensuring Slider Success
Even simple recipes can trip us up. Here’s how to sidestep common pitfalls:
- Overcooking the Eggs: This is the biggest culprit for rubbery eggs. Cook them just until set but still slightly moist. They finish cooking in the oven.
- Skipping the Cool Down: Rushing to slice the sliders before they cool completely is a recipe for disaster (soggy, falling-apart sliders). Patience is key!
- Overloading the Buns: While generous is good, piling on too much egg mixture can make the buns soggy and prevent even cooking. Aim for a generous but manageable amount.
- Not Preheating the Oven: Starting with a cold oven means the sliders take longer to cook and may not get that perfect golden, bubbly top.
- Using Crusty Buns: They don’t hold up well and can become soggy. Stick with soft, pillowy rolls.
- Skipping the Grease: Lightly greasing the baking dish prevents sticking and makes cleanup easier.
Your Burning Questions Answered (FAQs)
- Can I make these sliders ahead of time? Absolutely! That’s the whole point! Assemble them, bake them, let them cool completely, wrap tightly, and freeze them. They’re perfect for meal prep.
- How long do they last in the freezer? When stored properly in an airtight container or freezer bag, they maintain peak quality for about 3 months. They’re still safe to eat beyond that, but texture and flavor may diminish slightly.
- Can I reheat them in the toaster? It’s not recommended. The high heat can burn the outside before the inside is heated through, and the cheese might melt unevenly. The oven or microwave are safer bets.
- What if my sliders are soggy when I reheat them? This often happens if they weren’t cooled completely before freezing or if reheated in the microwave without a damp paper towel. Using the oven method helps retain crispness better. Ensure they are completely cooled before freezing.
- Can I use different types of cheese? Yes! Experiment! Sharp cheddar, Monterey Jack, pepper jack, Swiss, or a blend – choose what you love. Just ensure it melts well.
- Can I add meat? If you’re not avoiding pork, cooked bacon or sausage crumbles are a delicious addition to the egg mixture. Use sparingly.
- Are these suitable for gluten-free diets? Yes, by using gluten-free slider buns or rolls. Ensure all other ingredients (like cheese) are naturally gluten-free.
- Can I make a larger batch? Definitely! Simply scale up the ingredients and use a larger baking dish (like a 13×9 inch pan). Adjust baking time slightly if needed, checking for doneness.
- Can I add vegetables? Absolutely! Diced onions, bell peppers, mushrooms, spinach (wilted first), or tomatoes are all great additions. They add flavor, color, and nutrients.
- How do I prevent the eggs from being rubbery? Cook them gently over medium heat, stirring constantly but gently until just set. Don’t overcook them before baking. They finish cooking in the oven.
- Can I make these without milk or cream? Yes! The milk or cream is optional and mainly adds richness and fluffiness. You can skip it if you prefer, just whisk the eggs well.
The Final Slice: A Conclusion to Savor
There you have it – the ultimate guide to creating your own batch of Make-Ahead Egg and Cheese Breakfast Sliders. These little bundles of breakfast joy are more than just a recipe; they’re a lifestyle upgrade. They transform hectic mornings into moments of calm, provide nutritious and satisfying fuel, and offer the ultimate convenience without sacrificing flavor. The process is simple, the ingredients are accessible, and the results are incredibly rewarding. Whether you’re prepping for a busy workweek, hosting a brunch, or simply craving a delicious, portable breakfast, these sliders deliver. They freeze beautifully, reheat easily, and are endlessly customizable. So, gather your ingredients, embrace the make-ahead magic, and enjoy the delicious, stress-free mornings these sliders promise. Happy cooking, and here’s to many delicious bites ahead!
Pin this recipe for later!
")