Contents
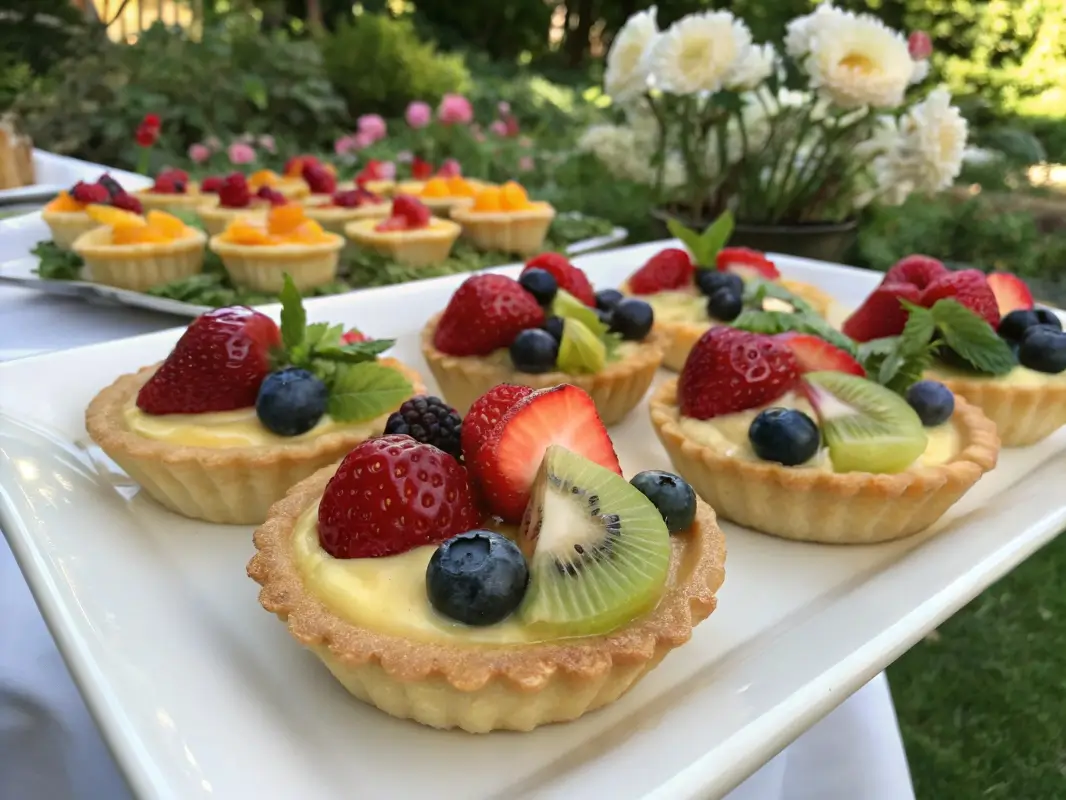
Mini Fruit Tarts are the perfect dessert when you want something elegant, colorful, and refreshingly sweet. These dainty tarts feature a crisp, buttery shell, creamy filling, and a jewel-like arrangement of fresh fruits. Whether you’re preparing a tray for a bridal shower, brunch, afternoon tea, or a festive holiday spread, Mini Fruit Tarts are always a show-stopping addition.
Bite-sized but big on flavor, these tarts bring a balanced blend of textures and flavors in every mouthful—from the crunch of the pastry to the smooth custard and the burst of natural sweetness from fresh berries and fruit. They’re not just visually stunning; they’re also easy to make and highly customizable to suit seasons, events, or dietary needs.
Why You’ll Love These Mini Fruit Tarts
Mini Fruit Tarts combine the elegance of patisserie-style desserts with the simplicity of home baking. These single-serve sweets are easy to pick up and eat—no cutting, no mess—and their versatility makes them ideal for entertaining.
Top Reasons to Make Mini Fruit Tarts
-
Visually impressive and great for special occasions
-
Easy to customize with seasonal or favorite fruits
-
Perfectly portioned for individual servings
-
Can be made ahead for stress-free entertaining
-
Delightfully light and refreshing
Ingredients for Mini Fruit Tarts
These tarts are made of three simple components: the tart shells, the creamy filling, and the fresh fruit topping. You can use store-bought items to save time, or make everything from scratch for that homemade touch.
Tart Shells (Makes about 12 mini tarts)
-
1½ cups all-purpose flour
-
½ cup powdered sugar
-
¼ teaspoon salt
-
½ cup cold unsalted butter, cut into cubes
-
1 large egg yolk
-
1–2 tablespoons cold water
Alternative: Use mini phyllo shells or pre-baked tartlet shells for a shortcut.
Pastry Cream Filling
-
2 cups whole milk
-
½ cup granulated sugar
-
¼ cup cornstarch
-
4 large egg yolks
-
1 teaspoon vanilla extract
-
2 tablespoons unsalted butter
Optional Variation: Substitute vanilla pudding or mascarpone whipped cream for an easier filling.
Fresh Fruit Topping (Choose a mix for visual appeal)
-
Blueberries
-
Raspberries
-
Strawberries, sliced
-
Kiwi, peeled and sliced thin
-
Mango, diced
-
Blackberries
-
Grapes, halved
Optional Garnish: Mint leaves, powdered sugar, or a light apricot glaze for shine.
How to Make Mini Fruit Tarts from Scratch
Making Mini Fruit Tarts is a simple yet rewarding process. Each step can be done ahead of time, making this recipe ideal for parties and meal prep.
Step 1: Prepare the Tart Shells
In a food processor, pulse together flour, powdered sugar, and salt. Add cold butter and pulse until the mixture resembles coarse crumbs. Add egg yolk and water, one tablespoon at a time, until dough forms. Wrap in plastic and chill for at least 30 minutes.
Preheat oven to 350°F (175°C). Roll out dough and cut into circles to fit mini tart pans or a muffin tin. Press dough into greased molds, prick bottoms with a fork, and bake for 12–15 minutes or until golden. Let cool completely before filling.
Step 2: Make the Pastry Cream
In a saucepan over medium heat, warm the milk until just beginning to steam. In a separate bowl, whisk sugar, cornstarch, and egg yolks until pale. Slowly add the hot milk to the egg mixture, whisking constantly to temper. Return mixture to saucepan and cook over medium heat, stirring until thickened.
Remove from heat and stir in vanilla and butter until smooth. Let cool to room temperature, then chill for 1 hour before using.
Step 3: Assemble the Tarts
Once tart shells are cooled and pastry cream is chilled, spoon or pipe the filling into each shell. Top with an assortment of fresh fruit. Arrange in patterns for a polished, professional look.
Optional: Brush a warm apricot jam glaze (thinned with water) over the fruit for a glossy finish.
Step 4: Serve or Store
Chill until ready to serve. These mini tarts can be made up to 24 hours in advance. Keep refrigerated to maintain freshness and texture.
Customizations and Variations
Mini Fruit Tarts can be adapted in countless ways. Here are a few creative options to try.
Flavor Variations
-
Chocolate Pastry Cream: Add 2 tablespoons cocoa powder to your filling for a chocolatey twist
-
Lemon Curd Filling: Use lemon curd instead of pastry cream for a tangier profile
-
Coconut Cream: Mix coconut milk and cream cheese for a tropical vibe
Crust Alternatives
-
Graham cracker crusts for a no-bake version
-
Phyllo dough cups for a flaky, crispy shell
-
Almond flour crust for gluten-free tarts
Fruit Themes
-
Red, white & blue for patriotic holidays
-
Tropical blend with mango, pineapple, and kiwi
-
Autumn twist with poached pears, figs, and spiced cream
Serving Suggestions
Mini Fruit Tarts are best served chilled. They work beautifully on tiered dessert trays, rustic wood boards, or white porcelain platters for contrast. Pair with coffee, tea, sparkling wine, or lemonade for a refined touch.
These also make perfect additions to:
-
Wedding and baby showers
-
Easter and Mother’s Day brunches
-
Graduation or birthday buffets
-
Summer BBQ dessert tables
Storage and Make-Ahead Tips
How Long Do They Last?
Mini Fruit Tarts are best enjoyed within 24–48 hours. After that, the crust may begin to soften and the fruit can lose freshness.
Can I Freeze Them?
You can freeze the tart shells and pastry cream separately. Assemble with fresh fruit after thawing for best results.
Can I Make the Filling in Advance?
Yes. Pastry cream can be made up to 3 days in advance and stored in the fridge. Just give it a stir before using.
FAQs About Mini Fruit Tarts
What’s the best fruit to use?
Berries work best for size and moisture control. Softer fruits like peaches or plums should be sliced thin and well-drained.
How do I keep the fruit from turning brown?
Use acid-rich fruits like berries or kiwi. For apples or bananas, dip slices in lemon juice before placing them on the tarts.
Can I make this recipe gluten-free?
Yes—use almond flour or gluten-free baking mix for the tart crust. Also confirm all ingredients, including thickeners and flavorings, are gluten-free.
What if I don’t have tart pans?
Use a mini muffin tin lined with parchment strips for easy removal. You can also buy pre-made tartlet shells at most grocery stores.
Can kids help with this recipe?
Absolutely! Kids can help press the dough into pans, decorate with fruit, and even pipe the filling (with supervision).
Final Thoughts
Mini Fruit Tarts are one of those desserts that strike the perfect balance between stunning presentation and delightful flavor. With their buttery crusts, smooth creamy centers, and a rainbow of fresh fruits on top, they appeal to both the eye and the palate. Whether you’re planning a formal celebration or simply want to treat yourself and your family, these tarts are guaranteed to impress.
Customize them to your occasion, prep them in advance, and enjoy the bite-sized brilliance of one of the most elegant yet easy desserts you can make at home.
")