Contents
- 1 Why Mini Gingerbread House Cookies Are Perfect for Families
- 2 Ingredients for Mini Gingerbread House Cookies
- 3 Preparing the Mini Gingerbread Dough
- 4 Rolling and Cutting the Mini Gingerbread Houses
- 5 Baking Instructions
- 6 Assembling the Mini Gingerbread Houses
- 7 Decorating Mini Gingerbread House Cookies
- 8 Creative Presentation Ideas
- 9 Tips for Stress-Free Mini Gingerbread Houses
- 10 Storing Mini Gingerbread Houses
- 11 Troubleshooting Common Issues
- 12 Frequently Asked Questions
- 13 Final Thoughts
Mini gingerbread house cookies are the perfect festive treat for the holiday season. These bite-sized versions of the classic gingerbread house bring all the charm and fun of traditional gingerbread construction, but in a much easier, family-friendly format. Perfect for kids’ holiday baking parties, cozy evenings with hot cocoa, Christmas cookie platters, or festive gifting, these small cookies are both adorable and delicious.
This article provides a comprehensive guide for creating mini gingerbread house cookies—from simple dough preparation to easy assembly and creative decorating ideas. You’ll learn step-by-step instructions, tips for sturdiness, ideas for icing and candy accents, packaging suggestions, troubleshooting help, and a full FAQ section. Every suggestion is free from pork, bacon, wine, alcohol, beer, or whisky, making it suitable for family-friendly holiday baking.
With this easy version, even beginners can create festive, visually stunning mini gingerbread houses without stress.
Mini gingerbread house cookies combine creativity, tradition, and fun in a manageable way.
Fun and Interactive
Kids and adults alike can help assemble, decorate, and personalize each house.
Easy Portion Control
Small size means bite-sized treats, perfect for sharing or gifting.
Beginner-Friendly
Simplified designs and cookie structures eliminate the complexity of traditional gingerbread houses.
Perfect for Hot Cocoa Boards
Add a touch of festive charm to holiday desserts and winter snack tables.
Great for Gifts and Party Favors
Tiny houses fit easily into gift boxes or cookie bags.
Decorative and Edible
Mini houses are charming table décor before being enjoyed as a sweet treat.
These ingredients produce cookies that are sturdy enough to hold together but soft enough to enjoy.
Dry Ingredients
-
All-purpose flour
-
Baking soda
-
Salt
-
Ground ginger
-
Ground cinnamon
-
Ground cloves
-
Ground nutmeg
Wet Ingredients
-
Unsalted butter, softened
-
Brown sugar
-
Molasses
-
Egg
-
Pure vanilla extract
Optional Decoration Ingredients
-
Royal icing or thick glaze
-
Mini candy sprinkles, chocolate chips, or nonpareils
-
Powdered sugar for snow effect
All ingredients are family-friendly and free from restricted products.
Preparing the Mini Gingerbread Dough
Creating dough that is easy to cut and sturdy for assembly is crucial.
Mix Dry Ingredients
Whisk together flour, baking soda, salt, ginger, cinnamon, nutmeg, and cloves in a medium bowl.
Cream Butter and Sugar
In a large bowl, beat softened butter with brown sugar until light and fluffy.
Add Molasses, Egg, and Vanilla
Mix in molasses until combined, then add the egg and vanilla extract.
Combine Wet and Dry Ingredients
Add dry ingredients in small portions to the wet mixture. Stir until just combined—overmixing can make cookies tough.
Chill the Dough
Wrap dough in plastic and chill for at least one hour. This makes it easier to roll, cut, and maintain house shapes.
Rolling and Cutting the Mini Gingerbread Houses
Preparing Your Workspace
-
Lightly flour a clean surface and rolling pin.
-
Roll dough to about ¼ inch thickness—thin enough for assembly but thick enough for sturdiness.
Cutting House Pieces
-
Mini houses typically require 5–6 pieces: front, back, two sides, roof halves, optional chimney.
-
Use a small rectangular cutter for walls, triangles for roof ends, and rectangles for roof panels.
Tips for Consistency
-
Use a ruler or template for uniform pieces.
-
Transfer shapes carefully using a thin spatula.
Baking Instructions
-
Preheat the oven to 350°F (175°C).
-
Line baking sheets with parchment paper.
-
Bake mini gingerbread house pieces 8–10 minutes, or until firm but not darkened.
-
Allow pieces to cool completely on the baking sheet before assembly.
Proper cooling prevents breakage and ensures your houses hold their shape.
Assembling the Mini Gingerbread Houses
Preparing the Icing
Use thick royal icing as “glue” to hold the pieces together.
Step-by-Step Assembly
-
Pipe icing along the edges of a wall piece.
-
Attach side walls and hold until stable.
-
Add the front and back panels, securing with icing.
-
Place roof panels on top, pressing lightly to adhere.
-
Allow the assembled house to dry completely (1–2 hours).
Tips for Sturdiness
-
Use a small amount of icing at a time.
-
Hold pieces in place for a few seconds to prevent sliding.
-
Chill assembled houses for faster drying.
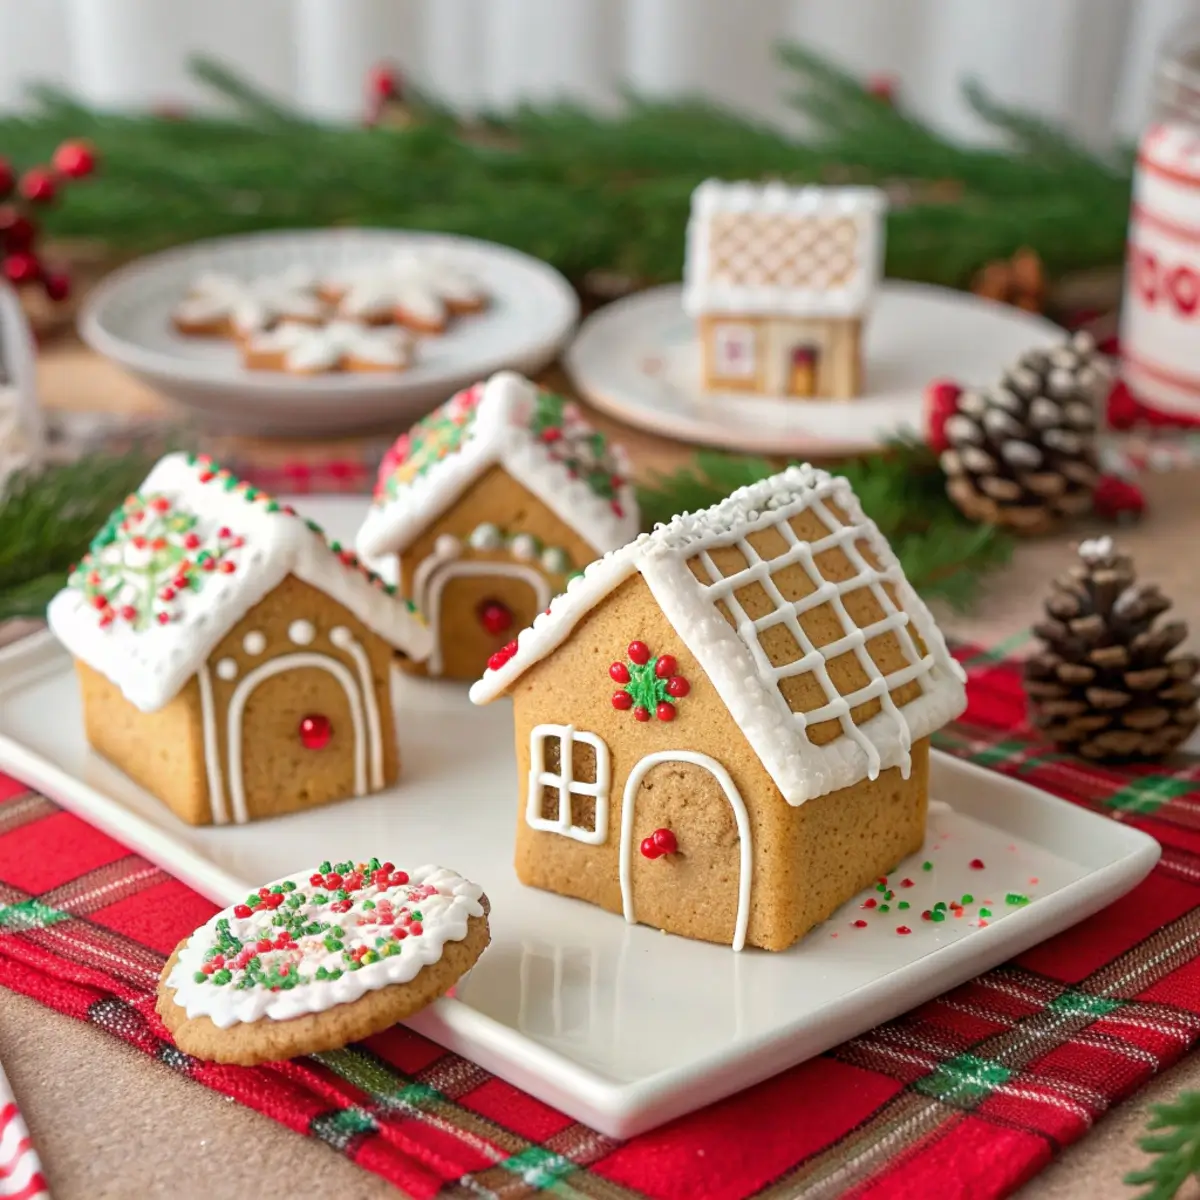
Decorating is where you can get creative while keeping things simple for beginners.
Classic Icing Designs
-
Snow-dusted roofs with zigzag lines.
-
Window and door outlines.
-
Roof panels with simple line patterns.
Candy Decorations
-
Mini sprinkles as rooftop snow.
-
Small chocolate chips or candy pearls for windows.
-
Edible glitter for magical sparkle.
Minimalist Winter Designs
-
Single-line roof patterns.
-
Simple geometric shapes.
-
Powdered sugar snow effect.
Color Palette Ideas
Stick to neutral and festive shades: white, soft cream, light green, muted red, warm brown.
Creative Presentation Ideas
Holiday Table Displays
Arrange houses on a snowy cookie board with powdered sugar as snow.
Hot Cocoa Boards
Mini houses paired with mugs of cocoa, candy canes, and marshmallows create festive trays.
Gift Packaging
Place houses in small boxes or bags with tissue paper and holiday accents.
Mixed Cookie Platters
Combine with mini trees, stars, and snowflakes for a cohesive winter theme.
Tips for Stress-Free Mini Gingerbread Houses
Use Templates
Templates help keep pieces uniform.
Start Simple
Begin with a basic 4-wall house and add optional roof details.
Work in Stages
Bake, assemble, then decorate. Don’t rush.
Dry Completely
Allow full drying time before moving or stacking.
Involve Kids
Assign simple tasks like piping lines or adding candy sprinkles.
Storing Mini Gingerbread Houses
Short-Term Storage
Keep in an airtight container for 3–5 days.
Displaying for a Party
Keep on a plate covered with a loose plastic dome.
Freezing
Assembled houses can be frozen after icing dries—wrap individually in plastic wrap.
Troubleshooting Common Issues
Houses Collapsing
-
Ensure icing is thick enough.
-
Hold walls in place until partially set.
Roof Pieces Sliding
-
Use small dabs of icing rather than long strips.
-
Allow walls to firm before adding roofs.
Cracks or Breakage
-
Roll dough evenly.
-
Don’t overbake.
Icing Smudging
-
Let each layer dry completely before adding new designs.
Frequently Asked Questions
Can beginners make mini gingerbread houses?
Yes—this easy version is designed for beginners and kids.
How long do assembled houses last?
They can last up to a week if stored in a dry, airtight container.
Can I make houses in advance?
Yes—bake and freeze pieces or fully assemble and freeze after icing dries.
Can I use other decorations besides candy?
Yes, edible pearls, chocolate chips, or sprinkles work well.
Can adults enjoy assembling them too?
Absolutely! They are fun for all ages and can become a family activity.
How do I make houses sturdy?
Chill dough, use thick icing, and allow full drying time.
Can I make different sizes?
Yes—simply scale templates for larger or smaller houses.
Final Thoughts
Mini gingerbread house cookies bring together creativity, holiday fun, and delicious flavor in a simple, family-friendly format. They are adorable, easy to assemble, and perfect for gifting, decorating, or adding charm to a festive table. With sturdy construction, soft interiors, and endless decorating possibilities, these tiny gingerbread houses are a delightful project for both kids and adults.
From cozy family baking nights to trendy Pinterest-inspired displays, these mini gingerbread house cookies combine the warmth of traditional holiday baking with the convenience of an easy, beginner-friendly recipe. Build, decorate, and enjoy the magic of the season one tiny house at a time.
")