Contents
- 1 The Base: How to Build a Strong Monster Milkshake
- 2 Monster Milkshake Variation A: Classic Chocolate Monster Shake
- 3 Variation B: Pumpkin Spice Monster Shake
- 4 Variation C: Green Monster (Matcha / Mint) Shake
- 5 Variation D: Black Magic Monster Shake (Dark & Dramatic)
- 6 Decoration & Topping Techniques
- 7 Tools, Materials & Supplies
- 8 Dietary Adjustments & Allergy Options
- 9 Make‑Ahead, Storage & Serving Tips
- 10 Troubleshooting & Common Pitfalls
- 11 Frequently Asked Questions
- 12 Final Thoughts
If you’re looking to bring maximum flair and fun to your Halloween dessert lineup, monster milkshakes (a.k.a. freakshakes) are the way to go. These towering, candy‑topped milkshakes combine creamy goodness with bold visual drama. You get the shake, you get the extras, and you get a treat that doubles as a centerpiece.
In this guide, you’ll get:
-
The foundational monster milkshake base recipe
-
Multiple monster milkshake variations (chocolate, pumpkin, green monster, black magic)
-
Decoration and topping ideas to go wild
-
Tools, supplies, and plating notes
-
Dietary and allergy adaptations
-
Make‑ahead, storage, and serving tips
-
Troubleshooting & common mistakes
-
Frequently asked questions
Let’s build monstrous, indulgent shakes that scream Halloween.
The Base: How to Build a Strong Monster Milkshake
Before you stack on cookies, candy bars, and spooky bits, you need a reliable shake base to support the weight and hold flavor.
Core Ingredients (for one large monster shake)
-
2 cups good quality ice cream (vanilla, chocolate, or flavored)
-
½ to 1 cup milk (or dairy‑free milk)
-
1 to 2 tablespoons chocolate sauce, caramel, or flavored syrup
-
A pinch of salt to balance sweetness
Tips for a Shake That Supports the Load
-
Use slightly thick consistency – not too thin, so it can hold toppings without them sinking or sliding.
-
Don’t overblend—mix just enough to incorporate.
-
Chill your glass or jar ahead of time to keep things colder longer.
-
Use wide‑mouth jars or glasses so toppings fit better.
Once your base is solid, you can get creative with the monster augmentations.
Monster Milkshake Variation A: Classic Chocolate Monster Shake
This version is a chocolate lover’s dream, decked out for Halloween.
Ingredients
-
2 cups chocolate ice cream
-
½ cup milk
-
2 tbsp chocolate syrup
-
Whipped cream (dairy or non‑dairy)
-
Toppings: chocolate chip cookies, chocolate bars, chocolate sprinkles, fudge drips, candy eyes
Assembly Instructions
-
Combine ice cream, milk, and chocolate syrup in a blender. Blend until creamy but still thick.
-
Drizzle chocolate syrup inside the glass in a “melting” pattern.
-
Pour shake into your glass, leaving some room at top.
-
Pipe or spoon a mound of whipped cream on top.
-
Embellish with cookies, candy bars, fudge drizzle, candy eyes.
-
Use a straw and a spoon—this is a “peek over the brim” kind of shake.
The deep chocolate tones serve as a dramatic canvas for toppings.
Variation B: Pumpkin Spice Monster Shake
Celebrate fall flavors with a pumpkin twist—perfect for Halloween.
Ingredients
-
2 cups vanilla ice cream
-
¼ cup pumpkin purée
-
½ cup milk
-
1 tsp pumpkin spice mixture
-
1 tbsp maple syrup or honey
-
Whipped cream
-
Toppings: chocolate drizzle, ginger snaps, candy pumpkins, crushed graham crackers
Assembly Instructions
-
Blend vanilla ice cream, pumpkin purée, milk, spice, and sweetener until smooth.
-
Drizzle glass with chocolate or caramel (optional).
-
Pour the shake, pipe whipped cream, and top with ginger snaps, candy pumpkins, graham cracker crumbs, and drizzle.
This seasonal flavor blends the creaminess of a shake with cozy pumpkin spice notes.
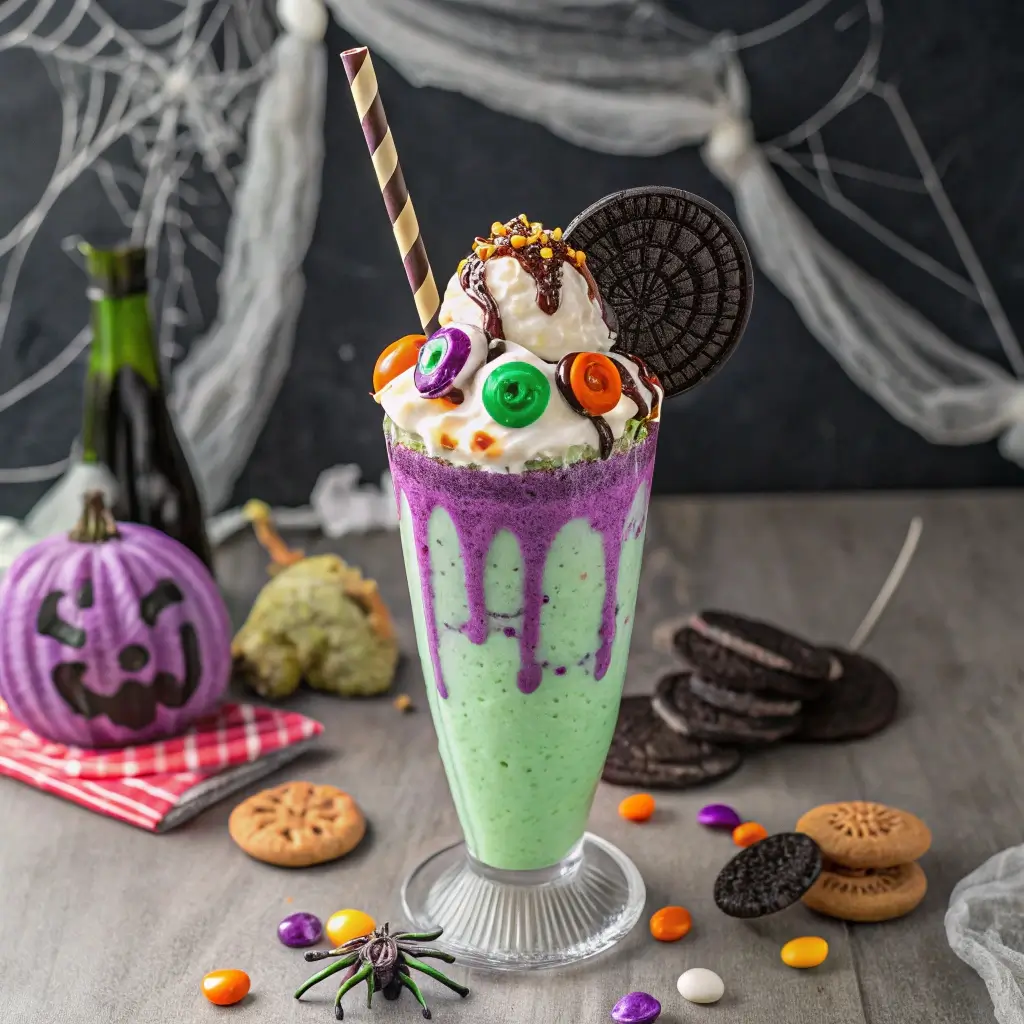
Variation C: Green Monster (Matcha / Mint) Shake
For a creepier, vivid green monster effect, go with matcha or mint.
Ingredients
-
2 cups vanilla ice cream
-
1 tbsp matcha powder (or ¼ tsp mint extract)
-
½ cup milk
-
1 tbsp white chocolate or vanilla syrup
-
Whipped cream
-
Toppings: macarons, green candy, chocolate shards, candy eyes
Assembly Instructions
-
Blend ice cream, milk, matcha or mint, and syrup until smooth.
-
Drizzle white chocolate around the inside of the glass.
-
Pour shake in.
-
Top with whipped cream, add macarons or green candies, shards, and candy eyes.
The green color is eye-catching and eerie—perfect for monster motifs.
Variation D: Black Magic Monster Shake (Dark & Dramatic)
If you want the creepiest look, go dark—black or deep purple.
Ingredients
-
2 cups vanilla ice cream
-
½ cup milk
-
1 tbsp activated charcoal powder (food grade) or black cocoa powder
-
1 tbsp chocolate syrup
-
Whipped cream
-
Toppings: black sprinkles, licorice, dark chocolate shards, candy eyes
Assembly Instructions
-
Blend ice cream, milk, charcoal or black cocoa, and syrup until it attains a dark hue.
-
Swirl a bit of chocolate syrup in the glass.
-
Pour the shake carefully.
-
Top with whipped cream, then sprinkle black sugar, chocolate shards, licorice bits, and candy eyes.
The deep black color creates a spooky, moody aesthetic perfect for Halloween.
Decoration & Topping Techniques
To take your monster shakes from “wow” to “holy moly,” here are decorative and structural strategies.
Drip & Smear Patterns
-
Before pouring the shake, smear chocolate, caramel, or colored sauces around the inside walls for a melting or blood‑drip effect.
-
Use piping bags or squeeze bottles for controlled drips at the rim, then let gravity help the rest.
Candy Eyes, Fangs, & Monster Features
-
Candy eyes (store‑bought or fondant) are essential for monster faces.
-
Use chocolate sticks or small triangles of candy/fondant for fangs or horns.
-
Edible candy gems, sprinkles, or sugar strings can form “scar lines.”
-
For tooth or bone shapes, mold fondant or use white chocolate shards.
Layering & Height
-
Stack toppings: cookies first, then whipped cream, then candy pieces and final drips.
-
Use skewers or straws to anchor heavier candy items upright.
-
Leave the center of whipped cream taller for visual height.
Color Themes & Contrast
-
Use contrasting colors (dark shake + bright toppings or vice versa) to make decorations pop.
-
A sprinkle of edible shimmer dust or glitter adds supernatural sparkle.
-
Colored whipped cream tips (orange, mint, white) can denote “fang foam” or spectral effects.
Decorative techniques elevate these shakes from dessert to spectacle.
Tools, Materials & Supplies
To execute monster shakes, you’ll want:
-
High‑powered blender
-
Large glass jars or milkshake glasses
-
Squeeze bottles or piping bags for drips
-
Long spoons and wide straws
-
Candy eyes, candy bits, chocolate shards, sprinkles
-
Food coloring gels (bright, concentrated)
-
Whipped cream (stabilized if warm environment)
-
Edible glitter, shimmer dust
-
Fondant or moldable candy for features
-
Optional: skewers or small dowels for anchoring heavy toppings
Having these ready lets you work smoothly.
Dietary Adjustments & Allergy Options
-
Vegan / dairy-free: Use non‑dairy ice cream, plant milk, whipped coconut cream, vegan candy pieces.
-
Nut‑free: Avoid peanut butter drizzles or nutty candies; choose safe candy.
-
Lower sugar: Use ice creams with reduced sugar, sugar-free syrups, or moderation in candy toppings.
-
Colored powder sensitivities: Use natural colorants or subtle shades.
-
Food dye safety: Use food grade dye, avoid excess liquid color syrups which can thin your shake.
Adapting ingredients helps accommodate allergies and preferences without losing fun.
Make‑Ahead, Storage & Serving Tips
-
You can prepare drip sauces or candy features ahead and store in sealed containers.
-
Don’t combine full shake ahead—blend just before serving to maintain thickness.
-
Chill glasses ahead so shake stays colder longer.
-
If toppings slump, chill the decorated shake briefly (5 minutes) before serving.
-
Serve with wide straws and long spoons so guests can scoop or sip.
-
For parties, display shakes in a row on a tray, with matching decoration around.
Troubleshooting & Common Pitfalls
-
Shake too thin: Add less milk or more ice cream; avoid overblending.
-
Toppings sliding off: Let frosting or whipped cream firm slightly first, anchor heavier pieces.
-
Candy melt or drip too runny: Stiffen with more powdered sugar or cooling.
-
Color fading: Use bright gel color, avoid over-diluting.
-
Overloaded shakes toppling: Use stable base, center heavy pieces, distribute weight.
-
Coating flavors overwhelming base: Taste test your toppings and adjust sweetness.
Frequently Asked Questions
Are monster milkshakes just for kids?
Absolutely not! They’re for anyone who loves over-the-top dessert fun. Adults enjoy them as much for visual flair and flavor creativity.
How many shakes per recipe?
The base recipe yields one large “monster” shake; you can halve it for smaller shakes or scale up for many servings.
Can I make a “bloodless” version?
Yes—you can skip red syrup drips and stick to themed toppings like monster eyes, candy bits, and color contrast.
Can guests help decorate?
Yes! Set out candy eyes, sprinkles, and toppings and let people top their own shakes. It becomes part of the fun.
What’s the best straw or utensil to use?
Wide straws or bubble tea straws work great (for scooping bits). Long spoons help dig through toppings.
Final Thoughts
Monster milkshakes embody Halloween indulgence. They’re dramatic, playful, and a delicious mash-up of dessert components. With a solid base, supporting toppings, edible decorations, and a dash of creative flair, you can elevate your Halloween desserts to an eye‑catching spectacle.
Whether you go for classic chocolate monsters, pumpkin spice versions, ghostly pale shakes, or deep black monstrosities, the core is fun. Let your imagination drive toppings—candy eyes, shards, drips, sparkles—and delight friends and family with these decadent spectacles.
")