Contents
- 1 Why Try the Oven Method?
- 2 What You’ll Achieve with This Recipe
- 3 Ingredients
- 4 Equipment & Tools
- 5 Step-by-Step Instructions
- 6 Tips for Success
- 7 Creative Uses & Serving Ideas
- 8 Storage & Shelf Life
- 9 Troubleshooting & Common Issues
- 10 Frequently Asked Questions
- 11 Estimated Nutritional Info (Per Slice)
- 12 Why This Method Works Well
- 13 Seasonal & Thematic Variations
- 14 Final Thoughts
Why Try the Oven Method?
Traditional candied orange slices are made by simmering in sugar syrup and then air-drying or oven-drying. But if you’d rather skip the lengthy stovetop simmer or want more control over the drying step, the oven candied orange slices method is a smart shortcut. You still get glossy, chewy, translucent citrus slices, but with more predictability and less active time.
This approach is ideal when you want to make festive decorations, edible gifts, or cozy snacks without heating up your whole kitchen. It’s forgiving, beautiful, and versatile — perfect for cakes, cookies, breads, or even to enjoy on its own.
In this guide, you’ll learn how to make oven candied orange slices from start to finish, how to store them, and creative ways to use them.
What You’ll Achieve with This Recipe
-
Consistently chewy, translucent slices
-
Glossy finish that catches the light
-
Minimal hands-on time
-
Easy to scale for gifts or batch making
-
Safe for decorations, desserts, or snacking
Ingredients
You’ll only need a few simple items — mostly things you likely have on hand:
-
3 medium seedless oranges (navel, blood, or Cara Cara)
-
2 cups granulated sugar
-
2 cups water
-
Optional: pinch of sea salt or a dash of vanilla extract
-
Optional: a cinnamon stick or star anise for mild flavor infusion
Equipment & Tools
-
Sharp knife or mandoline slicer for even cutting
-
Baking sheets lined with parchment paper or silicone mats
-
Wire rack (optional, but helpful)
-
Small saucepan
-
Tongs or slotted spoon
-
Cooling rack
-
Airtight containers for storage
Step-by-Step Instructions
Below is a comprehensive, step-by-step guide to making gorgeous oven‑candied orange slices.
Step 1: Prepare the Oranges
-
Rinse the oranges under warm water to wash away any residue or wax. Pat dry.
-
Using a sharp knife or mandoline, slice oranges into thin rounds — aim for about 1/8 inch (3 mm) thickness.
-
Remove any visible seeds gently. Try to preserve the shape of the slices.
Uniform slicing is critical: slices that are too thick will be chewy and may not become translucent; slices that are too thin may burn or become brittle.
Step 2: Blanch (Optional but Recommended)
To reduce bitterness and soften the peel:
-
Bring a pot of water to a boil.
-
Drop the orange slices in and blanch for 2 minutes.
-
Drain immediately and rinse under cold water.
This step is especially helpful if you’re using oranges with thicker peel or if you’re sensitive to bitterness. It’s optional, but many bakers prefer it.
Step 3: Prepare a Light Syrup
In a small saucepan:
-
Combine 2 cups sugar and 2 cups water.
-
Heat gently, stirring, until the sugar fully dissolves and the syrup is clear.
-
Optionally, add a small pinch of sea salt or a splash of vanilla extract. You may also drop in a cinnamon stick or star anise for mild warming notes.
You’re not looking for a heavy caramel — just a light sugar syrup to infuse the orange slices.
Step 4: Soak the Orange Slices
-
Lay the orange slices on a nonstick tray or a liner.
-
Using a brush or spoon, lightly coat both sides of each slice with the syrup.
-
Let them sit in the syrup for about 5 to 10 minutes, flipping once, so both sides absorb moisture.
This step helps preload the slices with moisture and sugar, so they’ll caramelize evenly in the oven without drying out.
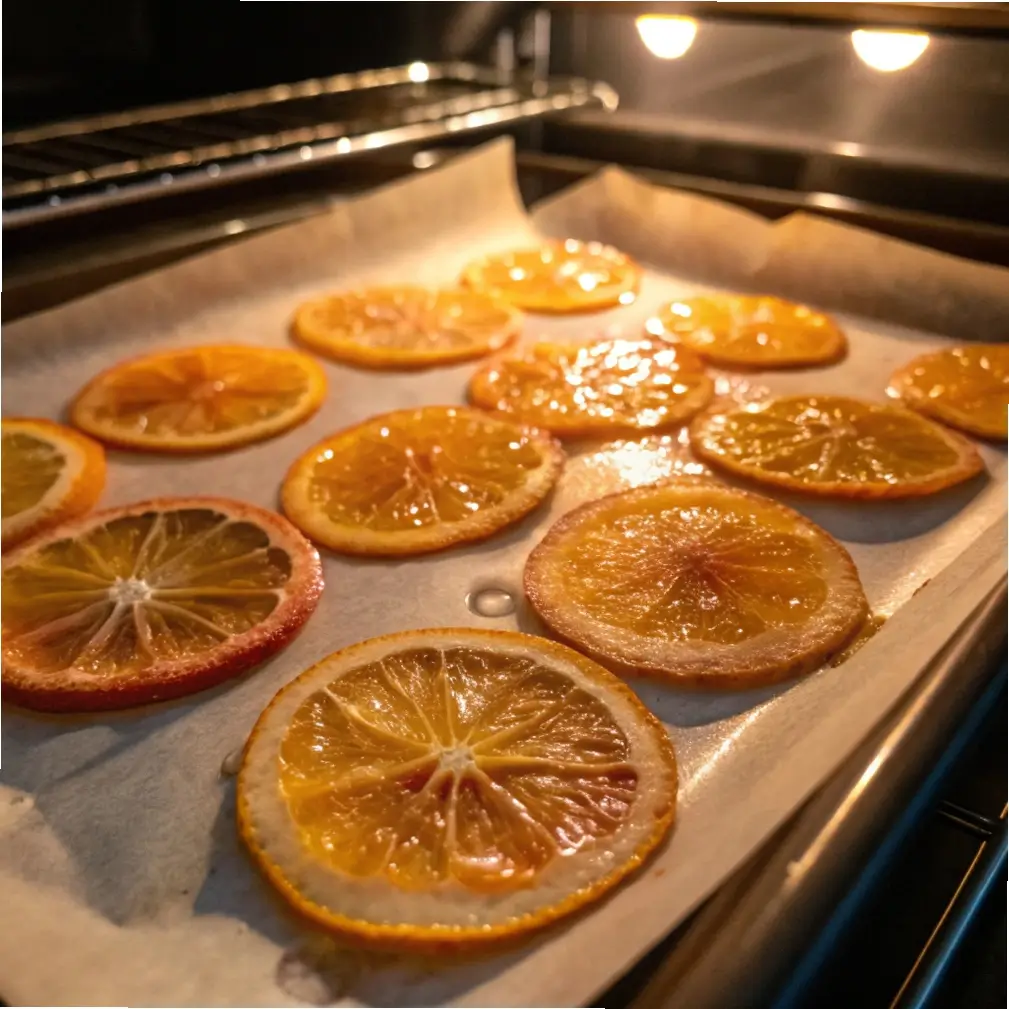
Step 5: Preheat Your Oven & Arrange Slices
-
Preheat your oven to 170°F (75°C) or as low as your oven allows.
-
Place the slices on parchment-lined baking sheets, spaced slightly apart so air can circulate. If you have a wire rack that fits inside your sheet pans, you can place the slices on the rack so airflow reaches underneath.
Step 6: Bake Slowly & Flip
-
Bake for 1.5 to 2 hours, then flip each slice carefully using tongs or a spatula.
-
Continue baking for another 1.5 to 2 hours, checking periodically, until the slices are tacky, translucent, and chewy rather than wet or brittle.
Total baking time may vary depending on your oven, thickness of slices, and humidity. The goal is not to dry them completely but to achieve that candied texture.
Step 7: Cool & Finish Drying
-
Remove the slices from the oven and allow them to cool on a wire rack or the parchment-lined tray.
-
They may still feel slightly sticky — that’s fine. As they cool, they will firm up.
-
If necessary, you can place them back in the oven at the same low temperature for another 30 minutes to an hour for finishing.
Once fully cooled and set, they’re ready to use or store.
Tips for Success
-
Consistent Slices Matter: Use a mandoline if your knife skills aren’t precise.
-
Low Oven Temperature is Key: Too hot and they’ll crisp or burn; too low and they won’t properly candy.
-
Rotate Trays: If your oven has hot spots, swap trays halfway through.
-
Use the Rack Trick: Elevating slices helps airflow and prevents soggy bottoms.
-
Don’t Rush the Bake: The slow process ensures the sugar penetrates the peel without burning.
-
Monitor Closely at the End: Judging doneness is subtle — they should be tacky and bendable, not soggy or brittle.
Creative Uses & Serving Ideas
Once you have a batch of beautiful oven candied orange slices, the possibilities are abundant.
Cake & Loaf Toppings
-
Use as a decorative ring on top of bundt, loaf, or layer cakes.
-
Press slices slightly into frosting edges for a polished finish.
-
Garnish cheesecakes, pound cakes, or pound-cake slices.
Cookie Accents
-
Place half-slices on top of soft sugar cookies or gingerbread before the final bake.
-
Use them as a topper on frosted shortbread or holiday cookies.
Edible Garnishes & Decoration
-
Attach to cake pops, cupcakes, or dessert buffs.
-
Float in mocktails, sparkling water, or herbal iced tea.
-
Use as a rim garnish on tall non-alcoholic drinks.
Gift & Decoration Use
-
Wrap a few slices in parchment or cellophane as edible ornaments.
-
Combine with cinnamon sticks, nuts, or dried cranberries in jars for festive edible gifts.
-
Use them in edible wreaths or centerpieces with herbs and pinecones.
Snacking
-
Enjoy them as a sweet snack, especially with tea or coffee.
-
Pair slices with nuts, chocolate, or other dried fruits.
Storage & Shelf Life
To keep your candied slices fresh and usable, follow proper storage methods.
Room Temperature Storage
-
Place slices in an airtight container, layering between parchment or wax paper to prevent sticking.
-
Keep in a cool, dry place away from heat or humidity.
-
Best if used within 1 week.
Refrigeration
-
For longer storage, refrigerate in a sealed container.
-
Can last 2 to 3 weeks in a cool refrigerator.
Freezing (Optional, with caution)
-
While possible, freezing may alter the texture or make them sticky when thawed.
-
If you choose to freeze, place parchment between slices and store in a rigid container.
-
Thaw slowly at room temperature before use.
Troubleshooting & Common Issues
Slices are too sticky / soggy
-
They likely didn’t bake or dry long enough. Return to the oven for a bit longer at low temp.
Slices are too hard or brittle
-
Overcooking or too high temperature may be to blame. Next batch, reduce bake time or heat.
Uneven color or texture
-
Uneven slicing or poor air circulation may cause this. Use a rack and rotate trays.
Bitterness remains
-
Try blanching first next time, or use oranges with thinner peels. Remove white pith if possible.
Burned edges
-
Slices too thin on edges, or oven temperature is uneven. Monitor closely and rotate.
Frequently Asked Questions
Can I skip the stovetop syrup step entirely and just bake slices dry?
You’ll end up with dried citrus rather than properly candied slices. The syrup infusion gives that glossy, chewy candy texture.
What kind of oranges work best?
Seedless navel or blood oranges are excellent. Oranges with thinner peel tend to candy more evenly.
Can I use other citrus?
Yes — lemons, limes, or tangerines can be candied the same way. Watch slice thickness and adjust baking time as needed.
Do I have to blanch the slices?
It’s optional. Blanching helps reduce bitterness, especially with thick peel varieties. If your oranges are mild, you can skip it.
Can I dip these in chocolate?
Absolutely! After the slices are fully dry, dip half in melted dark chocolate and place on parchment to set.
Are they fully edible, peel and all?
Yes. The candying process softens the peel, making the entire slice delicious.
Estimated Nutritional Info (Per Slice)
-
Calories: ~60
-
Carbohydrates: ~16g
-
Sugars: ~14g
-
Fiber: ~1g
-
Fat: 0g
-
Protein: 0g
(Note: These are rough estimates and depend on slice size, thickness, and residual sugar.)
Why This Method Works Well
The oven method balances ease and precision. By using a light syrup soak first, you ensure the citrus is infused with sugar. The gentle heat of the oven then allows moisture to evaporate slowly, resulting in a chewy, glossy final product. Because it’s mostly unattended after initial setup, it’s a great method for people who want beautiful results without monitoring a simmering pot for hours.
Seasonal & Thematic Variations
-
Spiced Orange: Add cinnamon, star anise, or clove to the syrup.
-
Vanilla Orange: Stir in a bit of vanilla extract for a sweet aromatic twist.
-
Mixed Citrus Tray: Combine lemon, lime, and orange slices for a colorful assortment.
-
Chocolate Edge: Dip one edge in chocolate for a two-tone presentation.
-
Sugar-Dusted: Toss semi-dry slices lightly in superfine sugar for sparkle.
Feel free to experiment and discover your favorite flavor combinations.
Final Thoughts
If you’ve ever admired the stunning glow of candied orange slices but shied away from the stovetop method, the oven candied orange slice technique is your gateway to effortless elegance. The method is forgiving, the yield is beautiful, and the uses are plentiful.
Whether you’re making edible gifts, decorating cakes and cookies, or simply looking for a flavorful snack, these candied citrus slices are a delicious project — one that fills your home with warmth and light.
So gather your oranges, preheat the oven, and treat yourself to a batch of gorgeous oven candied orange slices this season.
")