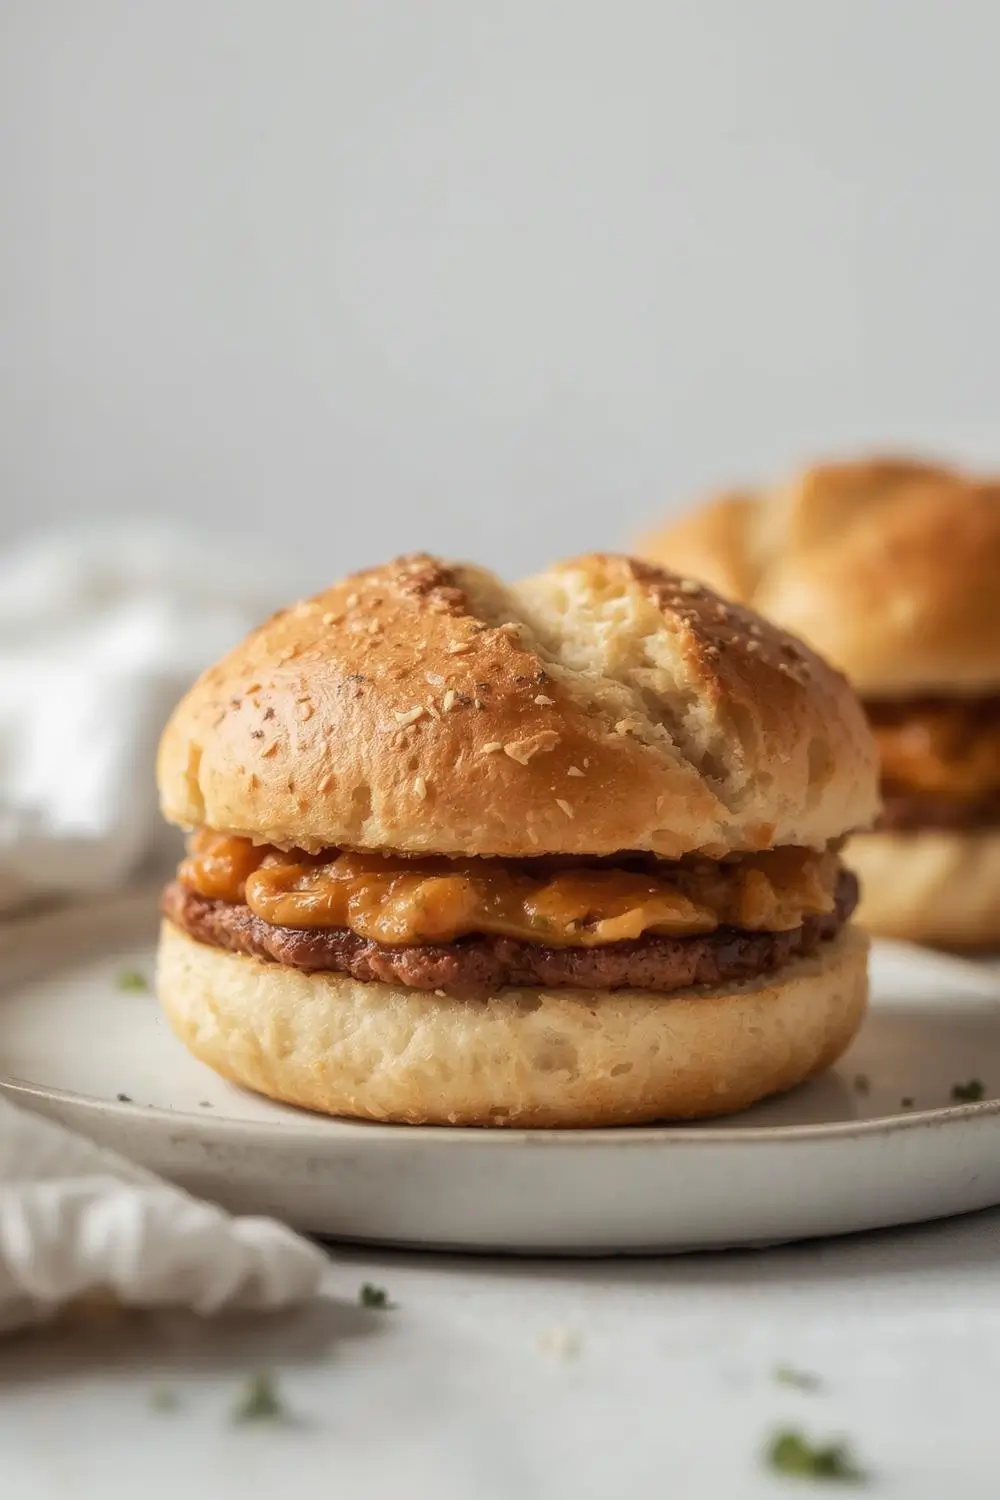
Perfect SourdoughDiscard Soft Sandwich Buns: Transform Waste into Wonder!
Imagine biting into a pillow-soft, golden-brown sandwich bun that practically melts in your mouth. Now, imagine knowing that this delicious treat came from something you were about to throw away – your sourdough discard! This recipe unlocks the incredible potential of your leftover starter, turning it into incredibly soft, fluffy, and utterly irresistible sandwich buns. Bursting with that signature tangy sourdough flavor and boasting a tender, airy crumb, these buns are perfect for burgers, sandwiches, or even breakfast toast. Best of all, you’re reducing food waste while creating something truly special. Let’s dive into making these magical buns together.
Why Sourdough Discard is Perfect for Buns
Sourdough discard is often seen as a nuisance, but it’s actually a baker’s secret weapon, especially for tender baked goods like these buns. Its acidity helps tenderize the gluten, resulting in a softer crumb than you’d get with just regular flour and water. The natural fermentation process also develops complex flavors that regular yeast can’t replicate. Using discard means you’re utilizing a resource you already have, making this recipe incredibly economical and sustainable. Plus, the tangy note adds a delightful depth that complements savory fillings beautifully.
The Magic of Softness: Ingredients Explained
The key to these incredibly soft buns lies in a few carefully chosen ingredients working together:
- Sourdough Discard: The star! Use your discard that’s been fed recently (within the last 24-48 hours is ideal for maximum activity and flavor). It provides the tangy base and tenderizing acidity.
- All-Purpose Flour: Provides the structure. While bread flour offers more chew, all-purpose flour creates a softer, more tender bun perfect for sandwiches.
- Whole Wheat Flour (Optional): Adds a subtle nuttiness and extra fiber. Use 1/4 to 1/2 cup for a heartier texture and flavor. For a lighter bun, stick with all-purpose.
- Warm Water: Activates the yeast in the discard and hydrates the flour. Use water between 100-110°F (38-43°C) – too hot kills the yeast, too cold slows it down.
- Salt: Essential for flavor development and controlling yeast activity. It strengthens the gluten slightly, preventing the buns from being too fragile.
- Sugar (Optional): A tiny bit (1/2 to 1 teaspoon) helps feed the yeast and promotes browning, adding a hint of sweetness that balances the tang. Honey or maple syrup work beautifully too.
- Olive Oil or Neutral Oil: Adds richness, tenderness, and helps keep the buns soft. It also contributes to a lovely golden crust.
- Baking Powder (Optional but Recommended): This is the secret weapon for extra softness and lift! A small amount (1/4 to 1/2 teaspoon) reacts with the liquid and heat, creating tiny air pockets that make the buns incredibly light and fluffy. Don’t skip it!
Gathering Your Tools
Before you start, ensure you have these handy:
- Large mixing bowl
- Stand mixer with dough hook (highly recommended for kneading)
- Clean work surface for shaping
- Baking sheet
- Parchment paper or silicone baking mat
- Sharp knife or bench scraper
- Kitchen scale (highly recommended for accuracy)
- Measuring cups and spoons
- Plastic wrap or clean kitchen towel
- Pastry brush (optional, for egg wash or oil)
Step-by-Step: Crafting Your Soft Sourdough Buns
1. Activating the Discard & Mixing the Dough (The Foundation)
- Combine: In your large mixing bowl, whisk together the warm water, a pinch of sugar (if using), and your active sourdough discard. Give it a gentle stir and let it sit for 5-10 minutes. You should see it become slightly frothy and bubbly – this confirms your discard is active and ready to work its magic.
- Add Dry Ingredients: To the bubbly discard mixture, add the all-purpose flour (and whole wheat flour, if using), salt, and baking powder. Whisk briefly to combine.
- Knead: Using the dough hook on your stand mixer, mix on low speed for about 2 minutes. The dough will start to come together. If it seems too sticky, add a tablespoon of flour at a time. If it seems too dry, add a teaspoon of water. The goal is a soft, slightly tacky dough that cleans the sides of the bowl but doesn’t stick excessively to your fingers.
- Knead Thoroughly: Continue kneading on medium-low speed for 8-10 minutes. This develops the gluten just enough for structure without making the buns tough. The dough should become smooth, elastic, and spring back when gently poked.
2. The First Rise: Letting the Flavor Develop
- Oil the Bowl: Lightly oil the large mixing bowl with a teaspoon of your chosen oil.
- Shape & Cover: Gently transfer the dough to the oiled bowl, turning it once to coat lightly. Cover the bowl tightly with plastic wrap or a clean kitchen towel.
- Find a Warm Spot: Place the bowl in a warm, draft-free spot (like an off oven with the light on, or near a sunny window). Let the dough rise for 1 to 1.5 hours, or until it has roughly doubled in size. It should look puffy and feel light when lifted.
3. Shaping the Buns: Creating Perfect Rounds
- Punch Down: Gently punch down the risen dough in the center to release the large air bubbles. This redistributes the yeast and relaxes the gluten.
- Divide: Turn the dough out onto a lightly floured surface. Divide it into 8 equal pieces (about 60-70g each). A kitchen scale is invaluable here for consistent size.
- Shape: Take one piece and gently flatten it into a disk. Fold the edges into the center to form a tight ball. Pinch the seam closed firmly on the bottom. Repeat with all pieces. Place the shaped buns seam-side down on a lightly floured surface or a piece of parchment paper.
- Final Rise: Cover the shaped buns loosely with plastic wrap or a towel. Let them rise again for 30-45 minutes. They should puff up noticeably but not quite double in size. This second rise is crucial for maximum softness and height.
4. Baking to Golden Perfection
- Preheat: While the buns rise, preheat your oven to 375°F (190°C). Place a rack in the center position.
- Score (Optional but Recommended): Just before baking, use a sharp knife or razor blade to make a shallow cross or slit on the top of each bun. This allows steam to escape and helps them rise evenly, preventing splitting.
- Bake: Place the buns (on the parchment paper if using) onto the preheated baking sheet. Bake for 18-22 minutes. They are done when they are deep golden brown all over and sound hollow when tapped on the bottom. The internal temperature should reach around 190-195°F (88-90°C) if you have a thermometer.
- Cool: Remove the buns from the oven and transfer them to a wire rack. Let them cool completely before slicing. This is vital! Cutting into them while hot releases steam and makes them gummy. Patience pays off for perfect texture.
Variations & Substitutions: Making it Your Own
- Whole Wheat Twist: Increase the whole wheat flour to 1/2 cup for a heartier, nuttier flavor and denser texture. The buns will still be soft but have more character.
- Sweetened Buns: Add 2-3 tablespoons of sugar or honey to the dry ingredients for a sweeter bun, perfect for breakfast sandwiches or toast.
- Flavored Buns: Fold in 1/4 cup of finely chopped nuts (walnuts, pecans), dried fruit (raisins, cranberries), or seeds (sesame, poppy) into the dough after the first rise for added texture and flavor.
- Egg Wash for Shine: Brush the tops of the shaped buns with a beaten egg mixed with a splash of water or milk before baking for a beautiful, shiny golden crust.
- Butter for Richness: Substitute 1-2 tablespoons of the oil with softened butter for an extra rich, buttery flavor and tender crumb.
- Gluten-Free Option: Unfortunately, creating truly soft, sandwich-style buns with sourdough discard alone without gluten is extremely challenging. This recipe relies on gluten development for structure and softness. For gluten-free, explore dedicated gluten-free sourdough discard bun recipes using specific GF flours and binders.
Storage & Reheating: Keeping Them Perfect
- Room Temperature: Store completely cooled buns in an airtight container or resealable plastic bag at room temperature for up to 2 days. They stay remarkably soft this way.
- Refrigeration: For longer storage (up to 5 days), refrigerate the buns. They will firm up slightly. To restore softness, bring them to room temperature or gently warm them in a low oven (300°F/150°C) for 5-10 minutes.
- Freezing: Freeze cooled buns in a single layer on a baking sheet until solid, then transfer to a freezer bag or airtight container. Freeze for up to 3 months. Thaw at room temperature or reheat frozen buns in a 300°F (150°C) oven for 10-15 minutes.
Common Mistakes to Avoid
1. Inactive Discard: Using discard that’s too old or not active enough won’t provide the necessary lift and tang. Always use discard that’s been fed recently and shows signs of bubbling.
2. Over-Kneading: Over-kneading develops too much gluten, leading to tough, chewy buns instead of soft and tender ones. Knead just until the dough is smooth and elastic.
3. Under-Kneading: Under-kneading results in a weak structure that can collapse or not rise properly. Ensure the dough is smooth and springs back when poked.
4. Skipping the Baking Powder: Omitting the baking powder significantly reduces the softness and lift. It’s a key ingredient for achieving that pillowy texture.
5. Rushing the Rises: Skipping or shortening the rise times results in dense, flavorless buns. Be patient – the dough needs time to develop flavor and structure.
6. Cutting Too Soon: Slicing into hot buns releases steam and makes them gummy. Always let them cool completely on a wire rack.
7. Over-Oiling the Bowl: Using too much oil can make the dough greasy and affect texture. A light coating is sufficient.
8. Using Cold Water: Water that’s too cold can slow or kill the yeast, preventing proper rising. Use warm water (100-110°F/38-43°C).
Frequently Asked Questions (FAQs)
- Q: Can I use rye flour instead of all-purpose? A: Rye flour has different properties and can make the buns denser and more crumbly. If you want to experiment, use a blend (e.g., 50% rye, 50% all-purpose) but expect a different texture. All-purpose is best for classic softness.
- Q: My buns are dense. What went wrong? A: This is often due to under-kneading, skipping the baking powder, using inactive discard, or not letting the dough rise long enough. Check your steps carefully.
- Q: Can I make these without a stand mixer? A: Absolutely! You can knead the dough by hand on a lightly floured surface for 10-15 minutes until smooth and elastic. It takes more effort but is very doable.
- Q: How do I know if my discard is active enough? A: After mixing with warm water and sugar, it should become frothy and bubbly within 5-10 minutes. If it’s still flat and inactive, your discard might need another feeding.
- Q: Can I use sourdough discard straight from the fridge? A: Yes, but it might take a bit longer to activate. Let it come to room temperature first, then proceed as usual. You might need to let it sit a bit longer to become frothy.
- Q: Why are my buns browning too fast but not cooked inside? A: This can happen if your oven runs hot. Lower the temperature slightly or tent the buns loosely with foil during the last 5-10 minutes of baking.
- Q: Can I make these buns ahead of time? A: Yes! Bake them, let them cool completely, store them as described, and reheat gently before serving. They freeze beautifully too.
- Q: Are these buns suitable for people with dietary restrictions? A: They are naturally gluten-containing. For gluten-free, dairy-free, or vegan options, specific substitutions are needed (e.g., GF flour blend, plant-based milk/oil, egg replacer). Always check ingredients against specific dietary needs.
- Q: Can I use a different type of flour? A: While all-purpose is ideal for softness, you can experiment with bread flour for slightly more chew, or a blend. Avoid high-protein flours like whole wheat unless you want a denser texture. The baking powder is crucial regardless.
- Q: How do I get the buns to rise higher? A: Ensure your discard is very active, knead the dough sufficiently, let it rise in a warm spot, and don’t skip the second rise after shaping. The baking powder also contributes lift.
The Perfect Finish: A Warm Bun Awaits
There’s something deeply satisfying about transforming your sourdough discard into something so delicious and useful. These soft, tangy sourdough discard buns are a testament to the magic of fermentation and the resourcefulness of home baking. They elevate any sandwich, burger, or breakfast toast to new heights. The next time you have leftover starter, don’t discard it – embrace it! Gather your ingredients, follow these steps, and enjoy the incredible aroma and taste of your very own homemade buns. Share your creations, experiment with variations, and savor the joy of baking with what you already have. Happy baking!
Pin this recipe for later!
")