Contents
- 1 Why You’ll Love This Recipe
- 2 Ingredients
- 3 Equipment Needed
- 4 Step-by-Step Instructions
- 5 Flavor Profile
- 6 Presentation Ideas
- 7 Make-Ahead Instructions
- 8 Variations
- 9 Dipping Sauce Ideas
- 10 Expert Tips
- 11 Pairing Ideas
- 12 Storing Leftovers
- 13 Troubleshooting
- 14 Nutrition (Per Serving, Approximate)
- 15 Festive Serving Suggestion
- 16 Why This Recipe Works
- 17 FAQs
- 18 Final Thoughts
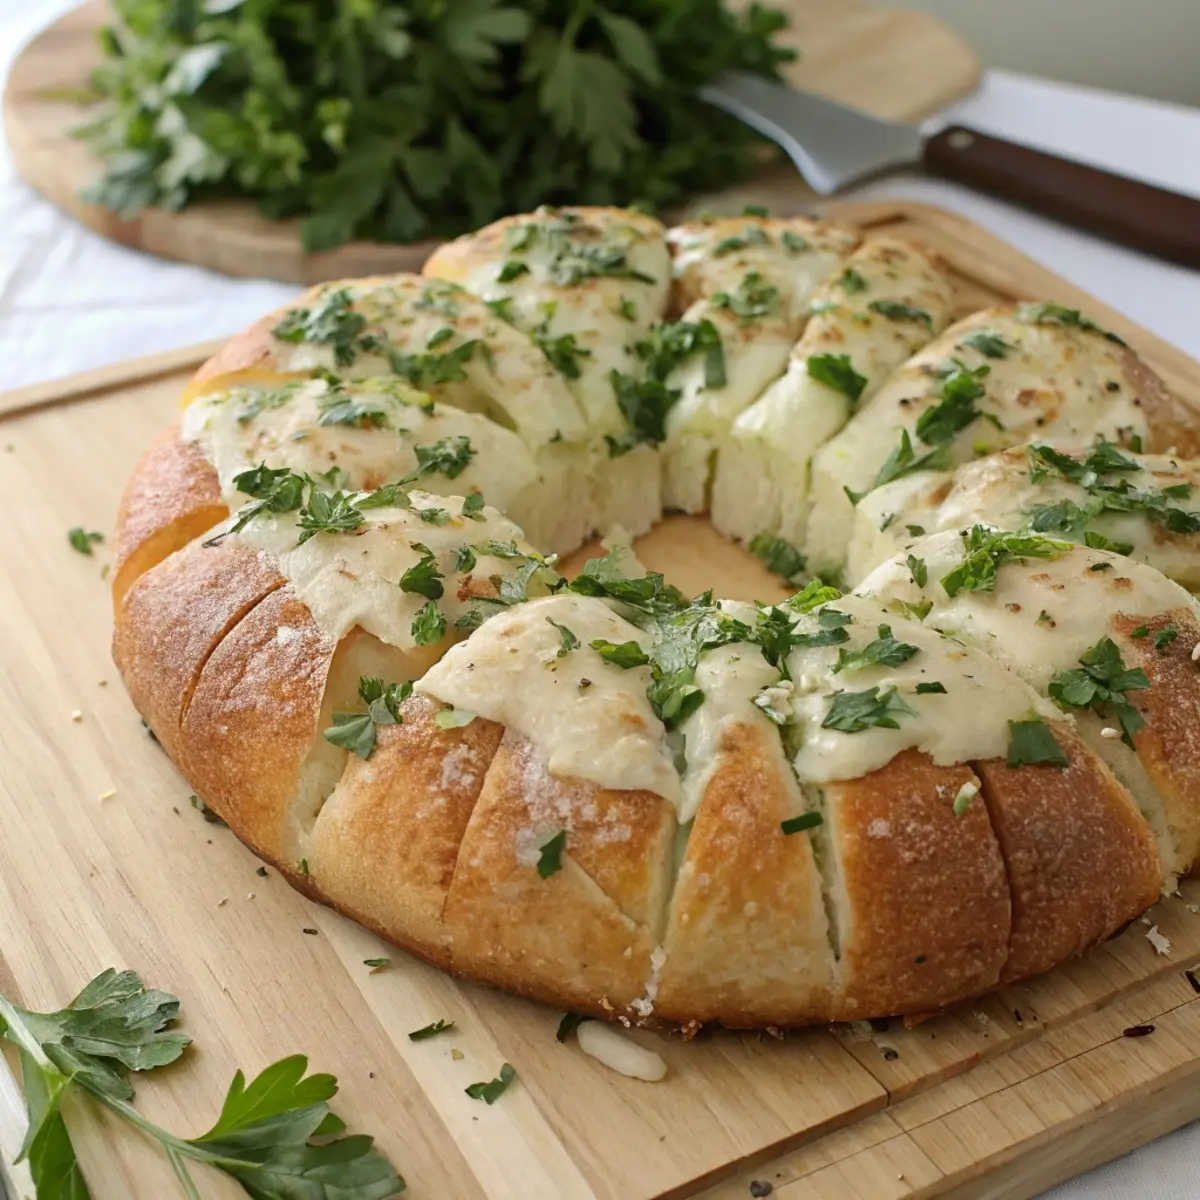
If you’re looking for a show-stopping holiday side dish that’s equal parts beautiful and delicious, this Pull-Apart Cheesy Garlic Bread Wreath is exactly what you need. It’s the kind of recipe that gets everyone talking — buttery, garlicky, and irresistibly cheesy, shaped into a stunning wreath perfect for Christmas dinners, holiday parties, or New Year’s gatherings.
This bread isn’t just about looks — it’s pillowy soft on the inside, perfectly golden on the outside, and bursting with gooey cheese in every bite. Each pull-apart piece is brushed with a fragrant garlic-herb butter that fills your kitchen with that unmistakable fresh-baked aroma.
Whether you serve it as an appetizer, side dish, or centerpiece bread for your festive feast, this wreath brings that magical, cozy, crowd-pleasing energy every holiday table needs.
Why You’ll Love This Recipe
-
Visually stunning: The wreath shape makes a gorgeous, edible centerpiece.
-
Soft + cheesy: Every bite is buttery, fluffy, and filled with melted cheese.
-
Perfect for sharing: The pull-apart design makes it easy and fun to serve.
-
Festive flavor: Garlic, butter, herbs, and cheese — the ultimate holiday combo.
-
Easy to make: With simple ingredients and minimal steps, it’s holiday baking made simple.
Ingredients
For the Dough
-
3 cups all-purpose flour (plus extra for dusting)
-
2¼ teaspoons instant yeast (1 packet)
-
1 teaspoon salt
-
1 tablespoon sugar
-
¾ cup warm milk (about 100–110°F)
-
¼ cup warm water
-
3 tablespoons unsalted butter, melted
-
1 egg
For the Garlic Butter
-
4 tablespoons unsalted butter, melted
-
3 garlic cloves, finely minced
-
1 tablespoon fresh parsley, chopped
-
½ teaspoon dried oregano
-
¼ teaspoon salt
-
Pinch of red pepper flakes (optional for a mild kick)
For the Cheese Filling
-
1½ cups shredded mozzarella cheese
-
½ cup shredded parmesan or provolone
-
1 teaspoon Italian seasoning
Optional Garnish
-
Extra melted butter for brushing
-
Sprinkle of flaky sea salt
-
Fresh herbs (parsley, thyme, or rosemary)
Equipment Needed
-
Large mixing bowl
-
Stand mixer (optional, for kneading)
-
Baking sheet or round pizza pan
-
Parchment paper
-
Small saucepan for garlic butter
-
Pastry brush
Step-by-Step Instructions
Step 1: Activate the Yeast
In a small bowl, combine warm milk, warm water, sugar, and yeast. Let it sit for 5–10 minutes until foamy. This shows your yeast is alive and ready to rise.
Step 2: Make the Dough
In a large mixing bowl, whisk together flour and salt. Add in melted butter, egg, and the activated yeast mixture. Mix until a sticky dough forms.
If using a stand mixer, knead with the dough hook on medium speed for 5–7 minutes until smooth and elastic.
If kneading by hand, lightly flour your surface and knead for about 10 minutes.
The dough should be soft but not overly sticky.
Step 3: Let It Rise
Place the dough in a lightly oiled bowl, cover with a damp cloth or plastic wrap, and let it rise for 1 to 1½ hours, or until doubled in size.
Pro Tip: Warm environments help yeast rise faster. If your kitchen is cold, place the bowl in a turned-off oven with the light on.
Step 4: Prepare Garlic Butter
While the dough rises, melt 4 tablespoons butter in a small saucepan over low heat. Add minced garlic, parsley, oregano, and salt. Stir until fragrant — about 1 minute — then remove from heat and set aside to cool slightly.
Step 5: Shape the Rolls
Once the dough has doubled, punch it down to release the air.
Divide the dough into 18–20 equal pieces (golf-ball size). Flatten each piece slightly, place a spoonful of shredded cheese in the center, and pinch the edges closed to form a sealed ball.
Repeat until all dough pieces are filled.
Step 6: Arrange the Wreath
Line a baking sheet with parchment paper.
Place a small, oven-safe bowl or ramekin in the center (to help keep the circular shape). Arrange the dough balls in a ring around it, slightly touching each other.
Brush each roll generously with garlic butter.
Cover loosely and let rise again for 20–30 minutes while you preheat the oven to 375°F (190°C).
Step 7: Bake to Golden Perfection
Bake the wreath for 20–25 minutes, or until golden brown and puffy.
Remove from the oven and immediately brush with more garlic butter. Sprinkle with parmesan cheese and fresh herbs for extra flavor and shine.
Step 8: Serve Warm
Remove the center ramekin and replace it with a small bowl of marinara sauce, cheese dip, or herb butter for dipping.
Serve warm so that the cheese is still gooey inside the rolls.
Flavor Profile
This recipe brings together classic Italian-inspired comfort and festive holiday flair:
-
Cheesy: The melted mozzarella gives every bite that stretchy, indulgent texture.
-
Garlicky: Minced garlic and herbs infuse every roll with rich flavor.
-
Buttery: Brushed butter creates a soft, golden crust.
-
Aromatic: Herbs like parsley and oregano give that warm, cozy holiday aroma.
The result? A bread wreath that’s soft inside, crisp at the edges, and loaded with gooey, cheesy bliss.
Presentation Ideas
-
Serve on a large white platter with a small bowl of dipping sauce in the middle.
-
Garnish with fresh rosemary sprigs or cranberries for a festive Christmas touch.
-
Drizzle lightly with extra melted butter just before serving for shine.
It’s not just bread — it’s a centerpiece that doubles as a party appetizer!
Make-Ahead Instructions
To make ahead:
-
Prepare the dough and shape the rolls up to one day in advance.
-
Store covered in the refrigerator overnight.
-
Bring to room temperature (about 45 minutes) before baking.
To freeze:
-
Freeze unbaked, shaped dough balls on a tray until solid.
-
Store in a freezer bag for up to 2 months.
-
Thaw overnight in the fridge before arranging and baking.
To reheat:
Wrap in foil and bake at 325°F for 10–12 minutes to refresh.
Variations
-
Cheddar + Chive Wreath: Use sharp cheddar and sprinkle fresh chives before serving.
-
Spinach Artichoke Version: Add a spoonful of creamy spinach artichoke filling to each dough ball.
-
Caprese Style: Fill with mozzarella, sun-dried tomato, and a drizzle of basil pesto.
-
Four Cheese Wreath: Mix mozzarella, Gruyère, provolone, and parmesan for ultra richness.
-
Herb Butter Pull-Apart: Skip the cheese filling and brush extra herbed butter for a lighter version.
Dipping Sauce Ideas
-
Classic Marinara – Perfectly tangy with garlic and herbs.
-
Creamy Alfredo Sauce – Luxurious and rich.
-
Basil Pesto – Fresh and aromatic, adds a gourmet touch.
-
Spicy Honey Butter – For a sweet-heat twist.
Expert Tips
-
Don’t overstuff: Too much cheese can cause the rolls to burst open while baking.
-
Seal tightly: Pinch the dough well so the cheese stays inside.
-
Use room temperature ingredients: Ensures smooth dough and even baking.
-
Garlic butter timing: Brush before and after baking for maximum flavor.
-
Presentation tip: Serve immediately — this bread is at its absolute best warm and fresh.
Pairing Ideas
This wreath goes perfectly with:
-
Christmas roast chicken or beef tenderloin
-
Creamy mashed potatoes
-
Tomato basil soup
-
Pasta dishes like lasagna or baked ziti
-
Charcuterie boards or holiday grazing tables
Storing Leftovers
-
Refrigerate: Store in an airtight container for up to 3 days.
-
Reheat: Warm in oven at 325°F for 8–10 minutes or in air fryer for 3–4 minutes.
-
Freeze: Wrap individual rolls and freeze for up to 2 months.
Troubleshooting
Bread didn’t rise:
Your yeast might have expired or the milk was too hot. Ensure liquid is warm, not hot.
Wreath lost its shape:
Use a ramekin in the center to keep the circular form while baking.
Garlic butter burned:
Lower oven temperature slightly or brush with butter halfway through baking instead of before.
Nutrition (Per Serving, Approximate)
| Nutrient | Amount |
|---|---|
| Calories | 210 |
| Fat | 9g |
| Carbohydrates | 25g |
| Protein | 6g |
| Sugar | 2g |
| Sodium | 240mg |
Festive Serving Suggestion
To make it look extra special for the holidays:
-
Garnish with rosemary sprigs (they look like mini wreath greens).
-
Add a few fresh cranberries for a pop of color.
-
Place a candle or dipping sauce bowl in the center for a true “wreath” presentation.
Why This Recipe Works
This pull-apart bread is built on the perfect trifecta — soft, fluffy bread, garlicky butter, and melty cheese. The wreath shape isn’t just decorative — it ensures even baking and makes it easy to pull apart during serving.
The mix of butter and herbs infuses every layer with rich flavor, while the melted cheese keeps the center moist and satisfying. It’s the perfect balance of comfort food and festive flair — ideal for any holiday spread.
FAQs
Can I use store-bought pizza dough?
Yes! It’s a great shortcut. Let it rest at room temperature for 30 minutes before shaping.
What kind of cheese works best?
Mozzarella is classic, but you can use any good melting cheese like provolone, Monterey Jack, or Gruyère.
Can I make this wreath vegan?
Use dairy-free cheese, plant-based butter, and skip the egg in the dough.
Can I bake this in a bundt pan?
Yes! It’ll help hold the perfect circular shape — just grease it well and bake until golden.
How do I prevent soggy bottoms?
Make sure your baking sheet or pan is preheated and don’t overcrowd the rolls.
Can I make mini versions?
Yes — shape smaller dough balls and bake on a smaller tray for individual servings.
Final Thoughts
This Pull-Apart Cheesy Garlic Bread Wreath is more than just a recipe — it’s a holiday experience. The aroma of garlic butter, the golden crust, the gooey cheese that stretches with every pull — it’s pure joy baked into bread form.
It’s festive, flavorful, and guaranteed to be the centerpiece of your Christmas table. Whether you’re hosting a big family dinner or a cozy holiday party, this bread wreath will disappear in minutes — because no one can resist freshly baked garlic bread, especially when it looks this good.
Serve it warm, pair it with your favorite meal, and watch everyone go back for “just one more piece.”
")