Contents
- 1 What Are Stars & Stripes Cookie Bars?
- 2 Why You’ll Love These Cookie Bars
- 3 Ingredients for Stars & Stripes Cookie Bars
- 4 Step-by-Step Instructions for Making Stars & Stripes Cookie Bars
- 5 Tips for Perfect Stars & Stripes Cookie Bars
- 6 Why You’ll Love Stars & Stripes Cookie Bars
- 7 Frequently Asked Questions (FAQs)
- 8 Final Thoughts
Stars & Stripes Cookie Bars Recipe: A Festive Treat for Any Patriotic Celebration
When it comes to celebrating holidays like the Fourth of July, Memorial Day, or Veterans Day, few things bring people together like a sweet, colorful dessert. The Stars & Stripes Cookie Bars are a delightful and festive treat that combines the chewy, buttery goodness of cookie bars with the iconic red, white, and blue colors of the American flag. These bars are perfect for parties, picnics, and any event where you want to show your patriotic spirit while satisfying your sweet tooth. In this article, we’ll walk you through how to make these delicious cookie bars, share some tips and tricks, and answer frequently asked questions to ensure your baking experience is a success.
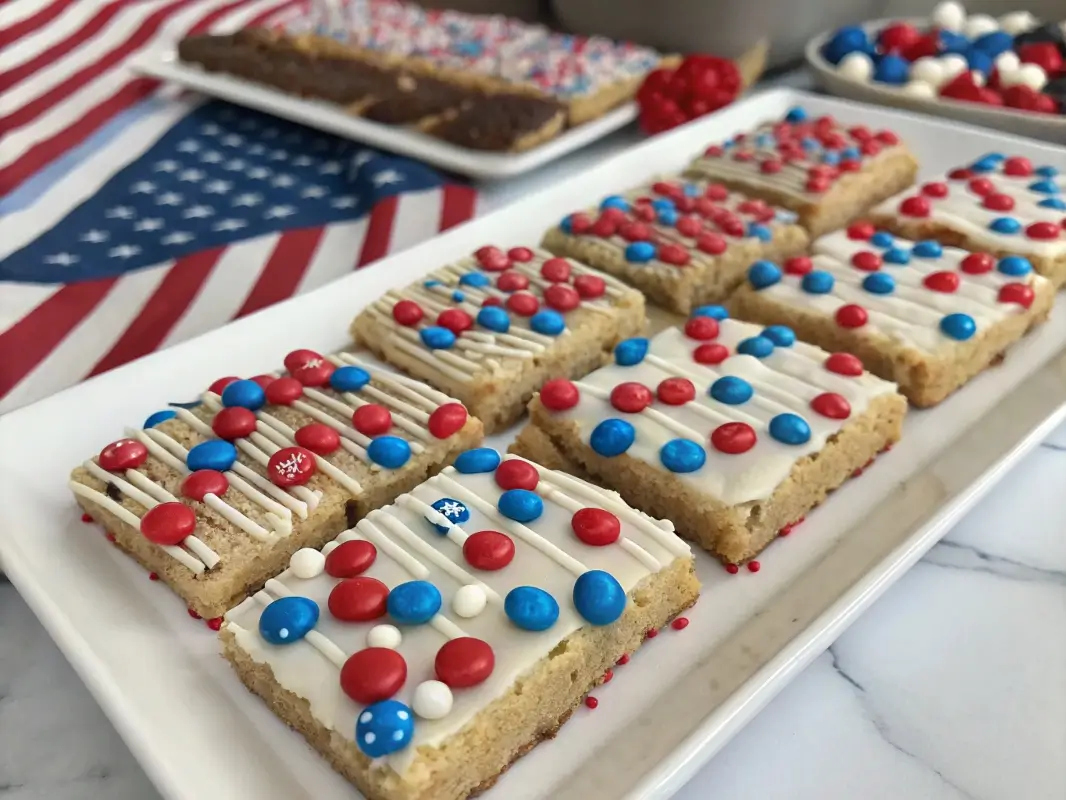
Stars & Stripes Cookie Bars are a patriotic dessert made from a buttery cookie base, topped with a mixture of red, white, and blue decorations that make them visually striking and fun to eat. The bars are made with simple ingredients like flour, sugar, butter, and eggs—just like traditional cookie dough—combined with colorful M&Ms, sprinkles, and sometimes even star-shaped candies or frosting to create a festive, American-themed dessert. They are easy to make, serve, and enjoy, making them a crowd-pleasing favorite for any holiday gathering.
These Stars & Stripes Cookie Bars aren’t just a treat for the tastebuds—they’re also a visual spectacle. The vibrant red, white, and blue colors make them perfect for national holidays, especially those that celebrate American pride. The chewy, buttery base pairs perfectly with the crunchy M&Ms and the slight sweetness from the sprinkles. Whether you’re hosting a BBQ, going to a picnic, or just need a fun treat for a family gathering, these cookie bars will undoubtedly be the star of the show.
Creating these patriotic cookie bars is simple, and the ingredients can usually be found in your pantry or local grocery store. Here’s what you’ll need:
For the Cookie Base:
-
2 1/2 cups all-purpose flour
-
1 1/2 teaspoons baking powder
-
1/2 teaspoon salt
-
1 cup unsalted butter, at room temperature
-
1 cup granulated sugar
-
1/2 cup packed brown sugar
-
2 large eggs
-
1 tablespoon vanilla extract
For the Topping:
-
1 cup red and blue M&Ms (or other colorful candies)
-
1/4 cup red, white, and blue sprinkles
-
1/2 cup white chocolate chips (optional, for extra sweetness)
-
1/4 cup star-shaped sprinkles or edible glitter (optional, for decoration)
For the Icing (Optional):
-
1/2 cup powdered sugar
-
1 tablespoon milk
-
1/2 teaspoon vanilla extract
Step 1: Preheat the Oven and Prepare the Pan
Start by preheating your oven to 350°F (175°C). Line a 9×13-inch baking pan with parchment paper, leaving an overhang on the sides for easy removal later. This will also prevent the cookie bars from sticking to the pan.
Step 2: Make the Cookie Dough
In a medium bowl, whisk together the flour, baking powder, and salt. Set this mixture aside.
In a large bowl, use a hand mixer or stand mixer to beat together the softened butter, granulated sugar, and brown sugar until light and fluffy (about 3-4 minutes). Add the eggs, one at a time, beating well after each addition. Then, add the vanilla extract and mix until incorporated.
Gradually add the dry flour mixture to the wet ingredients, mixing until just combined. Be careful not to overmix, as this can lead to dense cookie bars. The dough should be thick and slightly sticky.
Step 3: Press the Dough Into the Pan
Transfer the cookie dough into the prepared 9×13-inch pan. Use a spatula or your hands to evenly press the dough into the bottom of the pan, making sure to spread it into all the corners.
Step 4: Add the Toppings
Once the dough is evenly spread, it’s time to add the toppings. Sprinkle the red and blue M&Ms evenly across the top of the dough. You can also sprinkle the white chocolate chips over the top at this point for a burst of sweetness. Finally, add the red, white, and blue sprinkles for that festive touch.
Step 5: Bake the Cookie Bars
Place the pan in the preheated oven and bake for 20-25 minutes, or until the cookie bars are golden around the edges and a toothpick inserted in the center comes out clean. Keep an eye on them, as baking times can vary depending on your oven.
Step 6: Cool the Cookie Bars
Remove the pan from the oven and allow the cookie bars to cool in the pan for about 15 minutes. Afterward, lift the bars out of the pan using the parchment paper overhang, and transfer them to a wire rack to cool completely.
Step 7: Optional Icing
If you’d like to add an extra touch of sweetness, mix together the powdered sugar, milk, and vanilla extract in a small bowl until smooth. Drizzle this icing over the cooled cookie bars for a glossy finish. If you prefer, you can also use royal icing for a more defined look.
Step 8: Cut and Serve
Once the bars have cooled and the icing (if using) has set, use a sharp knife to cut the cookie bars into squares or rectangles. Serve immediately or store in an airtight container for up to 4 days.
-
Use Room Temperature Butter: For the best texture, make sure your butter is softened to room temperature before starting. Cold butter can result in dense bars, while melted butter can cause them to spread too much.
-
Don’t Overmix: When incorporating the dry ingredients, be careful not to overmix the dough. Overmixing can lead to tough cookie bars.
-
Chill the Dough: If you have time, you can chill the dough for about 30 minutes before pressing it into the pan. This will help prevent the cookie bars from spreading too thin during baking.
-
Customization: Feel free to get creative with the mix-ins. If you don’t like M&Ms, you can use Reese’s Pieces, chocolate chips, or even dried fruit for a different flavor profile.
-
Make It Gluten-Free: For a gluten-free version, swap the all-purpose flour with a 1:1 gluten-free baking flour blend.
Stars & Stripes Cookie Bars are more than just a patriotic treat—they are incredibly easy to make and adaptable to any taste. The balance between buttery cookie dough and the sweet, crunchy toppings makes these bars a perfect dessert for any occasion. They’re also incredibly shareable, so they’re ideal for large gatherings, parties, or family picnics. Plus, the colorful presentation adds a special touch that’s sure to impress your guests!
Frequently Asked Questions (FAQs)
Can I Make These Bars Ahead of Time?
Yes! You can prepare the dough and refrigerate it for up to 24 hours before baking. If you bake the bars in advance, store them in an airtight container at room temperature for up to 4 days. You can also freeze the cookie bars for up to 2 months. Just wrap them tightly in plastic wrap and store in a freezer bag.
Can I Use Different Colors for the Sprinkles and M&Ms?
Of course! While red, white, and blue are perfect for patriotic holidays, you can easily adapt the colors for different holidays or events. Try using pastel colors for Easter, orange and black for Halloween, or green and red for Christmas.
Can I Make the Cookie Bars Without Icing?
Yes! The icing is entirely optional. The cookie bars are delicious enough on their own without the added sweetness of the glaze. If you prefer a more subtle flavor, skip the icing and let the colorful toppings shine.
How Do I Store the Leftovers?
Store leftover Stars & Stripes Cookie Bars in an airtight container at room temperature for up to 4 days. If you want to keep them fresh longer, store them in the refrigerator.
Final Thoughts
Whether you’re looking to celebrate Independence Day, Memorial Day, or simply show off your patriotic pride, Stars & Stripes Cookie Bars are an irresistible and fun way to do it. These cookie bars are incredibly easy to make, and they offer the perfect combination of flavor, texture, and color. With just a few simple ingredients, you can create a festive dessert that’s sure to be a hit with everyone at your gathering.
")