Contents
- 1 The Ultimate Creepy Treat for Halloween
- 2 Why You’ll Love This Recipe
- 3 Ingredients
- 4 Equipment Needed
- 5 Step-By-Step Instructions
- 6 Tips for Perfect Witch’s Finger Cookies
- 7 Variations and Customizations
- 8 Serving Suggestions
- 9 Frequently Asked Questions (FAQs)
- 10 Nutrition Information (Approximate per cookie)
- 11 Final Thoughts
The Ultimate Creepy Treat for Halloween
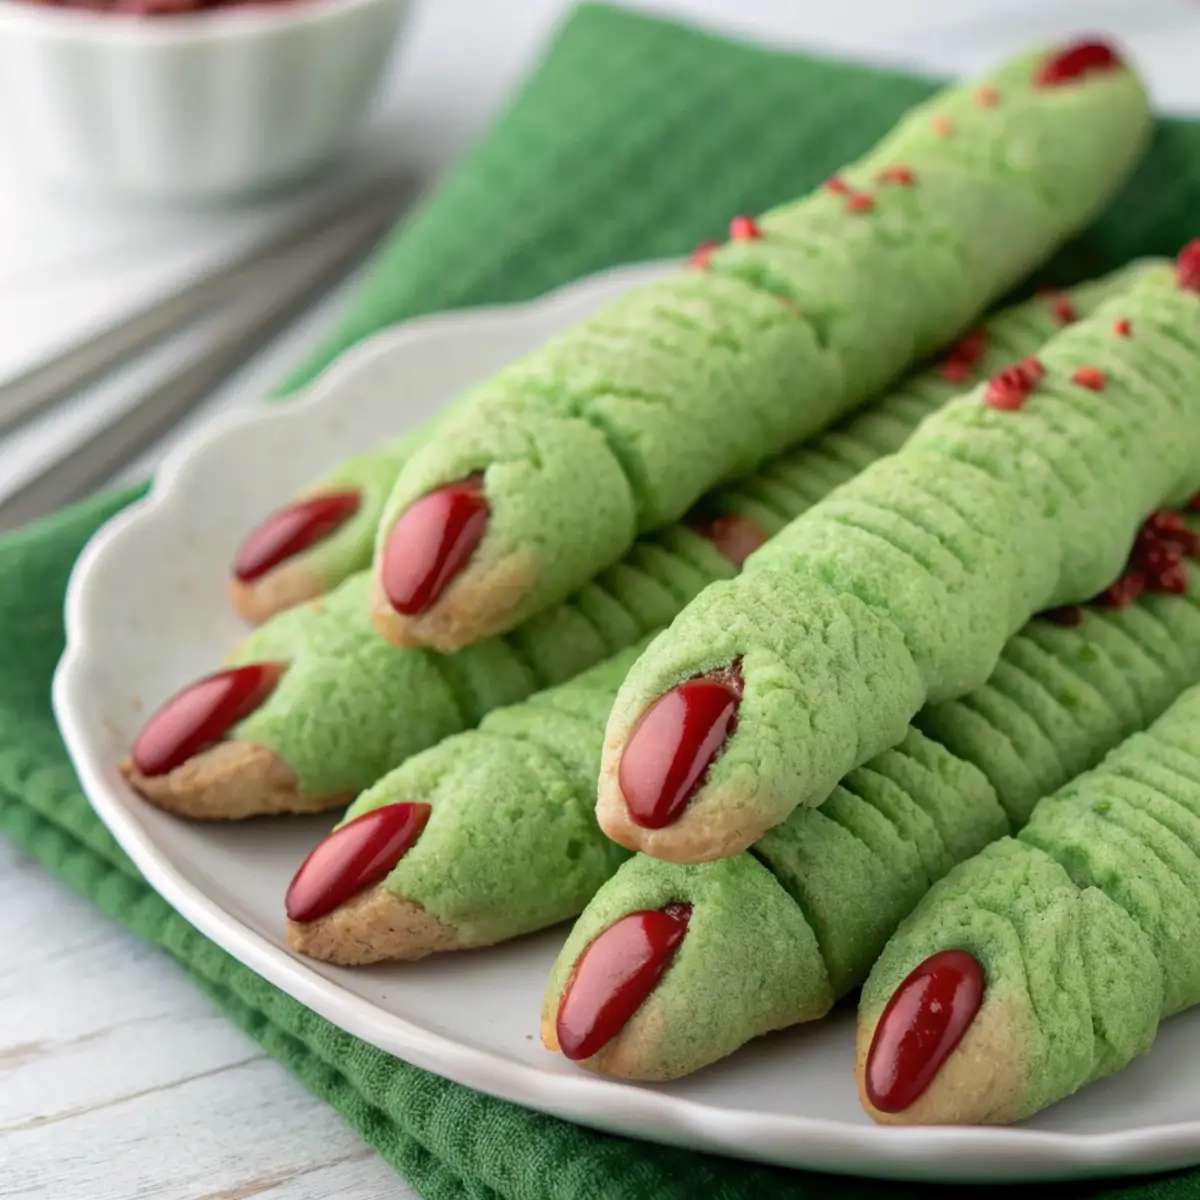
Halloween is the perfect time to let your creativity run wild in the kitchen—and what better way to delight and spook your guests than with Witch’s Finger Cookies? These eerie green cookies shaped like crooked, gnarly witch fingers with almond nails and red “blood” oozing at the tips are sure to be a hit at any Halloween party or family gathering.
They combine a delightfully soft and buttery texture with just the right amount of spooky presentation. Plus, they’re easy enough for home bakers of all levels. Whether you’re baking with kids or preparing a centerpiece for your haunted house party, these cookies will bring creepy charm and sweet flavor to the table without any pork, bacon, or alcohol products.
Why You’ll Love This Recipe
-
Spooky & Visual: Realistic finger shapes with almond “nails” and red jam “blood” make this dessert a crowd-pleaser.
-
Simple Ingredients: Uses pantry staples with a green twist for a festive look.
-
Kid-Friendly: Fun to make with children and great for school parties.
-
Customizable: You can adjust colors, flavors, and size to suit your preferences.
-
Perfectly Themed: Fits right in with other creepy Halloween treats.
Ingredients
For the Cookie Dough:
-
1 cup (2 sticks) unsalted butter, softened
-
1 cup powdered sugar
-
1 large egg
-
1 tsp vanilla extract
-
2 ½ cups all-purpose flour
-
1 tsp baking powder
-
½ tsp salt
-
Green food coloring (gel or liquid) – enough to tint the dough a vibrant green
-
1 tsp almond extract (optional, for added flavor)
For Decoration:
-
Whole almonds (one per cookie, to serve as fingernails)
-
Red jam or red gel icing (for “blood” effect)
-
Powdered sugar for dusting (optional)
Equipment Needed
-
Mixing bowls
-
Electric mixer or hand mixer
-
Baking sheets
-
Parchment paper or silicone baking mats
-
Fork or toothpick (to make knuckle indentations)
-
Small knife or scoring tool (for shaping knuckles)
Step-By-Step Instructions
1. Prepare the Dough
In a large mixing bowl, cream the softened butter and powdered sugar together until light and fluffy. Add the egg, vanilla extract, and almond extract (if using), and beat until fully combined. Gradually add the flour, baking powder, and salt, mixing on low speed just until the dough forms.
Add green food coloring a little at a time until you get a spooky, vibrant green dough. Mix well to distribute color evenly.
2. Shape the Fingers
Preheat your oven to 350°F (175°C). Line baking sheets with parchment paper or silicone mats.
Take about a tablespoon of dough and roll it into a finger-like shape about 3 to 4 inches long. Taper the ends slightly to resemble fingertips. Press the whole almond into one end of the dough to create a nail.
Using a small knife or toothpick, score three shallow indentations along the length of each finger to simulate knuckles. Use a fork or toothpick to add texture and slight wrinkles for realism.
3. Add “Blood” Effect
Just before baking, gently press a small amount of red jam or gel icing around the almond nail to create the look of fresh “blood.”
4. Bake
Bake the cookies in the preheated oven for 12-15 minutes, or until they are firm but not browned. The edges should hold their shape but the cookies remain soft.
5. Cool and Decorate
Allow cookies to cool completely on a wire rack. You can add extra “blood” with red gel icing if desired, or dust lightly with powdered sugar for a creepy dusty effect.
-
Use gel food coloring for vibrant green without watering down the dough.
-
Don’t overbake; you want soft, slightly chewy cookies for the best texture.
-
If the dough gets too sticky, chill it in the fridge for 20 minutes before shaping.
-
For an extra spooky effect, consider painting a tiny bit of edible black gel around the knuckles or nails.
-
Experiment with different nuts for nails if almonds aren’t available—pecans or cashews work well too.
Variations and Customizations
Alternative Colors
-
Swap green for purple, gray, or black dough for different witchy looks.
Flavored Dough
-
Add a pinch of cinnamon or pumpkin spice for a seasonal twist.
Vegan Version
-
Replace butter with vegan margarine and use a flax egg instead of regular egg.
Gluten-Free Option
-
Use a gluten-free flour blend suited for baking.
Serving Suggestions
-
Serve on a platter with other creepy Halloween desserts like eyeball truffles or spider cupcakes.
-
Arrange with gummy worms and candy “dirt” for a gruesome party display.
-
Pair with a spooky drink like a blood-red punch or green slime soda.
Frequently Asked Questions (FAQs)
Q: Can I prepare the dough in advance?
A: Yes! You can make the dough, wrap it tightly, and refrigerate for up to 2 days before shaping and baking.
Q: How long do these cookies stay fresh?
A: Store in an airtight container at room temperature for up to 5 days. For longer storage, freeze the baked cookies.
Q: Can I use store-bought frosting instead of jam for the blood?
A: Yes, red gel icing or strawberry jam both work well for the “blood” effect.
Q: Are these cookies kid-safe to make?
A: Absolutely! Kids can help shape the fingers and press in the almonds with adult supervision.
Q: What can I use if I don’t have almonds?
A: Other nuts like pecans or cashews, or even chocolate chips, can substitute for the nails.
-
Calories: 120
-
Fat: 7g
-
Carbohydrates: 15g
-
Protein: 2g
-
Sugar: 8g
Final Thoughts
Witch’s Finger Cookies perfectly blend the spooky spirit of Halloween with delicious homemade goodness. Their eerie appearance combined with the sweet and slightly nutty flavor makes them a must-have for your Halloween dessert table. Whether you’re baking for kids, party guests, or just to enjoy yourself, these creepy cookies will make a lasting impression.
Get creative with shapes, colors, and presentation, and you’ll have everyone talking about your chillingly tasty treats all season long!
")