Contents
- 1 Ingredients & Tools You’ll Need
- 2 Step‑by‑Step Instructions: Classic Witch’s Fingers Cookies
- 3 Delicious Variations & Flavor Twists
- 4 Decorating & Presentation Ideas
- 5 Storage, Make‑Ahead & Serving Tips
- 6 Common Troubleshooting & Tips
- 7 Frequently Asked Questions
- 8 Why Witch’s Fingers Cookies Are a Halloween Favorite
- 9 Sample Menu Idea Featuring Witch’s Fingers Cookies
- 10 Final Thoughts
There’s something delightfully eerie about a plate of “witch’s fingers” — long, knuckle‑marked cookies topped with almond “nails,” shaped and baked to look like severed, gnarled witch digits. They combine whimsy with a bit of creepiness, perfect for Halloween dessert tables, school parties, or late‑night spooky snacking. And despite their spooky appearance, they taste absolutely delicious—crisp on the outside, tender inside, with buttery flavor and the satisfying snap of an almond tip.
In this article, you’ll find:
-
A detailed, step‑by‑step recipe for classic witch’s fingers cookies
-
Variations and flavor twists
-
Decoration ideas and presentation tips
-
Storage, make‑ahead, and serving suggestions
-
Common questions and troubleshooting
-
Tips to make the cookies more allergy- or dietary-friendly
Let’s slip on your witch’s hat and get baking!
Ingredients & Tools You’ll Need
Here’s what you’ll need to make a classic batch of witch’s fingers:
Dry Ingredients:
-
2 ½ cups all-purpose flour
-
½ teaspoon baking powder
-
¼ teaspoon salt
Wet & Fat Ingredients:
-
1 cup (2 sticks) unsalted butter, softened
-
¾ cup granulated sugar
-
1 large egg
-
1 teaspoon vanilla extract
-
A few drops of green food coloring (optional, for a “witchy” tint)
Decoration / Finishing Touches:
-
Whole or sliced almonds (for the “nails”)
-
A bit of red decorating gel or jam (for a “bloody” effect)
-
Optional: coarse sugar or sparkly sanding sugar
Tools & Bakeware:
-
Mixing bowls
-
Hand mixer or stand mixer
-
Measuring cups and spoons
-
Baking sheets
-
Parchment paper or silicone baking mats
-
A small knife or toothpick (for knuckle lines)
-
Cooling rack
Yield: This recipe makes approximately 24–30 witch’s fingers, depending on how long you shape each.
Step 1: Prep & Preheat
Preheat your oven to 350°F (175°C). Line two baking sheets with parchment paper or silicone mats. This helps prevent sticking and ensures even browning.
Step 2: Combine Dry Ingredients
In a medium bowl, whisk together the flour, baking powder, and salt. Set aside.
Step 3: Cream Butter & Sugar
In a large bowl (or stand mixer bowl), cream the softened butter and granulated sugar until light and fluffy (about 2–3 minutes). Scrape down the sides of the bowl as needed.
Step 4: Add Egg & Flavor
Beat in the egg and vanilla extract until fully incorporated. If you’re using green food coloring to tint the dough for extra spooky effect, add a few drops now and mix until dough is evenly colored.
Step 5: Mix in Flour
Gradually add the dry mixture to the wet mixture, mixing just until combined. Avoid overmixing to keep the cookies tender. The dough should be soft but firm enough to shape.
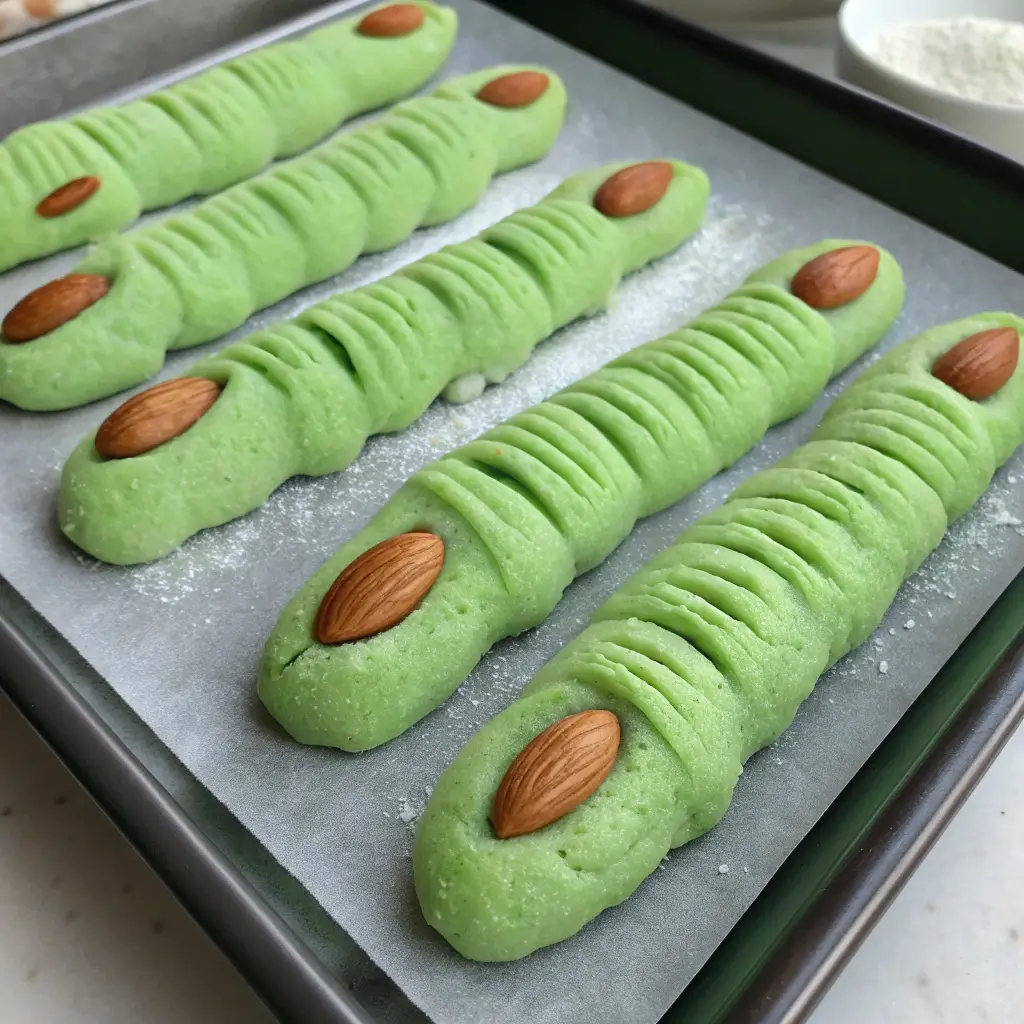
Step 6: Shape the Fingers
Take about 1 tablespoon of dough (adjust for your preferred finger length) and roll between your palms into a finger-like cylinder, tapering slightly at one end (the nail end). Press lightly at the base to flatten.
Place each shaped finger about 1 inch apart on the prepared baking sheets. Use a small knife or toothpick to make little horizontal indentations along the length to resemble knuckle lines.
Step 7: Add Almond “Nails”
Gently press a whole or sliced almond onto the tapered end of each finger to act as a creepy nail. Make sure the almond is pressed in enough to stay in place but not completely engulfed by dough.
Step 8: Optional Decoration
For a subtle sparkle, you can lightly brush or sprinkle coarse sugar or sanding sugar along each finger. Be gentle so you don’t disturb the almond nails.
Step 9: Bake
Bake for 12–16 minutes, or until edges are just starting to turn golden. The cookies should remain pale in color to preserve the eerie aesthetic. Overbaking will make them too crunchy or lose the visual effect.
Step 10: “Bloody” Effect (Optional)
After removing from the oven and while still warm, you may add a tiny dab of red decorating gel or jam at the base or around the almond nail to mimic blood. Use sparingly so it doesn’t flood the cookie.
Step 11: Cool & Serve
Let the cookies sit on the baking sheet for 2–3 minutes, then transfer to a cooling rack to cool completely. Once cooled, they’re ready to serve.
Delicious Variations & Flavor Twists
You don’t have to stick strictly to the classic recipe. Here are some fun variations:
Chocolate Witch’s Fingers
Mix in 2 tablespoons of cocoa powder into the dry ingredients. Use dark chocolate almond slivers for the nails. You’ll get a spooky chocolate version that’s extra rich.
Spiced Witch’s Fingers
Add ½ teaspoon ground cinnamon and ¼ teaspoon ground nutmeg to the dough for a subtle warm spice. These work especially well with the “bloody” jam effect.
Nut-Free Witch’s Fingers
Replace almond nails with sunflower seeds or pumpkin seeds. Alternatively, you can omit the nail entirely or use small circles of cookie dough as nails.
Gluten-Free Witch’s Fingers
Use your favorite gluten-free flour blend (a 1:1 substitute). Ensure your blend contains xanthan gum or another binder. Bake at the same temperature but watch carefully—gluten-free cookies may brown faster.
Vegan Witch’s Fingers
Replace butter with a vegan butter substitute, and use a flax egg (1 tbsp flaxseed + 3 tbsp water) instead of the egg. Use plant-based food coloring and vegan almond/nut substitutes for nails.
Decorating & Presentation Ideas
Presentation can elevate your witch’s fingers from fun to frightfully fabulous.
-
Creepy Platter: Arrange cookies on a black or dark-colored tray. Serve them nestled among faux cobwebs or around a “witch’s cauldron.”
-
Gory Plate: Drizzle a bit of red gel or strawberry jam as “blood splatter” around or under the fingers.
-
Elevated Display: Serve the cookies sticking out of a “severed hand” mold or a hollowed-out carved gourd for Halloween drama.
-
Party Placards: Add small signs like “Fresh Witch Fingers” or “Do Not Touch” near the cookies for fun.
-
Kid Interaction: Let guests add their own red gel drips or extra “veins” using decorating pen tubes—fun and interactive.
Storage, Make‑Ahead & Serving Tips
Storing the Cookies
Store cooled cookies in an airtight container at room temperature. Place wax or parchment paper between layers to prevent sticking. They should last for 4–5 days, possibly up to a week.
Make-Ahead
You can prepare the dough 1–2 days in advance. Wrap tightly and refrigerate. When ready to bake, let it sit at room temperature for 15–20 minutes to soften slightly before shaping.
You may also shape the fingers and refrigerate them on baking trays (covered loosely) overnight. Bake the next day, perhaps adding a minute or two to baking time if chilled.
Freezing
Freeze shaped but unbaked fingers on a tray until solid. Then transfer to a freezer bag. When ready, bake directly from frozen—add 1–2 extra minutes to baking time.
Serving Suggestions
-
Place near a Halloween cake or chocolate fountain for a dramatic snack table.
-
Pair with a warm spiced drink (like apple cider or spiced tea).
-
Use as a garnish—stick a finger cookie into cupcakes or Halloween cocktails.
-
Let kids enjoy a “finger-eating contest” (in good fun) with plates of the cookies.
Common Troubleshooting & Tips
-
If dough is crumbly, add 1 small teaspoon of milk (dairy or non-dairy) to bring it together.
-
If cookies spread too much, chill shaped dough for 10 minutes before baking.
-
To keep almond nails in place, press deeply and angle them slightly downwards.
-
Don’t overbake—edges should just begin to turn golden, crisp but not too brown.
-
Use a sharp knife or toothpick to make knuckle marks before baking—doing so after baking can crack the cookie.
-
For more dramatic effect, combine icing and jam to draw tiny “blood vessels” after baking.
Frequently Asked Questions
Are witch’s fingers cookies hard to make?
Not at all! The recipe is simple. The most time-consuming part is shaping and decorating. Even beginners can follow it.
Can I make them healthier?
Yes! Use whole-grain flour, reduce sugar slightly, or use a natural sweetener. For nut-free versions, replace the almonds with seeds or omit the nails.
How can I make them kid-friendly and safe?
Avoid sharp almond tips (use sliced almonds), choose allergy-friendly ingredients, and let children help with gentle tasks like pressing on nails or drawing veins.
Is there a dairy-free version?
Yes — simply swap in vegan butter and use plant-based substitutes for egg and decorations. Use dairy-free chocolate or jam for the “blood” effect.
How do I make them look more realistic and spooky?
Use red gel or jam sparingly for “blood,” draw thin red veins, vary finger lengths, and present them on dark or eerie serving trays.
-
They’re thematic and instantly recognizable
-
They appeal to both kids and adults with a mix of creepiness and sweetness
-
They’re flexible—easy to adapt for allergies or dietary restrictions
-
They’re fun to make and decorate
-
They add a dramatic, playful touch to any Halloween dessert table
-
Appetizer: “Bloody Eyeballs” (mozzarella/olive eyeballs) or deviled-egg eyeballs
-
Main: Pumpkin soup served in mini cauldrons
-
Side: Roasted vegetable medley, black bean dip, mummy wrapped asparagus
-
Dessert Table: Witch’s fingers cookies, chocolate spider web tart, ghost meringues
-
Drinks: Spiced apple cider, herbal teas, or a smoky “potion” punch
The witch’s fingers provide a star contrast among the sweets, giving your Halloween spread originality and delight.
Final Thoughts
Witch’s Fingers Cookies are more than just treats—they’re conversation starters, party highlights, and a bit of Halloween theater. With minimal ingredients and a little playful creativity, you can bake up spooky, edible fingers that look gruesome yet taste heavenly.
Whether you’re baking them with kids, surprising trick-or-treaters, or adding an eerie touch to your dessert table, these cookies bring fun, flavor, and festive spirit. Adopt the variations, tweak them for your dietary needs, and get creative with presentation—the more dramatic, the better.
Enjoy baking, decorating, and delighting your guests this Halloween. May your cookies be crisp, your nails stay in place, and your table bewitchingly beautiful. 🧙♀️🍪
")